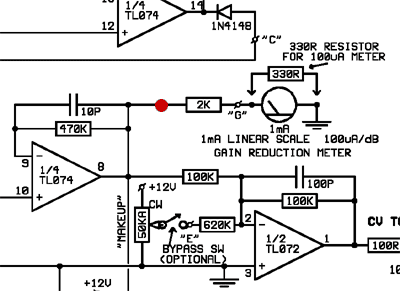
Using the Pico Compressor Gain Reduction Meter with the GSSL

GroupDIY Audio Forum

Help Support GroupDIY Audio Forum:

This site may earn a commission from merchant affiliate links, including eBay, Amazon, and others.
Have you guys tried chaining two meters together for greater resolution? Perhaps something like 20dB full deflection with each LED representing 1dB?


Possible? I assume you just set each meter to have 1dB increments, then add (or adjust) a resistor to make the second meter pickup where the first left off...

How very vague that was :oops:
 
Hey Roger,

With that schematic what does each LED represent? Am thinking about using one for the GR meter on an GSSL I'm wanting to build.

Cheers

Matt
 
Hey Guys,

Thanks for the comments. Roger can you give me the dimensions for the drill plot? I assume the LED's are 3mm and is so what is the distance from center to center and also the measurements of the mounting hardware used to mound it to the front panel.

Thanks in advance!

Cheers

Matt
 
Thanks Roger,

A strange question though valid... on the meter using the scale of 2-20dB's, which LED is 2dB's, I mean is the scale running left to right or right to left, if that makes sense?

Also the measurements above is that center to to center of the gap between the LED's, i.e the space between you '0 0 0 0' etc?

If you get a chance could you mock it up in a drawing to see, a pic is worth the thousand words they say and i'm sure it will be usefull for all who use the boards.

Also what is the size of the actual PCB.

Cheers

Matt
 
Hey Roger/Wayne,

Is there a reason you used yellow LED's? Is it possible to mix the colours? So say have a few yellow, green and red? The current draw might differ somewhat, not sure if it will be an issue, any ideas?

Cheers

Matt
 
Hi Roger,

I received my boards from Wayne yesterday and they look great. Thanks for a 'neat' little project! I plan on using them in my GSSL's and have taken a look at the schematic you posted and have quite a few questions relating to it.

Please confirm my observations based on your posted schematic.

1. It looks like the 50K resistor marked on the board is replaced by a 10K?

2. There is no mention of the 100K Trim Pot and Diode? I assume they are supposed to be there, just not marked?

3. There also seems to be no mention of any of the .1uF poly bypass caps. I assume they should be there but are just not shown on your schematic?

4. Though not marked I assume the values of the resistors on the + and ? V rails are the 2 screened 10R on the PCB.

5. I assume the RL designation on the PCB between the 2 Regs is 1K2.

6.The 1M between pins 2 and 4 is replaced by a jumper.

7.The 2 resistors marked Ref near the LM39XX values are 1K2 followed by 1K

8.Their are 2 pad just below Pin 9, the schematic references this as DOT and BAR, can you describe the difference (I think it is self explanatory, but would appreciate comment)

Also as far as hook-up goes.

I assume the following. IN on the PCB si the Meter + from the GSSL Control Board, - going to ground.
Where did you draw power from?

Cheers

Matt
 
Hi Roger,

I think there is an image on Waynes site of the board configured as a GSSL meter which may help.

I wish there was it might make things a littler easier here :green:

The board shots there seems to be set up for the PicoComp as it is has a Ireg not a Vreg, it also has the trimmer, which as you said is not needed for the GSSL, maybe you could post a pic of you set up?

I'm using the 218X Series of VCA's and have made the appropriate charges to the main board as per the THAT Application notes, still having to decide what resistor to use for the meter scale on the main board, since it will set up like yours I assume it is 2K.

I will need to look at the pin out of the TL072 and reconfirm my thoughts. I am just trying to get as much info about this documented in this thread to to help others, as you will see from my previous questions related to using this with GSSL, since that is what this thread is about.

It is getting late (1.30am here) and I can't really think any more about this, I was just trying to collate my thoughts in this thread to help others, and myself with your little project and kind of 'document' it as we go along...

If you could I'd love an answer to how you drew power off the main board and if my assumption about connecting it to the control board is correct.

Cheers

Matt
 
Hi Wayne/Roger,

Thanks for the input. I think I've worked out the adjustments that need to be made for the PCB to be used as a GR Meter for the GSSL, set to FS deflection from 2db ? 20db in 2 dB's steps, which I gather is how Roger had this set up on his test unit?

Below is the edited board, the REF Resistors and changes to the silkscreen board have been marked in yellow, pink are jumpers, and Red indicates parts left off the board.

EDIT: Updated Pic Below

I'm just a fellow hack, and not an electronics guru. I'm learning slowly and prior to starting DIY had not lifted an iron, so I'm working this through slowly. Forgive me if I'm not in your head space, this may seem simple for others, or maybe I'm just simple...

I think my rendering is pretty accurate thought I am a little confused by the IREG. I assumed that is where the 78L12 should be positioned, at first I thought it was the Vreg, as it wasn't marked on the Schematic, which prob would have helped a simpleton like me.

I have downloaded 3 different datasheets from 3 different manufacturers and all seem to confirm the pin out is as it is indicated on my 78L12 representation, I= Input, C = Common and O= Output.

The Schematic is marked, In, Out and Ground. If I assume (and may be so wrongly) that In on the Schematic is In on the Reg, Out is Out that leaves Common to represent Ground.

If that is so... maybe I'm reading the schematic all wrong, but then on the drawing vs the board it looks like the 1K2 Ref R links between IN and Out on the PCB not Common and Ground as per the drawing... I'm confused (like that was hard to tell!)

Back to connecting it to the main board. I assume for the V- and V+ you are drawing this regulated DC off the main board, a good place seems to to be the solder holes the input VCA's, is this what was done?

Also I need to understand how it is connected to the main board. My understanding, through it looks I may have been VERY wrong was to just connected it tot he Meter + and ? of the Control board as one would a passive DC meter.

Please can either you or Roger indicate how you connected it using the actual GSSL PCB?

The other thing that occurred to me was that if I recall Roger you modded your GSSL from the original Gyraf designs by using additional resistors on the Threshold pot? I assume these would then make the schematic a little differ from your stock GSSL? What changes do I need to make to the GSSL to have this LED board work correctly with the GSSL readings.

Sorry for all the questions, I just need to understand what it is I'm doing.

I hope to showcase my GSSL when it is done and hopefully it will inspire others to try out the boards and in turn lead to more sales.

Cheers

Matt
 
Hi Wayne,

Yes you are correct in the above. Thanks for the annotated drawing - I'd like to use that.

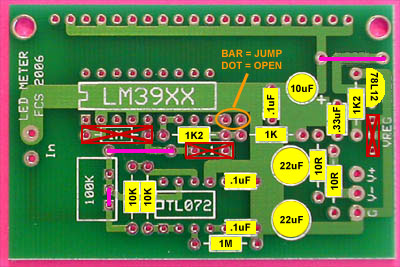
But, I think there needs to be a link across the trim pot terminals: The bottom two ones so the yellow 10K goes to the same point as the pink jumper. Electrically it goes from TL072 pin 7 to pin 6. (Would you mind adding a pink link there?)

Yes, I see my blunders! I have added the pink 'jumper' on the image below, which I assume is now correct. Also I see my issue with the reg, it is BOTTOM View the Datasheets I got off All Datasheet don't say bottom, I assumed, wrongly, that it was TOP view since it seems that way for the illustration in one of the datasheets... oh well, best we thrash these errors out now ;-)

EDIT: See Board overlay in a later post

I have relabeled the Reg and it seems to match the Schematic now, please take a look it when you can to confirm. You are most welcome to use the drawing to illustrate this for future builders.

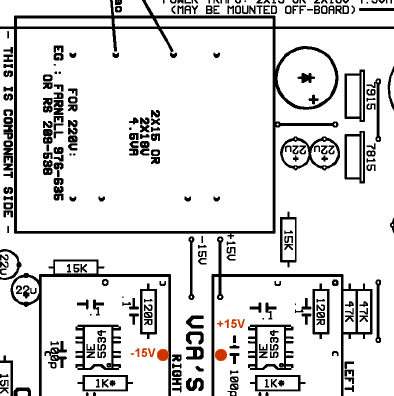
I'm not sure where Roger grabbed his bipolar 15V but it was most likely from the main PCB or PSU. Since the LED currents are quite high in bar mode, I suggest referencing it all back to the PSU to minimize any voltage drops. You don't want the meter currents corrupting ground. I measured about 130 mA in bar mode all LEDs lit.

Re drawing power, the best place I can think of is RIGHT after the regulators, and conveniently there are extra solder pad there when I have marked the board with the RED dots.

Regulated_15V.gif


As to the GR line to the meter take a look at Gyraf's drawing where I zoomed in to the meter section. You are correct as to the general location, but I think you want the point before the meter's series resistor, not after. That resistor is for use with current meters, we want the GR voltage output at pin 8. This voltage goes more negative with increasing GR.

Thanks Wayne, I think I have it. The schematic differs from the actual PCB, where the PCB is marked 2K** though the schematic it is the 4K7 written as 'Meter Calibration'. I suspect this part is LEFT OFF the main board and you that the reference for the PicoMeter meter off of that spot, indicated my the red dot below. If I follow that point across to the Control Board it is displayed as Meter ? on the Control PCB, or Pin G on the 10 Way Moulex Header. What does one do with Meter + on the control board? Nothing?

Meter_In.gif


Thanks for the questions Matt you've obviously put a lot of thought into them and they are the same ones everyone else will have including myself. I've built the meter but for the Pico Compressor not using Ireg.

Thanks Wayne. I think Roger has a GREAT little project here and I hope to see it be used on more GSSL's. To be honest the reason I wanted to try it was to make something that DIDN'T look like all the other clones, and it is also easier to read the LED across the room ;-) I hope others will be inspired to try it out for themselves!

Cheers

Matt
 
Hmm,

Thanks Wayne, hopefully Roger can chime in, since he has already done this for his own unit I assume he will be able to shed light on all the questions and RE hook up to GSSL.

I will pull the original image and update the current one later tonight, off to dinner with my wife in a bit, will work on it later.

RE the ground, since I'm using an off board trafo I think the best place to link to the PSU ground would be at the available solder tab on the center tap of the PCB mounted trafo, which isn't used.

I'll await some info from Roger on this one.

Sadly I'm not sure of the pin out on my 78L12's since they are unbranded! I assumed in this case that the pin out would be the same FOR all 78L12's, and if that is the case you seem to think they way I've illustrated it is incorrect?

Cheers

Matt
 
[quote author="RogerFoote"]Yeah, the 78L12 is flipped...

But the cap at the IREG or VREG output rail is a 10uF 50V, not 50uF. You also need a .1uF to bypass the input of the reg setup. (the one just above the 10uF)

You also need to put in 2- 10K Rs above the TL072 and jumper out the trimpot and diode. Leave out the 1M tiedown (between pins 2 and 5 of 3914) and the .1uF below the diode. You should then be good to go.

Pick power off of the +- 15 V rails and connect power gnd to the star gnd. The gnd connection next to the Input is only for a shield on the input cable (if needed, not for GSSL).

I have been extremely busy with multiple projects, so please be patient if my responses are slow or inadequate. Gonna be a little spotty for the remainder of the year.

Hope that helps[/quote]


Roger,

Thanks for the input and spotting my 50uF error, I've replaced it with a 10uF, the V ratting got me I think, good to double check these things!

Am I correct in thinking the schematic is wrong, or do I have the reg facing the wrong way?

I think I had already worked out the rest of the changes you stated, as per Wayne's request I've now filled in all the parts that need to be filled, bar the IC's, below, please confirm it if you can.

EDIT: See Board overlay in a later post

Can you confirm that I am taking the the meter in form the correct place on the GSSL main board? Where the 'Meter Sensitivity' Resistor would typically be?

Also I have read you modded your threshold , though looking at things it would have no effect on the meter if I am correct in thinking the meter reference is where it is, which would typically be Meter - on the control board.

Cheers

Matt
 
Hi Guys,

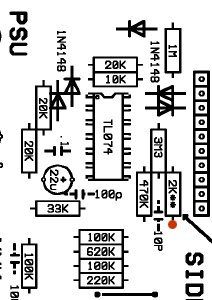
Not sure about why your power transformer center-tap is not connected to ground. I'd check that center-tap. Usually most bipolar supplies tie the center tap to ground. But, you want a sturdy ground at the regulators for the LED supply to the GR meter.

Wayne if you look at the board it will make more sense. For the GSSL you have the option of having either and OFF Board Transformer or a PCB mount On Board Trafo, each with their own connectors to the main board.

I'm using an OFF Board Torrid, so where the ON Board WOULD be is now left open and unused. There is a hole where center tap of the on board WOULD be if it was used that is connected via a trace to ground right where the filter caps are.

Your current drawing looks good but the 78L12 does need to be turned around.

Please add this to your drawing above the bar/dot link: Bar=Jmpr, Dot=Open and reverse the 78L12 so the flat side points to the LM3914.

Done! Here is the updated image, please triple check I have the labeling of the pins correct now and that the orientation is indeed correct.

EDIT: See Board overlay in a later post

I'll try and get to the LED's tomorrow, it is almost 12.30am and I need some rest.

Thanks for all the help, we are making good progress I think :thumb:

Cheers

Matt
 
Edit:

OK one thing jumped out at me already...

The lettering I C O next to the IREG should be O C I...


Or

O
C
I


Thanks Roger,

I think it is correct as is, if written from the TOP VIEW. Because based on the findings it looks like TOP View with the ROUND side of the reg facing the LM Chip it would be as you have it, but turning it around would change the I and O around would it not?

Please look at it again and see if my thinking is incorrect.

Cheers

Matt
 
matta;

Roger is correct. The device is oriented correctly - flat side to LM3914. But the text overlay is backwards. Sorry I didn't catch it.

But, I think the best thing to do is just remove the ICO overlay as the device orientation (being correct) makes it unnecessary.

Wayne

Updated!

GR_Meter_GSSL_Updated3.jpg


Thanks guys for the input. Roger please let us know about your findings with the use with your Stereo Buss Compressor.

The only thing I seem unsure of right now is where I should be taking the IN of the compressor from?

Cheers

Matt
 
Matt

You mean the input of the meter?

If so, just remove the meter scaling resistor that used to feed the 1ma meter movement and connect the input pad on the LED meter to the GSSL pad that connects to pin 8 of the TL074. (Or put a jumper where the meter resistor used to go and use the normal pad)
The meter will get it's ground reference through it's power ground.

Once you get it all hooked up, check that you get FS deflection of the LED meter when you have -120mV on pin 3 of either audio path VCAs (NOT the sidechain VCA)

If for some reason you want a FS deflection at a different level than 20db GR, put in a trimpot on the meter board and adjust the gain feeding the meter to suit your application.

Have fun!

Hi Roger,

Yeah I meant the Meter In.

Thanks for the description, I think I have worked it out. I have attached a drawing below to indicate where I think I should take it from, referenced by the red dot, can you confirm my thoughts?

GSSL_Meter-_In.gif


The 2K resistor I believe it the 'tracking resistor', which I can jumper and take it form the control PCB I think, as you suggested?

20dB FS Deflection is JUST what I'm looking for so, I'll work with the the -120mV on pin 3 as my benchmark.

I'm still a few days from being at that point as I'm still working on the GSSL main board right now.

Thanks again guys fro all the help, I'm glad we could thrash it out here as it will provide a good resource for future builders.

Cheers

Matt
 
Hey Guys,

I'm glad I could help! Thanks for working as a team, I guess this is one of the main reason I love this place so much. I'm glad we could lay the ground work for future builders!

Roger thanks for the comment on where to measure. I assume that the take up point to the meter in is at that red dot though, it is just if you measured there it would be +mV not -mV? To check -mV it would best be done on Pin 3 of the input VCA's?

Cheers

Matt
 
Roger and Wayne,

I have built the meter as per the layout and my parts overlay and it doesn't work... it may be an error on my side, but to date I've had no joy.

Here is a photo of my board.

GSSL_Meter_Build.jpg


Here is the overlay we did...

GR_Meter_GSSL_Updated3.jpg


Ground is connected to Star Ground as per Roger's advise, the +-V are feeding off the PSU, and getting +14,86V and -14.96 respectively.

I jumpered the 2K resistor on the main board which would have fed the mechanical meter and am using the solid pad on the control board to feed the meter IN.

I ran some programmed material through it and with the threshold at +20dB, so pot fully CW I read 0V between Ground and the signal IN. With is CRANKED all the way CCW I read between -4 - 6V as the the material changes dynamics (it is a drum loop).

Voltages check out on the TL072 and the LM3914, what does look odd are the voltages on the 78L12, the input voltage is right, but I'm getting 13,6V out... shouldn't that be 12V? Maybe the reg is in the wrong way round or blown?

We didn't cover the orientation of the LED's, though I assume looking from the component side of the PCB that the LED Kathode (short leg on the LED) goes to the Ground plane, or the 'long strip' parallel to the LM3914.

I'm kind of stuck here as Roger says it works and has proved it, but no joy here? Any ideas? Maybe we missed something in the documentation?

It isn't rocket science so hopefully we can get it up and running.

Thanks

Matt
 
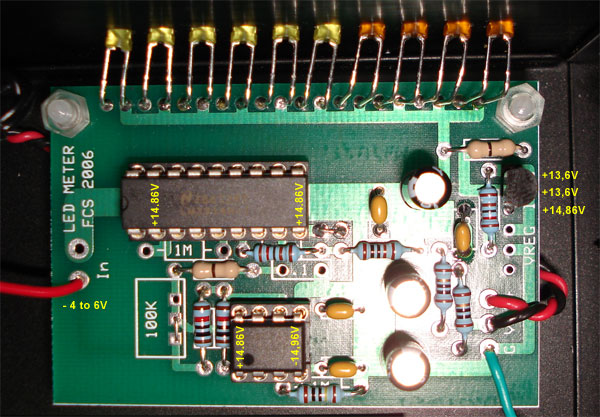
EDIT: Just checkd mine with an ohmmeter and the anodes are on the right (to the buss) and the flat side (cathode) to the left. So based on your description the LEDs are in backwards.


Ha Ha!!! It just goes to show... don't blindly lead by looking at photo's and not the datasheets and or PCB!!! It is CLEAR as day all my LED's are in BACKWARDS.... corrected and meter works lke a charm!!!

What threw me was an old photo of Roger's.

I will try and update my overlay ASAP so you can add it to your gallery.

Cheers

Matt
 

Latest posts

Back
Top