[BUILD] 1176LN Rev D DIY

GroupDIY Audio Forum

Help Support GroupDIY Audio Forum:

This site may earn a commission from merchant affiliate links, including eBay, Amazon, and others.
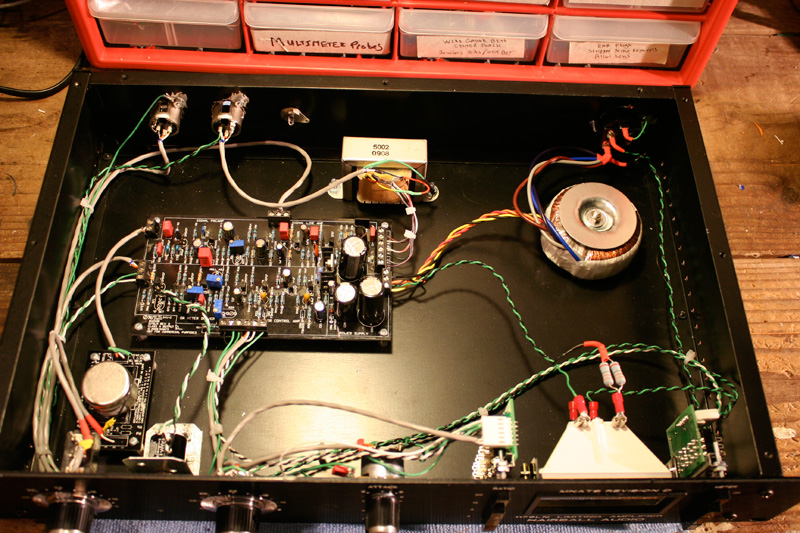
Oy vey... I wired the XLR sockets wrong, i.e. input for output. One of those forest for the trees things. So I'll have to swap those.

While I'm doing that, something I don't get. I was going to start tracing the signal in, to see where it was croaking. I set up a soft synth to generate a 1K sine and patched to my SSL comp and put the meter on in and adjusted the synth output to a steady 0dBVU there, so that I know it's good.

Before I discovered the above snafu, I started trying to measure the signal with my meter. Since I was not getting anything meaningful, I tried measuring them at the actual XLR cable pins on the male end. Shouldn't I be seeing about a 7 volt DC signal between two of the XLR pins? I'm not seeing anything at all.

Oh, and just in case... Do the settings of the other trim pots need to be set to any default setting before doing calibration step one? Or do they not even come into play becasue we've bypassed the GR circuit in this case?
 
OK, got the XLRs flipped back the right way and I've calibrated up through the two videos successfully and all looks good. I'll poke around for info on the next steps which I guess aren't video'd yet. Then I'll hook it up and try to record a bit.
 
[quote author=Dean Roddey]I'll poke around for info on the next steps which I guess aren't video'd yet. [/quote]

Ironically, I had planned to finish the next calibration video with the free time I had this weekend, but instead got pulled into this thread. All of the voice over and most of the video is done, but it still needs to be assembled.

[quote author=Dean Roddey]Shouldn't I be seeing about a 7 volt DC signal between two of the XLR pins? I'm not seeing anything at all. [/quote]

Can you tell us why you would expect to see 7 Volts DC at either XLR? (I would tell you that DC can't pass through a transformer but I'm sure you don't want to know that).
 
Echo North said:
That is r71 the 0 adjust.

You can use a PCB mount trimmer, but I like to put a pot on the front panel like an original.  Since the 1176 can drift a little it's nice to have the 0 adjust accessible through the front panel.

I used a 10 turn pot but a single 2K linear would work fine.

Mike
Those little PCB mount trimmers for the R71, if I decide to mount them like you have and not use a 10 turn pot, do you know if those trimmers are sensitive to distance? Will it cause problems if I use those little trimmers externally and extend them out with cables liek you have because the pots you are using are expensive?  :(

 
Dean Roddey said:
Before I discovered the above snafu, I started trying to measure the signal with my meter. Since I was not getting anything meaningful, I tried measuring them at the actual XLR cable pins on the male end. Shouldn't I be seeing about a 7 volt DC signal between two of the XLR pins? I'm not seeing anything at all.

I know that you really don't want to know this stuff and just want the answers. ::)

Audio is AC and if you're talking about the 1khz test signal for alignment it should be 0.775VAC across pins 2 and 3.

http://www.jimprice.com/prosound/db.htm

This is audio engineering 101.

Mark
 
I meant .7, not 7. That was a typo. I'd been going for like 14 hours on this by then. And yes after I typed that I figured it out myself and did a lot of measuring. I was just kind of thinking out loud more than anything else. But thank you for coming back and being an a$$hole some more. I was really missing that. I swear this is the most pathetic excuse for a community I've ever seen in my fairly long life online.
 
Can you tell us why you would expect to see 7 Volts DC at either XLR? (I would tell you that DC can't pass through a transformer but I'm sure you don't want to know that).

Yes, I figured this out. You know what. Just blow me. I'm sick all of you and your sanctimonious BS. You're a pathetic bunch of losers like I've never seen in my life. I'm really out of here now. I'll get it working myself, else I'll toss in the garbage.
 
Dean Roddey said:
I meant .7, not 7. That was a typo. I'd been going for like 14 hours on this by then. And yes after I typed that I figured it out myself. I was just kind of thinking out loud more than anything else.

Just to refresh your memory

[quote author=Dean Roddey]
Shouldn't I be seeing about a 7 volt DC signal between two of the XLR pins?
[/quote]

I'm sure the DC part was a typo too.  ::)

[quote author=Dean Roddey]
You know what. Just blow me. I'm sick all of you and your sanctimonious BS. You're a pathetic bunch of losers like I've never seen in my life. I'm really out of here now. I'll get it working myself, else I'll toss in the garbage.
[/quote]

Nothing like biting the hand that feeds.

Mark
 
:D

Reading the stuff about working on "14 hours straight" and hence being totally stuck with thoughts and getting angry about myself not figuring out something that seems obvious and simple... yes I could relate to that. But I couldn't relate to the last post by Dean.

Marvellous action :D ;D ::)

 
Dean Roddey said:
Can you tell us why you would expect to see 7 Volts DC at either XLR? (I would tell you that DC can't pass through a transformer but I'm sure you don't want to know that).

Yes, I figured this out. You know what. Just blow me. I'm sick all of you and your sanctimonious BS. You're a pathetic bunch of losers like I've never seen in my life. I'm really out of here now. I'll get it working myself, else I'll toss in the garbage.
It was a simple question Dean. My intention was to find out your reasoning of why you would think there was 7, 0.7 or indeed any DC voltage at the XLRs.

You wouldn't believe the sort of misconceptions I had before discovering this forum and that was after a lifetime of having electronics as one of my hobbies. These misconceptions were part of the impetus to go back to school and study. Now electronic repair is my profession (though sometimes it feels like I'm more of a mechanic, particularly compared to many of the members here). There's always more to learn - in life in general too, I would suggest.

That's part of the reason I'm passionate about being an electronic "evangelist" and why (and I already know you've made it clear that it's a bad attitude) I prefer to provide boards to people who want to learn about electronics and why I don't want to "make a lot of money" doing it. I already have a full-time job that pays the bills and makes it possible for me to spend my free time developing new projects, creating videos etc.

One thing that I've taken on board from this discussion is your point about having an illustration showing the wiring of my boards to the external components. I do think it would cut down considerably on the number of repetitive questions by those who cannot read schematics.

I've asked one of the forum members to consider doing these illustrations for inclusion in my PDFs posted to my site.
 
Dean, do not throw away your unit yet. See if you can get it checked out by an Electronics technician or something. Bring them the schematic and your unit and ask them to quote on finishing it off if you get desperate. If you are not happy with the quote, then sell it if you want. Maybe they can work out the issue with a simple service check and then you can finish it off. I read in a post somewhere where a person did the same thing and got his up and running by a tech.

Also sometimes a nice break can help you see the light of where the issue is on your build. Take a break and then in a few days or a week take another stab at it. Enjoy your La2a and other gadgets you have built for the meantime. Focusing too hard on one thing can sometimes blind you when problem solving or trouble shooting.
 
Dean, you're probably not going to do yourself any favours by saying that you're sick of us all. It's up to you though, but you'll find in some cases that you'll really need this place I reckon if you want to complete these projects. I don't understand people who say something along the lines of "you don't even know me..." followed up by something like "and I think you are a dicks...". There's irony there.

Regarding measuring AC voltage, your meter probably won't have a good frequency response up to 1KHz. Try 50Hz instead.
 
For the record, although I've heard that the output transformer wires should follow blue = hot, and red = cold, I have found that the phase is correct if wired the opposite way around.

I'll post some photos of my unit later when I get hold of a camera.

Roddy
 
Anyone have the wiring info or diagram to Hairballs EA-5002 Output transformer for the 1176 Rev D version 2 or a link to where I can find the information. Skylars diagram is for Cinemag only and there are 3 other wires and shield in Hairball transformer that's not matching to Skylars diagram.

Also the shield on Hairball output transformer, do I connect that to star ground or the case.

Thanks

 
canidoit said:
Anyone have the wiring info or diagram to Hairballs EA-5002 Output transformer for the 1176 Rev D version 2 or a link to where I can find the information. Skylars diagram is for Cinemag only and there are 3 other wires and shield in Hairball transformer that's not matching to Skylars diagram.

Also the shield on Hairball output transformer, do I connect that to star ground or the case.

Thanks

Try having a look at the Rev D schematic, it shows the connections for the output transformer.

Mark
 
canidoit said:
Anyone have the wiring info or diagram to Hairballs EA-5002 Output transformer for the 1176 Rev D version 2 or a link to where I can find the information.

Follow Skylar's latest drawing. Also note rev. 1 and rev. 2 PCBs have different layouts for the headers where the transformer wires attach.

Use the ground wire if you like; I trusted the chassis bond as the chassis is tied to mains earth as part of the star ground.
 
There is a difference between the CM and EA-5002 part.  For the EA-5002 you need to connect the yellow and orange wires together (and to nothing else).  On the CM part this conection is internal.

Mike
 
Echo North said:
Something rated for 125V/1A or better. 

If you run it to the front you'll want to keep it way from the audio as much as possible.

Here is what I do:
3205487836_14926b7e4e_o.jpg


Notice how I keep the power switch wires far right (green/black twisted on the right).

Mike

Hello Mike!

I already finished my second 1176LN RevD with your hardware! and it's fantastic!! but I have two issues...

The first one is:
The pushbutton's ratio board, isn't shown reversed on the schematic? I thought that I had wired in a wrong way my first one, and carefully wired the remaining one reagarding this topic. I regulated them with no problem, and both are working propertly! but had the same impression in my previous one...
I felt and hear that, in the way you have in the photo above, the gain reducton doesn't match with the labeled... in your schematic that comes with the board/switches, you say that the 1:20 is the pushbutton near the board's wiring contacts...
In fact, using the 1:4 labeled the first bottom position, I just can hear a hard compressing, that I don't in the labeled position 1:20 with the same settings, just switching the pushbuttoms... so, in both 1176 I reversed the board (the wiring contacts went down) and now everything seems to be right and kickin'!

Another issue:
I'm using a attack pot with a SPDT switch, so I'm wiring like you say in your schematic... just a original clone... and I noticed that it just only switch off the compression for the 1:4 and 1:8 ratios... for the 1:12 and 1:20 they still compressing... It's happening in my both 1176... is it the 1176 normal behaviour??

Please let me know, thanks for your amazing work and supplying this wonderful material!

Cheers,

Eddie  ;D
Should I do something wrong? I think I don't... but is just a question
 
My meter board wiring is correct.  I think you are getting the threshold confused with ratio (which is something you really need to measure).

At most settings if you keep all the knobs in the same place the 1:4 ratio will show more GR on the meter (and to your ears) than the 1:20 ratio setting.  This is because (generally) as the ratio increases the threshold increases.  However, if you plot and measure the the input vs output and examine the GR ratio you will see what you would expect.  

Have a look here:
http://www.axtsystems.com/index.php?view=article&catid=34%3A1176ln&id=54%3A1176lnratios&option=com_content&Itemid=27

As fr the SPDT switch, it sounds like you have a wiring issue.  I would look at it again.

Mike
 
- Which is + and - on the Mnats altran input transformer pcb board that connects to the "in" of the Main Mnats PC board?
- How do you wire the Hairball Fet Compressor Pot attenuator? Skylar has a different pot for his diagram? Is there a wiring diagram or instructions for wiring the Hairball Fet Compressor pot somewhere?

Hairball Meter Push Button PCB board
- Also, if you use the SPDT switch on the attack pot, how does it change the wiring for the Hairball Meter board and Skylars diagram?
 

Latest posts

Back
Top