[ACMP investiupgradifications] All things PREAMP

GroupDIY Audio Forum

Help Support GroupDIY Audio Forum:

This site may earn a commission from merchant affiliate links, including eBay, Amazon, and others.
Just glancing quickly at this page...

In case you still need votes...  I vote for option 2 removing all clipping circuitry in the '81s. 

I have no interest in any LED lights on the thing whatsoever, except power. 

Simpler the better.  Cleaner the better.  Back to nature.  Back to neve.  :)
 
If you push these preamps hard enough, I think the first thing you notice is blocking distortion when the bias is pushed out of range. Things are already getting crunchy as you approach the LEDs lighting anyway. I wasn't entirely sure if the clip opamps going into saturation would be a big issue seeing as they sit on a separate supply. I didn't think the 10K load they present seemed significant.

Regarding upping coupling caps, I think it's a bit like working with a Marshall preamp... the distortion character is shaped by the coupling, and things can potentially get a bit ugly if you upset this.
 
okgb said:
the red goop , i just gave it a quick snap
non of mine too tight  [ opposite if anything ]

The goop filling the screw recesses is sticky and soft.  Your comment about a quick snap makes me wonder if a little freeze spray might make it brittle enough to dislodge in one piece.  Maybe worth a try.
 
"Hi Steve.  Thanks for the update.  I'm going to say option 2 for the clip circuit and I would really appreciate your investigating the meter option as well.  Thanks for all the hard work!  I'm ready to place my order as soon as you give the word.

Paul "

+1 to all of above as it pertains to 73's

WRT the red goop. Mine only has it on the edge of screw heads and it has not been an issue.

-----

Resistors. PR9372.

Steve you mentioned how much you liked these resistors and others seem to concur. I was wondering what you or others think of replacing all or most of the resistors with these. Seeing that some of the resistors are dodgy at best and this would be diy rather than pay for time. This is also for the 73's. So the cost seems minimal.

It just seems like to me if I've got to get in there with a soldering iron for a few things, might as well upgrade as many important parts as is financially feasible.

Thanks again and looking forward to your rework kit.

Tom B.
 
Me as well. I figure since some of us are going to be breaking these things open and doing the soldering ourselves, might as well change out everything you can. If it takes a few months to get through my 8 pres, then so be it.

It should be noted that I would MUCH rather have Steve do the work but the cost of shipping these things back to Cali would be prohibitive from here in sunny western NY. Steve seems like a frickin genious when it comes to this stuff and I have no doubt that when these things are spruced up with his kits, these will be amazing. I figure the upgrade kits will be close to the cost of each unit and I think factoring in shipping you could easily double the cost.

Harrumpf.

Can't wait to get some definitive pricing!
 
okgb said:
fyi  there was a miscomunication between Cinemag & I  ,
so the replacement inductors will be on their way to me
and i'll report back on the results
Great! Looking forward.

Re the led's:
I would have ordered without but it wasn't an option :(
+1 on taking them out.. Maybe just lighting them up as power-on led's.. That way they at least serve some purpose..

Cheers,
J
 
Steve,

optio II is better overall, Ears are much better clip indicators than leds anyway.
 
rodabod said:
If you push these preamps hard enough, I think the first thing you notice is blocking distortion when the bias is pushed out of range. Things are already getting crunchy as you approach the LEDs lighting anyway. I wasn't entirely sure if the clip opamps going into saturation would be a big issue seeing as they sit on a separate supply. I didn't think the 10K load they present seemed significant.

Regarding upping coupling caps, I think it's a bit like working with a Marshall preamp... the distortion character is shaped by the coupling, and things can potentially get a bit ugly if you upset this.

Your comment about blocking distortion started me on an internet search of that phenomenon.  My initial research on the subject deals mostly with Vacuum tube circuits, especially guitar amps, which unlike mic preamps, are often intentionally overdriven.  I am not sure that the phenomenon of the tube grids drawing current and thereby upsetting the bias has a similar effect in these solid state circuits.  The really high resistor values in the vacuum tube circuits prevent a charged up coupling cap from quickly discharging after overload, and the solid state resistor values are much smaller.  There are no grids that suddenly go from MegOhm impedance to very low.  I am willing to be educated on this, so I am not pronouncing final verdict expertise here.

  It seems to me that if the time constants of the filter caps across the biasing resistors are significantly longer than the time constant of the lowest signal frequency being amplified, then the biasing shouldn't move enough to be a problem. It is possible to choose an asymmetrical test tone that could move the bias with continuous application, but real music doesn't do that, and in the case of the mic preamps the input transformers prevent ultra-low frequencies from ever being passed on to the amplifier circuits.

One of the biggest problems with single-ended powered circuits is that large caps in the biasing take a while to charge up.  This seems to me to be mostly an inconvenience rather than a problem.

Back to the ACMP preamps:
There are a couple of places where the loading of the individual amplifier circuits are greater than the loading that was originally in the Neve. The output amplifier in all the preamps has a 5K pot for an input.  The output coupling cap feeding that cap is only 22 uF.  When the EQ is switched in, there is a 100uF cap feeding that pot.  That's a x5 difference in LF response just at that location due to the difference in value.

I will do more homework, but I would guess that if there is some "crunchiness" going on, it may be in the output stage which has the output transformer in its feedback loop.  More research is needed.

Again, making major changes to the cap values will change the sound. Some may like it better.  Some may not.  My goal is to just check for major bottlenecks and deal with them.

By the way, for what it is worth, my rule-of-thumb for sizing audio coupling caps in solid state circuitry is 100uF for 10K loads, 220uF for 2 to 5k loads, and 470uF for 600 Ohm loads and bigger yet when the impedances get lower.
Sometimes those values get too big to be practical, so one has to adjust.

  The ACMP preamps use way smaller caps. Note the 470uF 1C2 in the first stage of the '81 preamp in series with the parallel combination of 1K8 1R5 and 91 Ohm 1R6 for a total series Z of 86.6 Ohms.  At 20 Hz a 470 uF cap is 16.9 Ohms.  At 2 Hz a 470uF cap is 169 Ohms. This cap by itself will result in significant LF rolloff and phase shift, which may be part of the color of the preamp.  For best frequency response and lowest waveform distortion 2200uF would not be too big in this location.  By the way, note that 120 Ohm resistor (1R28) is switched in only in mic position. During line-in operation there is only the 1K8 (1R19) in series with the 470uF 1C12.  The low frequency response is 10 x lower in line operation than in mic.

 
TB-AV said:
Resistors. PR9372.

Steve you mentioned how much you liked these resistors and others seem to concur. I was wondering what you or others think of replacing all or most of the resistors with these. Seeing that some of the resistors are dodgy at best and this would be diy rather than pay for time. This is also for the 73's. So the cost seems minimal.

It just seems like to me if I've got to get in there with a soldering iron for a few things, might as well upgrade as many important parts as is financially feasible.

The biggest problem with PR9372 is availability in the smaller 1/4 watt size from standard distributors like Michael Percy, etc.  I actually used the close cousin GP1/2 resistor for the phantom resistors due to wanting 0.1% tolerance and requiring 1/2 watt rating just for power dissipation reasons.  The GP1/2 use the copper leads and non-ferrous end caps like the 1/2 watt PR9372 resistors, but the Phantom resistors are in a location that has a secondary effect on distortion, so the extra fanciness of the PR9372 version was overkill.

Although there is certainly nothing wrong with changing the resistors to PR9372 quarter watt resistors, I personally wouldn't do it to my preamp remembering that these preamps are "color" preamps.  I would use them (and do) in certain locations in my 990 based Jensen Twin Servo preamp, which is designed for absolute minimum coloration. (I use a lot of Caddock and even some Kiwame resistors in that design).

I believe that a more practical choice for resistor replacements would be Roederstein MK-2 resistors. I wouldn't wholesale replace the resistors, though, just the ones that show signs of physical deterioration and the ones that must be changed to fix the gain switch pop, etc.
 
Steve Hogan said:
Your comment about blocking distortion started me on an internet search of that phenomenon.  My initial research on the subject deals mostly with Vacuum tube circuits, especially guitar amps, which unlike mic preamps, are often intentionally overdriven. 

Hi Steve. I shouldn't have probably used that term which as you correctly described, is something experienced with valve amplifiers. The perceived effect I am describing though is very similar; drive very high levels and the preamp falls over and recovers. I'd need to see what levels I was driving to see if the bias was swinging enough out of range. It is not pleasant.

Back to the ACMP preamps:
There are a couple of places where the loading of the individual amplifier circuits are greater than the loading that was originally in the Neve. The output amplifier in all the preamps has a 5K pot for an input.  The output coupling cap feeding that cap is only 22 uF.  When the EQ is switched in, there is a 100uF cap feeding that pot.  That's a x5 difference in LF response just at that location due to the difference in value.

I'm guessing it's maybe the '81 you speak of which has the 100uF coupling cap after the eq? I have the '84, but the same differences exist effectively from a quick glance. The original had a 22u coupling cap too. Thing is though, the Neve designs weren't consistent either. In addition to this high-pass filtering, the HF feedback caps on the amp stages when in series cause a low-pass filter which cuts off within the audio range. I haven't checked if the Chinese did this too, but it wouldn't surprise me.
 
ACMP '81 Q4,Q5 update

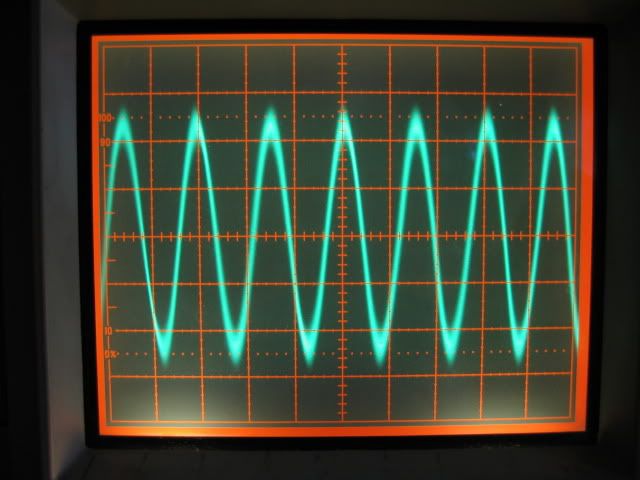
Scope photo below shows 70 MHz oscillation from an unmodified AMCP '81 EQ.
ACMP81EQ70MHzOscillation.jpg


I have now finalized my '81 EQ transistor mods for the BA-338 clone amplifiers.

I will be using Fairchild BC327-16 transistors to replace xQ4 (was BC557) and Fairchild BC337-16 for xQ5 (was BC547).
xD3 (was 1N4148 in the ACMP) will be replaced with a BAT-86 Schottky diode. This diode has the required low forward voltage drop to act as a Baker clamp similar to the Germanium diode used in the original Neve circuit.  The Germanium diodes are a weak spot in the Neve circuit -- the first place to look when an EQ goes south.  The Schottky diode is, in my opinion, a more reliable better choice.

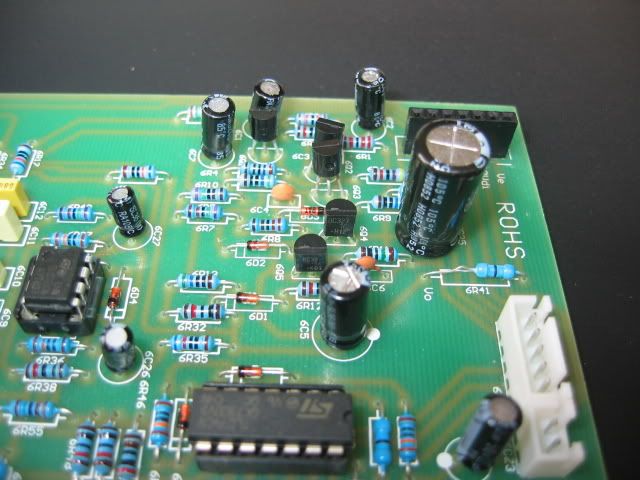
Each EQ card will have the 100uF 24V power supply decoupling cap (C25) replaced by 470uF/35V to improve isolation between EQ sections and provide  more locally available current for each EQ card.  I may transplant some of the 100uF caps to LF bottleneck locations such as 1C13 in the mic preamp.

ACMP81EQmodifiedPCB6top.jpg


The BC327-16 and BC337-16 are very close electrically to the original Neve BC461-6 and BC441-6 transistors.  They have graded Hfe to match the Neve original range, have plenty of collector current capability, and have exactly the same TO-92 package and CBE pinout as the factory transistors used in the ACMP preamps, making replacement a breeze.  It appears, as expected, that they also cause the 70 MHz oscillation to disappear as well.

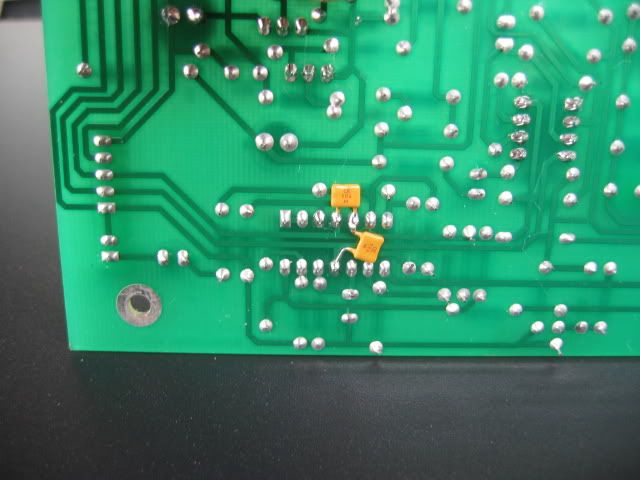
ACMP81EQmodifiedPCB6bottom.jpg


I have added a couple of 0.1uF caps to the backside of the card from the +12V rail to ground and from the -12V rail to ground to lower to provide local power supply decoupling for the TL072 and TL074 opamps used in the clipping indicators and meter drivers. 
 
rodabod said:
I shouldn't have probably used that term (Blocking Distortion) which as you correctly described, is something experienced with valve amplifiers. The perceived effect I am describing though is very similar; drive very high levels and the preamp falls over and recovers. I'd need to see what levels I was driving to see if the bias was swinging enough out of range. It is not pleasant.

As I was composing the post describing my xQ4, xQ5, and xD3 mods to the '81 EQ PCB's, it occurred to me that replacing the Baker clamp diode with a schottky type will help the overload characteristics.  The Baker clamp prevents Q4 from saturating, so it comes out of overload quickly.  The '84 amplifiers are not the same, so I'm not sure what might be causing your particular overload nasties.  Asymmetrical clipping may be happening, which can cause some shifting of the bias.  I haven't investigated the overload characteristics of these preamps.

Deane Jensen taught me many years ago that the overload behavior of any piece of audio gear makes a huge impact on its sound quality.  Some circuits overload very badly -- sometimes latching up to one rail for a time until it finally comes "unstuck" and finally returns to following the audio waveform.  Overload on such a device is very ugly, because the otherwise very short time that the overload occurs is extended in time to the point where it is always noticed. All clipping indicators employ some kind of time stretching circuitry to extend the LED flash long enough to allow it to be seen.

The reality is that occasional clipping is going to happen.  however, if the circuit overloads cleanly -- just clips with no hang and no burst of oscillation when it finally comes out of clipping, then occasional overload is almost undetectable.  When I have modified various European audio modules -- a Siemens EQ I worked on comes to mind, I have observed nasty slew limiting, and overload behavior that included bursts of oscillation on the trailing edge of any clipped waveform in the unmodified units.  My mods to the circuits clean up a lot of that uncontrolled behavior, and the results have been very noticeable.  Making any piece of gear clip cleanly and symmetrically is really important to how the unit sounds when being used, as opposed to being measured. 
 
Power Transformer Interest

The first production run of 40 power transformers is being made as I type this. There are two types of transformer:
TSS-Mp73/84 which is made to replace 73/84 preamp power transformers and
TSS-Mp81 which is made to replace 81 preamp power transformers.

The 81 transformer has an extra high-current 24 Volt winding and has a different lead break out than the 73/84 transformer.  The primaries, the faraday shield, the Phantom winding are identical on both models, and all 40 pieces have been done up to that point at this time.  Now I must decide how many '81 transformers and how many 73/84 transformers to make in this first run.  I obviously know how many units of each are required for those who have already sent units to me to get fixed, but I don't have a good count yet of how to divide up the 40 pcs based on those who plan to order kits.  The transformers will be the most expensive ($75 for the 73/84 and $80 for the 81 version) component in a kit of parts to modify your preamp in a DIY fashion.

If you would be so kind as contact me directly via email ASAP with your plans. I can be reached at stevehogan at soundsteward.com.  This will help me make the appropriate decision of how many of these first 40 pcs. should become '81's and how many should become '73/84's in order to cover the initial needs of interested parties.

Please don't respond to me on this board so we can keep the signal-to-noise ratio high. With this inquiry, I am dangerously close to having commercial content which I am trying to avoid, but I really need to figure out how many of each part to make and many of you have been waiting a long time already. 

Thanks! 

 
Baltimore said:
I run my preamps with at least one clip light blinking most of the times that I use them...I say ditch 'em.

Thanks for the feedback.  With all due respect, I would recommend backing off your levels, unless you are intentionally going for extra distortion. If any of the clip lights are coming on, you are probably well into clipping.

When I say that the clipping indicator LED's on the ACMP preamps lie, what I mean is that the preamp/EQ circuitry can be already clipping (especially in the negative direction) and the clip lights will not flash.  If they are flashing, you are already into clipping in a big way.  The simple half wave rectifer circuit is slow and not that accurate due to the 12V excursion the TL072 opamp output must make every half cycle.  Perhaps re-adjusting your recording chain gain structure will allow you to run the preamp at a lower level.  I would use external metering to set appropriate recording input levels and preamp output levels.

I realize that that would be an easier proposition if the preamps had a quieter noise floor, but that is coming soon.

My thinking on the clip lights has softened to the point that the benefits of having some kind of indicator is perhaps better than none at all.   I will give those who sent units to me the option and obviously the DIY folks can make that choice easily.   I can include the extra 0.1uF caps in their kit of parts or not, as they wish.
 
This has been some very interesting reading.  Thanks Steve and everyone else who has contributed to the discussion.

;D

 
Steve

Of great interest to me (and probably many others) is the effect of the new power transformer on the inductor hum/resonance in the 81. After correcting the oscillation with the transistor swap, this problem poses the greatest challenge in using these units effectively.

Does the new transformer correct this problem, or is shielding or inductor replacement still going to be necessary to get these ship-shape?
 
crazydoc said:
Of great interest to me (and probably many others) is the effect of the new power transformer on the inductor hum/resonance in the 81. After correcting the oscillation with the transistor swap, this problem poses the greatest challenge in using these units effectively.

Does the new transformer correct this problem, or is shielding or inductor replacement still going to be necessary to get these ship-shape?

When checking out the transistor mods by replacing first all the xD3 diodes, then the xQ4 and xQ5 transistors one '81 EQ PCB at a time, I also briefly looked at the inductor's tendency to pick up hum.  (I was doing the transistor swap on a "virgin" otherwise unmodified '81 unit with the stock power transformer and power supply).  Until I get more power transformers, I can't properly evaluate how low the noise drops compared with the stock transformer.

My comments below are preliminary and subject to revision. --Wow!  just had an earthquake here !! 2nd one today.


One thing is really clear, that the choice of mounting method for the stock inductors is unfortunate.  The very wide circle of pins and corresponding pcb layout leaves a lot of loop area to pick up trash.  The wire leads that connect the winding to the pins aren't twisted, and it seems that I can increase the hum a lot by waving my hand about the inductor or touching it.  Seems that this circuit in the '81 is operating at a very high impedance and is acting like a single coil guitar pickup. When I drop a mu-metal shield can over the whole inductor including the base, There is a significant reduction in hum, but it is steady only when the can is grounded (when the can is acting as both a magnetic and electrostatic shield).  It appears that there is more help by grounding the can than the fact that the can is mu-metal.  It appears that there is significant electrostatic pickup of garbage as well as magnetic.  I need to get a copper pipe cap to just try an electrostatic shield only. Of course, the lid on the preamp acts as an electrostatic shield to the outside world, so that may also have a significant effect.  The chassis and lid are also steel so they may effect the inductors by conducting magnetic lines of force from the power transformer.

It may be that to really make the preamps bulletproof in terms of inductor pickup from both internal and external interference sources that a shield of some kind will be necessary.  Best results will be obtained when the inductor is completely contained within a mumetal can of some kind with a lid.  My first thought would be to remove the inductor completely from its base, install it into a grounded mu-metal transformer can and bring its twisted wire leads out one of the holes in the can lid. The existing mounting scheme with the white base is pretty but it doesn't work nearly as well as other methods when it comes to external pick-up of trash.

It appears to me that the glue holding the pot core into the white shells is epoxy, so it will be a real pain to break them apart without damaging the pot core. To encase the whole thing with the white base requires a much larger (more expensive) can than would otherwise be necessary to just hold the inductor.  I haven't removed the inductors and measured them  as a standalone component yet.  Maybe that is next.


Steve Hogan said:
It appears to me that the glue holding the pot core into the white shells is epoxy, so it will be a real pain to break them apart without damaging the pot core. To encase the whole thing with the white base requires a much larger (more  expensive) can than would otherwise be necessary to just hold the inductor.  I haven't removed the inductors and measured them  as a standalone component yet.  Maybe that is next.

Today I removed samples of every inductor from an ACMP73, ACMP 84 and 2 ACMP-81 preamps. I also looked up the inductors made by Carnhill that most closely match the inductors in the TNC clones in order to figure out how difficult it would be to just make new, accurately made inductors in the smallest possible mu-metal cans to keep costs down.

I identified the exact core used by Carnhill to make their 9047 and 9048 inductors which look like a close match to the inductors in the '81.  I need to get the DCR's of the Carnhill inductors in order to know how they differ from the clone inductors.  Interestingly, these two Carnhill inductors are made from RM8 cores instead of Pot cores, so they have less self shielding than a similar pot core.  They are assembled with grounded clips instead of Glue, which allows their somewhat conductive cores to act as an electrostatic shield.

There were several interesting revelations as I measured, analyzed and compared 9 pcs of the factory supplied inductors. I measured DCR using my Fluke 8842A, and measured Inductance and Q using my GenRad 1659 Bridge.
Here are some observations: 

1.  All the Chinese inductors are made from the same size pot core.  Maximum inductance is 6.3H  and the lowest is 182 mH overall, leaving me to think that the gapping and/or the permeability/material of the cores may be different.

2.  Interestingly, the 6L1 inductor and circuit values on the PCB in the 73 and 84 are identical. Both inductors measured very similarly, however,
The frequencies on the 73 panel say 300, 160, 80, 50, OFF
The frequencies on the 84 panel say 360, 160, 70, 45, OFF

I haven't measured yet the center frequencies of these EQ's yet, maybe neither one is correct.

3.   The 5L1 inductor is identical in both the 73 and the 84.  Both the circuit values and the PCB's are identical.
This time the kiloHertz frequencies also match:  7.2, 4.8, 3.2, 1.6, 0.7, 0.36, OFF

4.   The 6L2 inductor in the '84 is unique to the '84 and does the high-cut filter.  I measured only one piece.

5.   The '81 4L1 and 5L1 inductors are unique to the '81. I measured 2 of each, and they were similar to each other.

6.   The ferrites use for these types of inductors are actually fairly conductive. If you look at catalog photos of the Carnhill inductors, you will see that they have used standard metal clips to hold the two halves of the cores together. These spring clips are generally grounded.  The cores on the Chinese inductors are not grounded, which may explain why the inductors are so prone to electrostatic pickup. Due to the difficulty of removing the pot cores from their white holder without cracking or otherwise breaking the pot cores, it is hard to add a grounding clip.

7.   I won't bother to rehearse the numbers here, but I measured two of each type of inductor, with the exception of the high cut filter in the 73 6L2.  There wasn't much variation between the samples, but they didn't quite read as advertised-- L5 in the 81's for example topped out at 4.7Hy when the schematic calls for 5Hy.

Thanks for emailing me with your power tranformer interest.  I have almost all 40 pcs allocated.
 

Latest posts

Back
Top