U47-style bodies - who can make one?

GroupDIY Audio Forum

Help Support GroupDIY Audio Forum:

This site may earn a commission from merchant affiliate links, including eBay, Amazon, and others.
Nice work man!

I'm sorry if I missed it but is there an estimated cost for these &/or the circuit boards?

I don't care for my G7 mic body (but LOVE the mic - with Dales M7 capsule, G7 circuit, ef86, etc...)
& I'm considering rebuilding in it one of these bodies... much nicer. ;D

I wish Dale was still making capsules.  :(

BTW, is the 7 pin connector easy to find & at what cost?

Thanks again.
 
I've had a read through the thread and just want to confirm (because I'm desperate not to miss this) that there's still a chance to order the mix bodies.  I haven't missed the boat yet, have I?
 
letterbeacon said:
I've had a read through the thread and just want to confirm (because I'm desperate not to miss this) that there's still a chance to order the mix bodies.  I haven't missed the boat yet, have I?

I think Skylar is opening a web shop for these some time soon so propably there will be bodies for everyone. There was some kind of wheeler list over a year ago.
 
I just hope there will be enough to go around in the first round of mfg, because I think there will be a HUGE demand.
 
Ok, I'm a little confused. Maybe I'm wrong, but I thought that those of us who have participated in and responded to the feeler in the development thread were going to be notified via email when these bodies were ready. Now, according to the EQU47 thread the pre-orders are open to anyone and it's first come first served. ????
 
I'm about to sent the email blast.

And pre-orders are NOT open yet.
Pre-orders won't be open until the webstore is launched, which will be this week.
A link to the webstore will be posted once it's open.

About 7 months back I decided to to open the pre-orders to everyone.
Read the first post in the White Market thread in its entirety if you have not already done so (I've updated it a few times).
If you need further clarification, please post your question in the White Market thread or send me an email = skylar [at] equinoxsystems [dot] net

 
Skylar, great job.  Thanks for your perseverance, and faithful pursuit of the true specs.  :eek:

Glad you'll be offering the female Binder.  What are you recommending/ using for the PS connector?  Are Binders available for that connection?  What are the options?  XLRs?  How many pins are the Binders, again, 7...?

 
Thanks for clearing that up Skylar.  And Thank You so very much for all your hard work. You've made a lot of people VERY happy. You are the BEST.....Lee.
 
tommypiper said:
Skylar, great job.  Thanks for your perseverance, and faithful pursuit of the true specs.   :eek:

Glad you'll be offering the female Binder.  What are you recommending/ using for the PS connector?  Are Binders available for that connection?  What are the options?  XLRs?  How many pins are the Binders, again, 7...?

Thanks, dude!

You can use Binder connectors on the PSU end. The ones I am using are the 691-Series 7-pin.
What I would actually recommend is to use Amphenol-Tuchel connectors on the PSU end.
Why? Because they're less expensive & more readily available.

So you could build a cable that has:
Binder 7-pin Female cable-mount connector on one side (this connects to the mic),
Amphenol T 3475 002 or T 3475 001 Male cable-mount on the other end.
Then at the PSU use an Amphenol Female panel-mount T 3478 000.

Now the $25,000 question...why not just use Amphenol all around in the first place?
a) because I wouldn't have been able to integrate it into the end-cap as well the Binder
b) the binder is larger in size which looks better and is slightly easier to solder/assemble.
 
Skylar said:
So you could build a cable that has:
Binder 7-pin Female cable-mount connector on one side (this connects to the mic),
Amphenol T 3475 002 or T 3475 001 Male cable-mount on the other end.
Then at the PSU use an Amphenol Female panel-mount T 3478 000.

Hi!

Skylar could you verify part number for Binder cable connector for mic end? Is this one suitable 690-09-0064-00-07?

Thanks!

Edit: Found out you are going to sell the Binder female cable connector in your web shop!

ps. For Europeans: Conrad.de sells Binder and Amphenol connectors.
 
Skylar said:
RE: capsule mounts & the EQU47

Option A = Thiersch STS-7
http://www.thiersch-mic.de/en/estm_produkte.html
This option is closest to the original.
You'll need to attach the EQU47 capsule mount insulator to the capsule mount disc using m2 set screws (included).
Insert an M3 screw through the bottom of this assembly into the capsule mount itself.
Step 6 in the following image:

Resulting capsule mount height should be 45mm, identical to that of the U47.
Right now, I have a Thiersch capsule and STS-7 mount coming my way.
When these arrive I will, of course, verify the capsule height.

question:

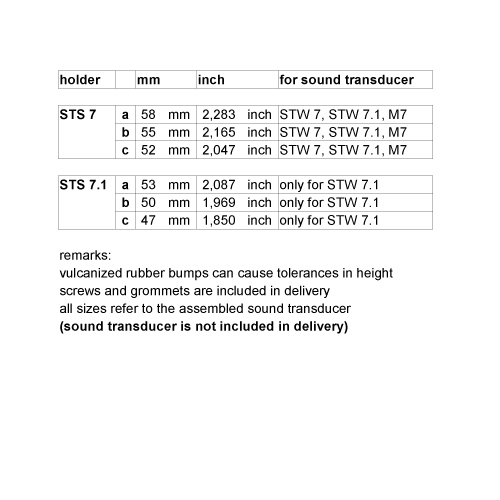
thiersch offers STS7 mounts in 3 sizes, as in the chart below.

holder_chart_e.jpg


when used with a dale m7, or other 34mm capsule, which size will put the capsule center at 45mm?

even the largest comes out as too small when i try to figure it out (say, 58mm mount puts the capsule center at 41mm in my calculations). i am guessing option a is the appropriate mount, and i am not calculating correctly. just want to confirm.

thanks.
 
thanks for the reply.

i understand that the sts7 is the correct mount, the issue is that it is offered in 3 sizes.

a. 58mm
b. 55mm
c. 52mm
 
From the white market thread:

me: "Hey Skyler - thanks so much for making this happen. Could you tell me which of the Thiersch capsule mounts would be the correct one to get the capsule at the same height as the original U47? There are 3 sizes available: 52mm, 55mm, and 58mm. Thanks, Ben"

Skyler:

"Thiersch used to only carry one size of the STS-7.

The ones that I have measure 58mm from bottom to top.
So, I would recommend the 58mm variety in order to attain the proper capsule height."

Best, Ben


Hi, I decided to post over in this thread because I didn't want to clog up Skylar's WM thread with "build-information" and the design history is already here. Skylar, if you would like to encourage this type of info to be directed into a particular "support-thread" please let us know.
------------------------------


Ok. Had some time last night and this AM to take the bodies apart, reassemble, and analyze with various assembly configurations, etc. The attachment of the headbasket on my two bodies is an issue. This appears to be the result of a couple items that I believe that I have identified in my case. I am going to approch this by identifying a problem, identifying sources that contribute to the problem and attempting to come up with a DIY-solution that optimally addresses the sources of the problem but at the end of the day addresses the overall problem.

All in the spirit of DIY.

The problem:
The headbasket does not easily attach secure and snug to the body/internal-rail mechanism. This issue lends itself to cross-threading of the headbasket mounting screws, stripping of the screw-heads, and un-desireable movement of the installed head-basket.

Issue #1:
The internal rails are slightly skewed. This does two things. 1. The top mounting plate is no longer parallel or horizontal. 2. The threaded hole in the rails intended to receive the headbasket screws are at slightly different heights promoting cross threading.

Issue #2:
The front headbasket screw does not have a threaded reciving hole like the two side screws. The result is that this screw is not tightned into anything and the headbasket moves from front-to-back.

Issue #3:
The elbow bend at the top of the mounting rails is not at the same angle (should be as close as possible to 90 degrees) on both rails. This contributes to the headbasket sitting slightly skewed on the top capsule-mount plate and as a result the headbasket mounting holes become more out of alignment with eachother and promotes cross-threading.

Some potential DIY fixes that I am considering to address the problem:

Potential-DIY-refinement #1:
Key the headbasket/capsule-plate "mating" such that the headbasket is "fixed" in only one position when mated together with the body-tube/capsule-plate. I haven't come up with a specific solution for this but am thinking that some acrylic/perspex can be easily affixed somewhere and is easy enough to file and shape by hand and provide a tight/secure/snug/positive fit. I think some sort of keying of the headbasket mating would help with addressing alignment issues. A steel ring fixed (same depth as the top capsule mount plate) to the inside of the headbasket would keep the capsule-mount-plate "centered" when the headbasket is mated. A precision steel ring may be hard to fabricate. Sections of steel wire may be fairly easy to DIY as well as providing a long-term solution?

Potential-DIY-refinement#2:
Very carefully hand bend the elbow and side-rail to close the gap between the out of true issues. Both in the skewed vertical orientation as well as the 90 degree elbow issue.

Potential-DIY-refinement #3:
Hand file down the very top of the side rails to make the capsule mounting plate parallel to the top of the body-tube. This can be finetuned and aligned such that the keyed-headbasket screws/receiving holes are as precise as they need to be. Tested by installing headbasket to the side-rails both with/without the body-tube. Small shims or washers can also be added to make small adjustments to height as required.

Potential-DIY-refinement #4:
Add a small elbow piece to the front underneath of the top capsule plate. Once the side screws are all level and "precise enough", drill and tap the new elbow to receive the front screw securely.

Potential-DIY-refinement #5:
Carefully use a hand reaming tool to very slightly enlarge the top body screw holes such that they allow the mounting screws to pass through from the headbasket to the mounting rails without obstruction. They will be covered by the chrome frame of the headbasket. If the reamer comes too close to the edge and the hole only needs to be enlarged in a specific direction, the out comes the micro-file!

Skylar, Thanks again for seeing this through to delivery. Looking forward to round two!

Best,
jonathan
 
Back
Top