sick telefunken v676's I think this will be a challenge...

GroupDIY Audio Forum

Help Support GroupDIY Audio Forum:

This site may earn a commission from merchant affiliate links, including eBay, Amazon, and others.

substitute

Well-known member
Joined
Jul 14, 2004
Messages
504
Location
PHILADELPHIA
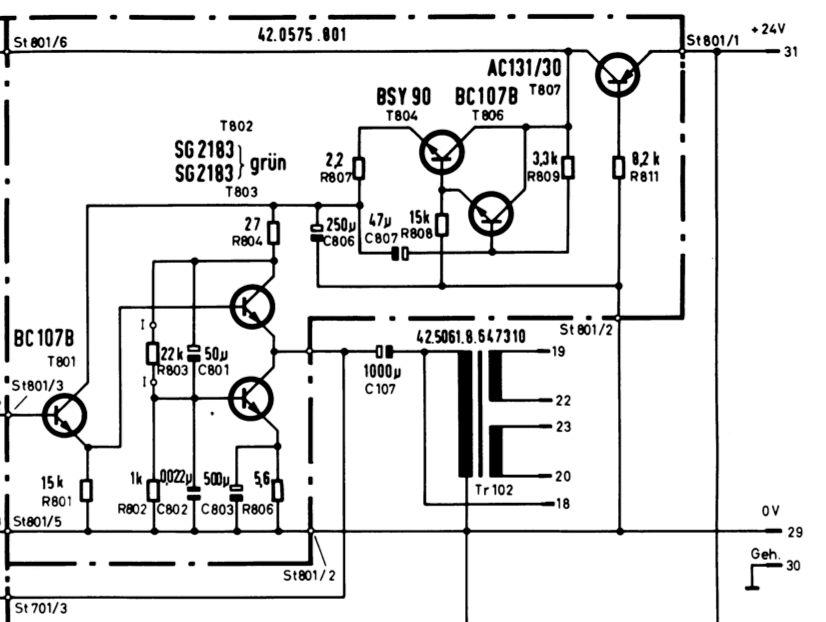
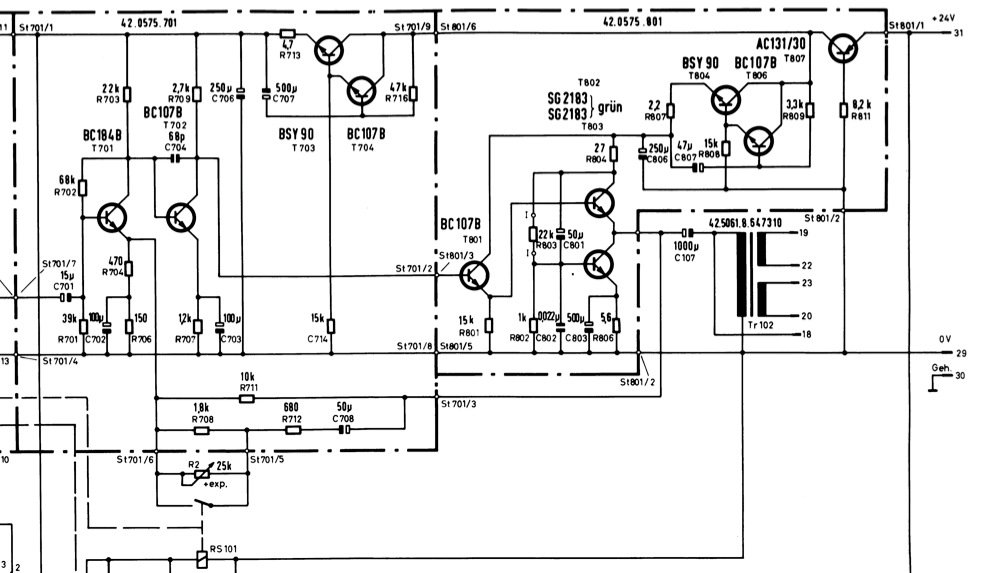
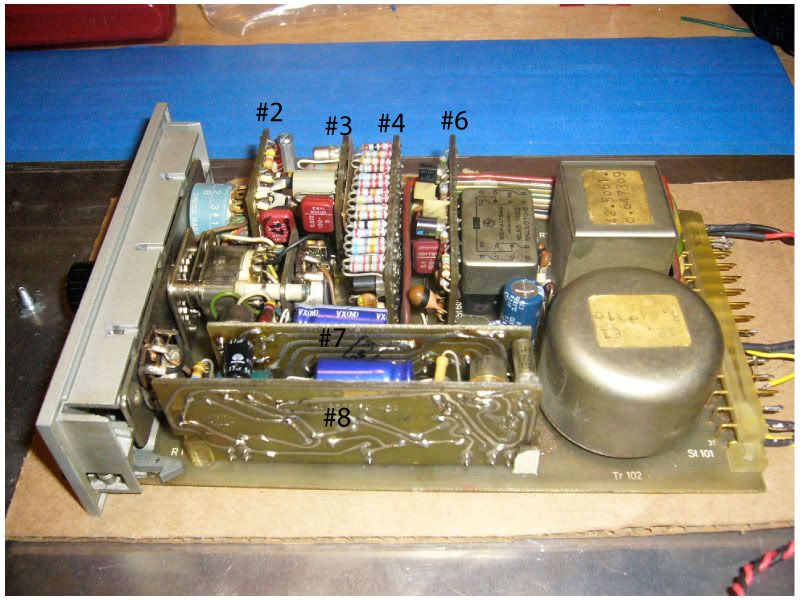
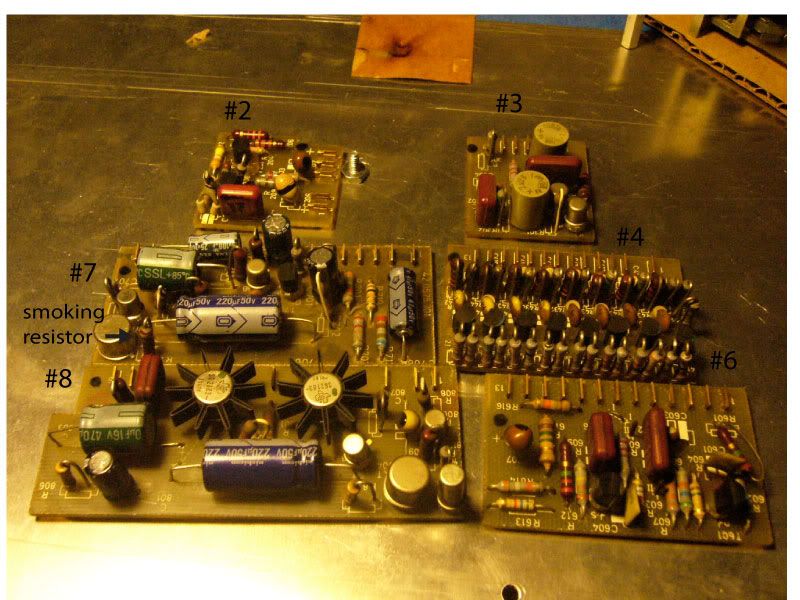
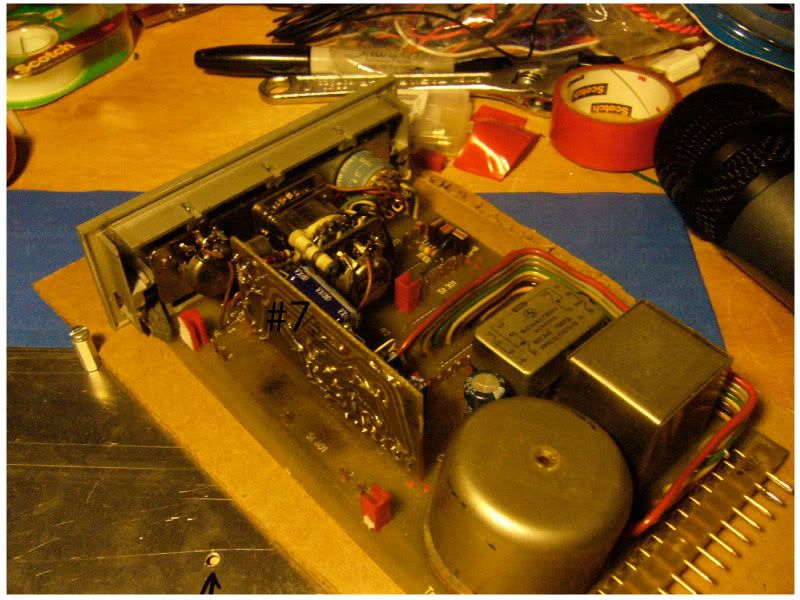
Last year I racked up a pair of v672's and everything worked great.  After getting a few more projects under my belt I thought I could do a better looking job with the metal work, so I decided to make a new chassis for them.  Some where in that process I shorted the regulator on the power supply and sent 48v to them and caused some damage.  One channel is not working at all, nothing is happening, seems dead.  The other, as soon as I give it power (+24) a resistor starts to smoke almost immediately.  R713 in the schematic...

smokingresistor.png


I've swapped around a few of the boards from channel to channel and get the same results.  Visually none of the caps look popped.  I have a scope that I kind of know how to use as far as getting a signal up on the screen but I don't really understand the finer points of signal tracing.

How do I dig myself out of this one?

 
I somehow remember these power supply emitter follower constructions
being relatively easy to piss off with wrong power. But something is obviously
drawing serious current after R713 so I'd probably go inspecting the tree there
after it first...
 
C706 (250uF)? or anything thats on this rail (after the t703/t704 gyrator) and not visible in this schem snippet...
 
> starts to smoke almost immediately.  R713

You got a short.

Gotta be C706. Or a dumb mechanical mistake (loose lead touching chassis). Everything else (that you -show-) has 2K7, 22K, etc in series. 2.7K in series with 4.7, the 2.7K will smoke first.
 
Thanks so much for the input, I'm not sure that it's c706...
Here's lot's of information...

To avoid wiring mistakes (since I'm very prone to them) I took the modules out of the chassis and disconnected everything but the leads going to the power supply.

first the complete schematic from kubarth, the v676 is about a third of the way down the list.  I though it made more sense to post the link than to make a jpeg and copy that into this post.

http://audio.kubarth.com/rundfunk/index.cgi

Now here's what I've done tonight...

This is the 676 with all the cards in, the numbers I've added are from the component silk screens on the PCBs.  I.E. resistor 713 is on board #7 and all the parts on that board are 7xx and on the schematic the boards are designated by the dotted lines.

676_with_all_cards.jpg


I have two modules (both used to work, neither are working now but only one smokes) so First I replaced card #7 on the smoking unit with card #7 from the non-smoking.  Turned on power and r713 smoked.

Then I replaced all the cards on the smoking unit with all the cards from the non.  Turned on the power, no smoke.

So, I took all of the cards out of both modules...

676_empty.jpg


676_cards.jpg


...added just card #7 (smoking card, in the smoking unit) , turned on the power, no smoking

676_with_card_7.jpg


I slowly added the original cards until r713 started smoking, this happened with card #4

676_card4.jpg


I replaced card #4 with the one from the non-smoking unit, powered up no smoke.

I'm too tired to press on tonight, but tomorrow I'll hook up the I/O and see if it passes signal in it's current state. 

In the mean time, any insights as to what's gone horribly wrong over on board #4 and what to do about that would be greatly appreciated.

THANK YOU!


I think I see some tantalums there on #4 and other places.

check the tantalum caps , all of them. If you need to pull them and measure them one by one to make sure they are within spec of capacitance and resistance. A cap checker is useful here. I have seen these buggers nearly short and shut down regulators and cause all sorts of weirdness in circuits where excess current is a primary symptom.

Infact , typically I come across more bad tants than other types of capacitors especially on vintage gear that uses them.

those tants are old enough to be causing issues too.

 
yes, 676.  No suffix either, like "a" or "b". 

I got stuck installing a bunch of new lighting at the studio tonight so I haven't had a chance to start checking those tants or anything.  But thanks for posting everyone.

 
Wow. Those 'Funken guys impress the socks off me every time. Makes me wish I had a million dollars, Illustrator, and health insurance ;)

Well then again two out of three ain't too bad...
 
Wow. Those 'Funken guys impress the socks off me every time. Makes me wish I had a million dollars, Illustrator, and health insurance Wink

Well then again two out of three ain't too bad...

You know if you already have a million dollars and health insurance you can probably afford illustrator :)

I'd like to add an unlimited supply of time to that list.
 
I agree about checking all the tantalum capacitors. In well aged gear, they can became 'tantrum' capacitors.
 
Right they keep screwing over the Neumann EQs in my console too. Funny how the guy
who makes the Quantec Yardstick is Electrolyte-o-phobic and designed his entire PSU around
paralleled tants, but he has this incredible multilayer PCB that is designed in such a
way that it actually a trafo so I do dig his concept at least thus far ;) One hell of a cool
PCB design that is...
 
electrochronic said:
I think I see some tantalums there on #4 and other places.

check the tantalum caps , all of them. If you need to pull them and measure them one by one to make sure they are within spec of capacitance and resistance. A cap checker is useful here. I have seen these buggers nearly short and shut down regulators and cause all sorts of weirdness in circuits where excess current is a primary symptom.

Infact , typically I come across more bad tants than other types of capacitors especially on vintage gear that uses them.

those tants are old enough to be causing issues too.


Yes change them all :).
 
with the V676 it is possible to  power up the daughter boards individually with a bench PSU to test them.  You just need to be careful to make sure that you hook the power up to the right pins !

Ahh, you again :)  You helped me get these running the first time around.

I replaced some tants and have one working channel now (the one that was burning up resistors)

Thank you so much for the help everyone!

Channel two is kind of passing audio, it has no gain, but if plug a mic into it and turn up the gain on my mixer I get some sounds  Weird distorted blips and fizzles... my first thought was tunning in an old transistor radio.

I'll play mister-potato head with the cards from the not working channel and the working to see if I can isolate the problem areas.  Then I'll report back with more pics and questions. 
 
Tonight I got down to some experimenting, since I have one working pre-amp (meaning one main PCB and the six removable cards) I decided to check the status of all the cards from the non-working pre by swapping them one at a time.  The only card I had a problem with was the "800" card.  When I put it into the working pre I got a lower crackly output. 

676_good_board.jpg


676_bad_board.jpg


676_800_schem.png


At first I thought that c803 was backwards, but It's just the way the part was layed down.  The only difference I can see is c807 was replaced on the good card.

As a matter of course I'll replace the tantulum c807 on the bad card, but is there anything else can test for or replace?

Now for the second dilema, even if I put a set of tested cards from the working pre in the non working pre I got problems.

Before I go into that I want to test some more stuff on that main board, for now I'd like to get all the cards working.
 

Latest posts

Back
Top