


sahib
Well-known member
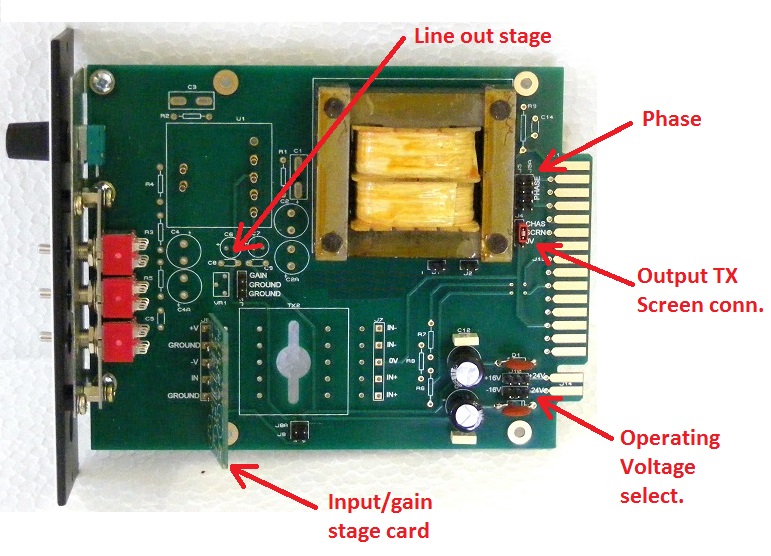
I have designed this as a multipurpose module. A few members purchased to build them as line amps for colouring. One built it as a micpre.
The module has two stages.
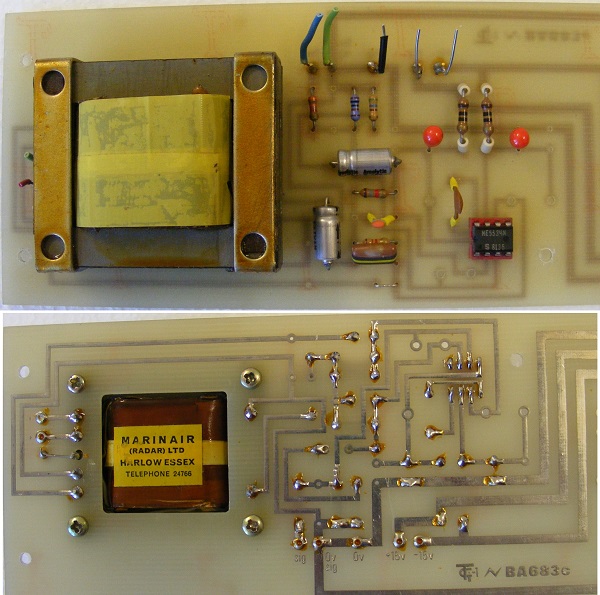
The main card is based on the Neve BA683 line output module which is based on 5534. However, I have designed the PCB also to accept DOA and included options for a variation of a non inverting stage. I will be supplying a small adapter card for 5534 if you wish to keep the original design. In which case all you have to do is to remove the components from the original board and plonk them on the new. But if you want to mix and match you then have the option of using a DOA. This is if you want to use it as a line stage for colouring.
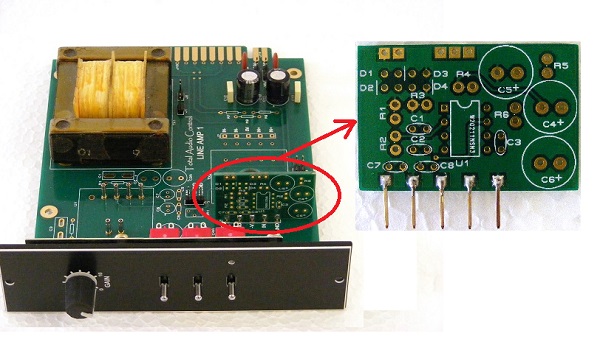
For micpre application there is the small daughter board which is based on V3 mic input stage. This is again based on 5534. This is your gain stage for the micamp.
The operating voltage can be selected between 16V and 24V through jumpers as shown. The output tx has an interwinding screen. On the original card this is tied to chassis ground but again I have made it selectable between chassis and 0V through jumpers.
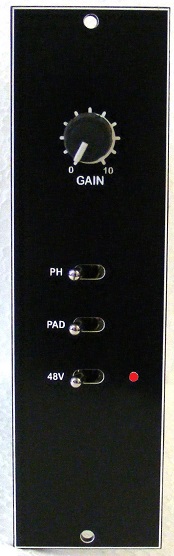
There are three DPDT toggle switches for +48, phase and pad. These are hard wired. There is also status LED for the +48V.
The input transformer foot print accepts a variety of types including Sowter. However, here is the bonanza. Member Greebok is selling original TF10014 mic input transformers. https://groupdiy.com/index.php?topic=65924.0
This effectively gives you an original vintage Neve micpre.
What you see in the pictures is what you get except the potentiometer. If you want to build the original V3 input stage you will require a 10k rev Log. I will also be supplying the full schematics and happily help you out if you need my assistance.
However, the kit includes the following;
The metal work
Main PCB
V3 input stage PCB with the components (excluding the potentiometer).
Adapter pcb for 5534 to DOA footprint (not shown in the pictures but included)
DOA pcb sockets
Single original BA 683C card with the Marinair transformer and components.
3 x DPDT toggle switch
Filter capacitors for the supply rails plus 2 x 150ma resettable fuse.
Please note that the faceplate shows the gain scaling as 1 to 10. This is what one of the members requested but I can change it to suite as it is laser engraved.
Price is GBP 200.00 plus shipping and paypal. There are 8 modules available.
Please note that I have to charge VAT on these for UK and EC member states. Rest of the world is VAT free.
The module has two stages.
The main card is based on the Neve BA683 line output module which is based on 5534. However, I have designed the PCB also to accept DOA and included options for a variation of a non inverting stage. I will be supplying a small adapter card for 5534 if you wish to keep the original design. In which case all you have to do is to remove the components from the original board and plonk them on the new. But if you want to mix and match you then have the option of using a DOA. This is if you want to use it as a line stage for colouring.
For micpre application there is the small daughter board which is based on V3 mic input stage. This is again based on 5534. This is your gain stage for the micamp.
The operating voltage can be selected between 16V and 24V through jumpers as shown. The output tx has an interwinding screen. On the original card this is tied to chassis ground but again I have made it selectable between chassis and 0V through jumpers.
There are three DPDT toggle switches for +48, phase and pad. These are hard wired. There is also status LED for the +48V.
The input transformer foot print accepts a variety of types including Sowter. However, here is the bonanza. Member Greebok is selling original TF10014 mic input transformers. https://groupdiy.com/index.php?topic=65924.0
This effectively gives you an original vintage Neve micpre.
What you see in the pictures is what you get except the potentiometer. If you want to build the original V3 input stage you will require a 10k rev Log. I will also be supplying the full schematics and happily help you out if you need my assistance.
However, the kit includes the following;
The metal work
Main PCB
V3 input stage PCB with the components (excluding the potentiometer).
Adapter pcb for 5534 to DOA footprint (not shown in the pictures but included)
DOA pcb sockets
Single original BA 683C card with the Marinair transformer and components.
3 x DPDT toggle switch
Filter capacitors for the supply rails plus 2 x 150ma resettable fuse.
Please note that the faceplate shows the gain scaling as 1 to 10. This is what one of the members requested but I can change it to suite as it is laser engraved.
Price is GBP 200.00 plus shipping and paypal. There are 8 modules available.
Please note that I have to charge VAT on these for UK and EC member states. Rest of the world is VAT free.
")
