ruffrecords
Well-known member
I am no mechanical engineer. I just spent nearly the entire evening trying to work out the correct way to assemble a modushop Pesante 2U rack box. It turns out there are quite a few wrong ways to do it and I think I found them all. Unfortunately there are no assembly instructions either supplied or on the web site. There are drawings to download from the web site but you need a program that reads dwg or dxf files and then you need to know how to interpret them. A simple exploded view in a pdf would do it for me.
So, for any other mechanically challenged engineers out there, here are the key points to successfully assembling you Pesante.
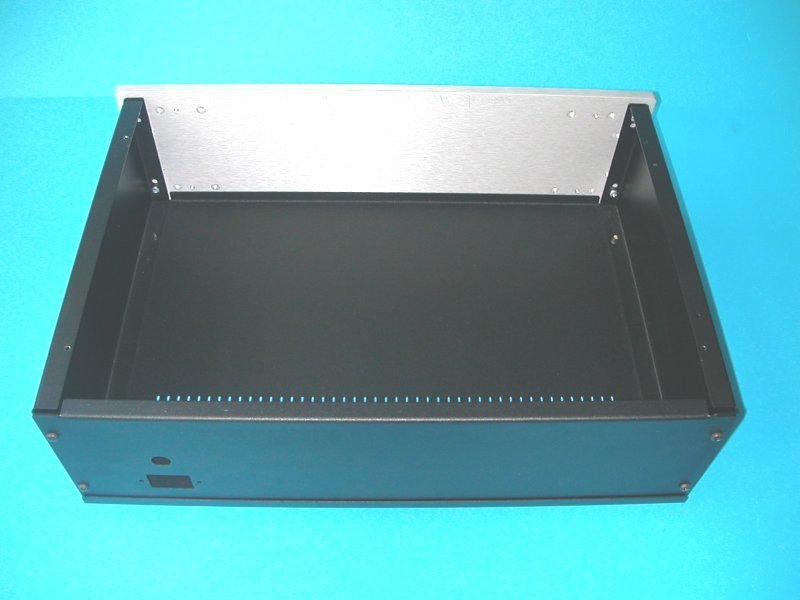
1. The rear panel mount behind the two side rails. There's a nice slot just inside the side rails that the rear panel fits neatly into and it looks really good after you do up the screws. Unfortunately this is completely wrong. The rest of the case will not assemble unless the back panel is fitted behind the side panels.
2. If you are going to used the extra punched base, then assemble it to the sides as the first job. ANd you need to take care to line up the punched holes at the edges so they mate up with the four holes in the sides. These holes take the screws that hold the bottom on and unless they are lined up you won't be able to fit the bottom last thing.
3. The top and bottom panels only fit one way round - with the vents at the rear. I ASSumed they were symmetrical but they are not. Only with the vents at the back and with the lip of the top (and bottom) behind the rear panel (which you will remember is beghind the side panels) will the top and bottom fit and its fixing holes line up with those in the sides.
4. The front lip of the top and bottom does fit in front of the ends of the side panels (the opposite of at the rear). This leave the front panel clear to mount directly to the sides at the front.
I am sure this all makes perfect sense to a mechanical engineer but to me it is nought but a headache that a single exploded view would have avoided. Hopefully the above will help others building these for the first time.
Let me say I really like modushop products. The Pesante is dirt cheap but sturdy. Although the rear panel is steel it is already punched for an IEC connector and a fuse. Most other holes are simple circles. The front panel comes in 4mm or 100mm thicknesses and they'll engrave/drill it for you from dxf files.
If you want something nearly all aluminium with an aly rear panel then the slightly more expensive Slim Line range is the one to go for. I am just about to try assembling one of those next. It looks a lot simpler to assemble as the sides are aluminium extrusions but you never know!
Cheers
Ian
So, for any other mechanically challenged engineers out there, here are the key points to successfully assembling you Pesante.
1. The rear panel mount behind the two side rails. There's a nice slot just inside the side rails that the rear panel fits neatly into and it looks really good after you do up the screws. Unfortunately this is completely wrong. The rest of the case will not assemble unless the back panel is fitted behind the side panels.
2. If you are going to used the extra punched base, then assemble it to the sides as the first job. ANd you need to take care to line up the punched holes at the edges so they mate up with the four holes in the sides. These holes take the screws that hold the bottom on and unless they are lined up you won't be able to fit the bottom last thing.
3. The top and bottom panels only fit one way round - with the vents at the rear. I ASSumed they were symmetrical but they are not. Only with the vents at the back and with the lip of the top (and bottom) behind the rear panel (which you will remember is beghind the side panels) will the top and bottom fit and its fixing holes line up with those in the sides.
4. The front lip of the top and bottom does fit in front of the ends of the side panels (the opposite of at the rear). This leave the front panel clear to mount directly to the sides at the front.
I am sure this all makes perfect sense to a mechanical engineer but to me it is nought but a headache that a single exploded view would have avoided. Hopefully the above will help others building these for the first time.
Let me say I really like modushop products. The Pesante is dirt cheap but sturdy. Although the rear panel is steel it is already punched for an IEC connector and a fuse. Most other holes are simple circles. The front panel comes in 4mm or 100mm thicknesses and they'll engrave/drill it for you from dxf files.
If you want something nearly all aluminium with an aly rear panel then the slightly more expensive Slim Line range is the one to go for. I am just about to try assembling one of those next. It looks a lot simpler to assemble as the sides are aluminium extrusions but you never know!
Cheers
Ian
")