Etching Own Face plates

GroupDIY Audio Forum

Help Support GroupDIY Audio Forum:

This site may earn a commission from merchant affiliate links, including eBay, Amazon, and others.
Ptownkid said:
I don't really see why you would want to use the brass to support everything. The best option would be to use thin brass in conjunction with an alu or steel panel behind it.

Just because of the cost factor?
 
You wouldn't need to "bond" them per se, as the pots and nuts and other misc screws and fasteners would do that for you.

@Rob, i would think that using thin brass (like the Home Depot kickplate option) and some kind backing material would be cheaper than getting brass in 1/8" or thicker...
 
My brass faceplate is cosmetic. The 2u rack I bought is black anodized aluminium and its front has two rails that the top and bottom bolt onto. So it would be difficult to replace with solid sheet metal. I haven't even costed thicker material yet although It would be nice to have a solid brass faceplate  You would definitely need thicker than 1.2mm to support the weight by the ears. I also have mounted all the pots and lorins on a piece of aluminium so that the knobs will mount flush with the brass for a better look. i.e. there's no nut in between. So in effect the front has three layers. So far it's the LED and instrument sockets holding it on. It may need gluing or some small bolts later.
I used a self adhesive book covering to block-out the back of the plate and folded it around the front a little as I had a border anyway. I also used an acid resist which is like mentholated spirit based shellac.   
 

Attachments

  • side-view.jpg
    side-view.jpg
    30.9 KB · Views: 429
I think it's the same stuff you use for etching pcb's.

I have some of that brass from Fastanal ready, need some of the other goodies to do it. I bought enough to do 2x1U and 2x2U, cost about $130.00. That 1/8" stuff is pretty heavy, I was real surprised when I picked it all up.

I'm going to send mine pre etch to Frontpanel Express to face and machine the holes.


When I used to work at heat treat shops they used to place a waxy paint on the metal (Boeing parts) to prevent coatings. I'm sure if you could find something like that that could  protect the backside and any other places you want flat with it.

I'm probably a few months out on this myself.

Kaz
 
sulpurated potash = liver of sulphur and is available as such at most craft stores

all of the rest of them you could look for the local chemicals store ( the universities have to get it from somewhere) or the science company sells it through thier website (shipping to canada and us only)

im pretty darn excited, project #1 .......fairlchild........ i would think letting the back etch a little wouldnt be the end of the world, just give it some roughness to help your adhesive grab it, im prob. going to be just using masking tape and see waht happens im going to pick up some copper while im at it and try a panel in that ( green patina all the way)
 
kazper(and anyone else), you might want to check out online metals for copper and brass, there in seattle, so you can save shipping and they do precut, im driving through town so ordered some copper and am going to pick it up direct!

ill let you know how i do, this has got me so excited im thinking about doing a steampunky diy mastering studio!
 
Here are some more etching experiments. This time using a converted computer power supply to electro etch the plate.
http://www.wikihow.com/Convert-a-Computer-ATX-Power-Supply-to-a-Lab-Power-Supply
The toner transfer method was used again and the plate was connected as the anode in a bath of saturated copper sulphate. If you’re using steel then you use ferric sulphate and I guess aluminium sulphate for aluminium although I haven’t tried it yet. The cathode was an oven shelf placed about 6cm from the plate. I used about 3V and I’m not sure how many amps but I think it was too strong as you can see areas were the stencil broke down. The etch only took 5mins. The good thing about electro etching is there in no under-cut so you can supposedly use low volts and amps and leave it going for hours for a sharp image. Also the chemicals are more environmentally and child friendly. The process leaves the sunken areas with a rough texture, which is good for holding ink. Unlike the ferric chloride. I just used felt pen.
This is some info I used for electro/galvetch:
http://www.greenart.info/galvetch/contfram.htm
I’m a bit apprehensive about throwing the switch on my G9. So coming across the “Dim Bulb tester” sounded like a good idea. The smallest font on my Dim bulb tester is 1mm high so it looks to me like pretty good resolution if there are no stencil problems.
About ¾ the way down is the Dim Bulb Tester.
http://myweb.tiscali.co.uk/nuukspot/decdun/gainclone_psu.html
Now I just have to stock up on Incandescent light bulbs before they become collector’s items. I can’t go sticking a fluro  in my funky Dim Bulb.    Maybe neon
 

Attachments

  • IMGb_4435.jpg
    IMGb_4435.jpg
    195.8 KB · Views: 280
holy sethyrish :eek:
your G9 front panel is striking, but these new panels take your equipment to a new level.
i'm very impressed by the resolution you were able to achieve on the dim bulb tester.
your bench must look like "the city of lost children". 
stunning and original (and eventhough i don't understand your pattern switch icons, they are totally original)!
regards,
grant
 
So the etched areas are the areas exposed to the solutions, and the raised areas are the ones covered, right?

What do you use for covering? Toner Transfer (for making PCBs?)

 
I'm in the process of buying pans, chemicals, gloves, funnel.... am excited to try this.

One last question.

Newsetup.jpg


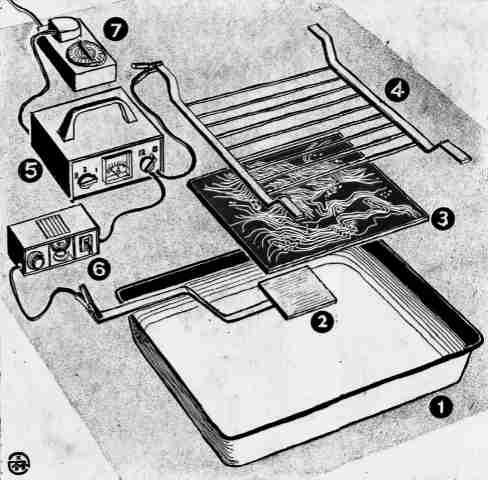
[4] Grid to form cathode; heavy copper strips silver-soldered to frame, bent to allow grid to be lowered to touch surface of electrolyte. A stainless steel grid can be used (only for cathode).

So the "panel" will be in contact with the copper plate at the bottom of the pan, and the Cathode (stainless steel, or copper strip) is just barely below the surface of the solution?

Am I understanding this right?  Is it important that the copper strip be "silver soldered".... can't use lead?
 
Back
Top