Sennheiser MD421-U still possible to repair ?

GroupDIY Audio Forum

Help Support GroupDIY Audio Forum:

This site may earn a commission from merchant affiliate links, including eBay, Amazon, and others.
I see the pics again. The diaphragm has been replaced already and glued on place. That may not be a good thing. Also the soldering lugs have been heated too much and the diaphragm ring has melted from two places because of that. The diaphragm is from MD21 and it fits of course.  All that glue is not a good thing and it makes it difficult to remove the diaphragm and coil intact. But all in all not much to loose there, so just go ahead and try to get it loose. A tiny swiss-army knife is good for that.
 
panman said:
I see the pics again. The diaphragm has been replaced already and glued on place. That may not be a good thing. Also the soldering lugs have been heated too much and the diaphragm ring has melted from two places because of that. The diaphragm is from MD21 and it fits of course.  All that glue is not a good thing and it makes it difficult to remove the diaphragm and coil intact. But all in all not much to loose there, so just go ahead and try to get it loose. A tiny swiss-army knife is good for that.

Thanks for the info - yes there is a lot of glue. I have a few days off now, so hopefully I'll be able to do some work on the microphone.
I'll keep you posted on the progress.
 
So I finally got around to try to cut the diaphragm free from the plastic, and it went pretty well. It was obvious that at least one of the connection enamel wires was broken. There was only some 2-3mm left to try to solder a piece of additional wire to.
That part did not go so well. :-( Allthough I've got a fancy, very small solderiron, I wasn't able to solder anything to the small piece of wire from the coil. It actually looked as if it melted when I tried to solder some tin to its end. I might have had the temperature set too high - i don't know. I tried to measure the resistance of the coil, connecting to the ends of the wires, but it kept being infinite, so maybe the coil itself was broken.

Here are a few pics that might help others in their quest for repairing an MD521 or MD421.


Knuddi said:
. It actually looked as if it melted when I tried to solder some tin to its end.

Dissolved, actually.

When copper is soldered,  an interface alloy of tin and copper is formed, the copper coming out from the surface. A wire that itty-bitty has nothing but surface, so it quickly dissolves. Back when I was younger, broker, had steady hands, and could actually see that mosquito-dick diameter wire, I fixed SM-57s and the like out of necessity, and that's some tiny wire. I have even unwound a turn if the broken lead was on the outside, to get enough for a few attempts. Overall, batted maybe 50%.

Best way I found, bend both wires into tiny hooks and hook them on each other, low heat, and get off quick about 1/4 second after the solder melts.  ZIT, and done.

I salute you for this undertaking. True DIY.

Gene
 
Knuddi said:
Allthough I've got a fancy, very small solderiron, I wasn't able to solder anything to the small piece of wire from the coil. It actually looked as if it melted when I tried to solder some tin to its end. I might have had the temperature set too high - i don't know.

You have to take the Enamel out of the part of the wire you wan to Tin with solder. And then probably use low temp (just enough to melt the solder) and be quick as a Ninja.

When I solder Copper wire with Enamel, if it's thicker I use the flame of a light to melt the enamel and the clean it before soldering.
But in wire as thin as that one you can't do this because it simply disintegrates.

Probably best option is to use paint Thinner to dissolve the enamel from the part of the wire you want to tin before attempting to solder.

As for the wires being small, you can probably follow Gene Pink advise and try to unwind 1 turn, then you will have more flexibility

Knuddi said:
I tried to measure the resistance of the coil, connecting to the ends of the wires, but it kept being infinite, so maybe the coil itself was broken.

Enamel isolates the contact, if you are probing on top of the enamel you will get and infinity reading , total resistance.
You need to touch the DMM probes on the copper itself, and for that you need to remove the enamel first.

Thank you so much for the pictures,
please take more during the process


Update.
I managed to solder two small pieces of enamal coated wire (0.056mm diamere) to the two broken ends of the coil wires.
At my job I managed to do it under a microscope, so I am not able to post any pictures of the process.
I tinned the end of two small pieces of wire, with a solder temperature of 350degC, which also melted the enamel off the wires.
The wires coming from the coil I managed to do the same with, but with a solder temperature as low as 250degC.
After doing that I made a small hook on each wire (as Gene suggested), hooked the wires together.
Still having the solder temperature at 250degC, I melted a little tin on the tip of the solderiron and quickly touched the "hookjoint", which then was soldered together. (Had to do it twice because I wasn't carefull enough)
Now I have to assemble the complete microphone again, starting with the hum cancelling coil on top of the diaphragm.
But compared to the latest task, that'll be a walk in the park. :)
 
Knuddi said:
Yes, the DC resistance measures some 210ohm. :)

So that's pretty good, that's the value you suppose to have in an working 421. 
Just be aware you can have that measurement but still have a lack of low end response, a common problem in vintage 421 mics.

I wish you will be able to repair it, you're doing a great job.

Does anyone know wich type of glue should be used to re-glue the diaphragm?
 
Whoops said:
Does anyone know wich type of glue should be used to re-glue the diaphragm?

I don't know the exact glue to use. I used small drops of silicone glue (Dow Corning 3140)  to glue the red diaphragm fixation ring to the black plastic base, while pressing the diaphragm firmly to the plastic base. (By means of a metal tube with the correct diameter.)
 
CORRECTION - I realized that the diphragm might need to be completely airtight glued to the base, so I have glued the red ring completely to the plastic base afterwards.
 
I finally got the time to do the last piece of work - reassembling the microphone.
First I had to glue some bits and pieces back to the body of the microphone handle, which I think had been dropped to the floor.
The end result is, what I think and hear, a  fine vintage microphone. (allthough not fine in the visual sense.  :) )
 
Really nice work Knuddi,
and thanks for you thread.

I dismantled today also an 521 diaphgram with the help of this thread.
One of the coil wires was broken.

There was no space in the wire left to solder another wire there, so I tried to take 1 turn from the coil.
Well it broke easilly. It's really hard to unturn this wire from the coil.

I will try with donor capsules just for fun and practice.

Does anyone know what is the type of glue Sennheiser used it in the capsules diaphgram?
or what could be a nice glue for this task?

The Glue used by Seenheiser seems similar to Contact Glue, but it's transparent ans seems to have more flexibility and thickness

thanks
 
I would guess 90% of the broken MD421 are due to the problems in the diaphragm. 

Possible and normal diaphragm problems in these mics:

- Diaphragm has metal dust or metal particles on top
- Diaphragm has unglued itself on the sides/extremities
- One end or both ends of coil wire (glued to diaphragm) are broken
- Diaphragm is ripped, has holes or it's scratched
- Voice Coil unglued from the diaphragm
- Diaphragm is ripped were the voice coil is glued

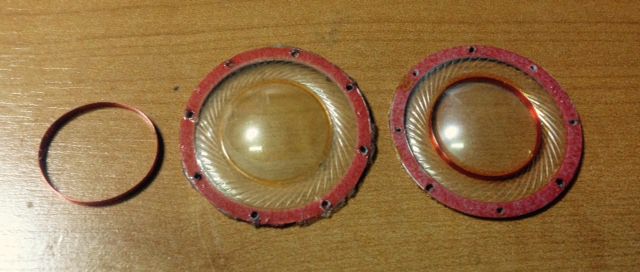
Most people think it's normally a problem in the capsule, but actually the capsule is quite sturdy, the problem lies normally in just one part of the capsule that is the "diaphragm with the small coil"

T5FW8Zk.jpg


If we could just get replacement diaphragms for these mics (the voice coil wires with a nice length for soldering) we could probably easily repair most of 421/521 microphones, being it vintage or modern ones.

It let me to start thinking how could we get new replacement diaphragms.
The most easy one would be if Sennheiser sold the diaphragm only has a repair part, but they will not do it because the company doesn't have any interest in people repairing their 40 and 30 years old mics, they want people to buy their new mics.

Another option, and that we would need a lot of luck, was to know or meet someone that works in the current factory (best even if it was in the assembly line) that does the modern 421 capsules, and that person would get us 50 to 100 diaphragms from the factory before they were glued to the capsules. (The unity cost of one of this diaphragm at the factory is completely marginal off course 100 is not, but still not expensive)
That would be possible if we knew someone there, but it's just an imagination at the moment.

The Last option, and actually I think is viable, is to find a factory that produces OEM dynamic capsules diaphragms, I would imagine nowadays it must be somewhere in China, and ask them a quote to reproduce this diaphragm. I guess we would need to order a high quantity but it's totally possible as this diaphragm is quite simple.

Does anyone around here have contacts of OEM dynamic capsule/diaphragm factories or companies in China?

Give me your thoughts

Thank you


It would be too dificult to DIY a new diaphragm?

If we get the correct material, an old diaphragm for the mould , dentist have good materials for casting and a vacuum table. It should be possible  to reproduce it.

The coil present other problems but is should possible to make it too.

Shure have a documentary of the Elvis microphone they show the prototypes and they look awful. They use aluminium foil for the first ones.
 
12afael said:
It would be too dificult to DIY a new diaphragm?

If we get the correct material, an old diaphragm for the mould , dentist have good materials for casting and a vacuum table. It should be possible  to reproduce it.

The coil present other problems but is should possible to make it too.

Shure have a documentary of the Elvis microphone they show the prototypes and they look awful. They use aluminium foil for the first ones.

The materials are so fragile and also the Coil that I really think it's not doable to DIY.
Specially also when similar Diaphragms are still produced in factories, I really think placing an order in a diaphragm factory would be the best way

thanks
 
Very interesting thread, and something I am looking into right now as I have two 421's with broken voice coils...

Has anyone contacted Sennheiser to ask about diaphragms? I am going to do it now, all they can say is no I guess :)

The other question is, were replacement diaphragms ever available in the long life of say the MD421? With the OP's mic the diaphragm had been replaced already am I right? So that means the person must have gotten a diaphragm from somewhere. Or maybe they were just regluing the original one due to lack of bass....?
 
vinyvamos said:
Very interesting thread, and something I am looking into right now as I have two 421's with broken voice coils...

Has anyone contacted Sennheiser to ask about diaphragms? I am going to do it now, all they can say is no I guess :)

I don't know, but I find it hard they will sell diaphragm for dynamic mics.
It doesn't hurt to ask for sure


vinyvamos said:
The other question is, were replacement diaphragms ever available in the long life of say the MD421?

I don't think so

vinyvamos said:
With the OP's mic the diaphragm had been replaced already am I right? So that means the person must have gotten a diaphragm from somewhere. Or maybe they were just regluing the original one due to lack of bass....?

I think the OP re-glued the original diaphragm

The only way at the moment to get a replacement diaphragm is from a donor microphone. Normally a cheaper mic from sennheiser that has a cheaper capsule but a similar/same size diaphragm
 
Back
Top