Neve Transformer Surgery?

GroupDIY Audio Forum

Help Support GroupDIY Audio Forum:

This site may earn a commission from merchant affiliate links, including eBay, Amazon, and others.

KDE

Well-known member
Joined
Aug 12, 2010
Messages
124
Location
LA
This is more of an ethics question really. But anyways i am a 500 series nut and pretty much i am in the process of tossing all my 19" rack gear for 500 modules. Anyways my idea was to make a minimal compromise vintage 500 series 1073/1290 Mic pre using David's NV73 kit. I've run into the most basic of issues is that the Marinair 1166 is alittle to fat on its board to fit the 500 series format in its current condition. I would need to sand down the board of the 1166 which would be a lot more work than it looks like in the pic. Also would possibly need to Modify the L Braket to be empty in the are where the 1166 legs are so nothing shorts. My question is very basic am i going over board with all this scheming or should i just stick to using some carnhills and call it a day? Put the vintage stuff toward something rack mounted?

l262.jpg


k5wj.jpg


jrzq.jpg


f6ng.jpg


Yes.  You answered your own question in the last two sentences.  If you can cut the board on the 1166, go ahead.  It's not sacrelidge.  On the other hand, if you can put a Carnhill in there with more grace and ease, why not do it?  I don't think you'll notice any difference.  Save the vintage stuff for another project.  Or sell it - it's getting very high prices these days.  You appear to have quite a collection of the oldies.  (If you don't plan to use them, I'd sell them.)
 
Shouldn't be hard to trim them down. If you plan it out...and go slow, it should turn out nicely!

Nice stuff btw... I respect someone that's willing to go the distance, to get what they want.

..and +, but not that big of a deal...value of the 500 module will certainly increase.
 
desol said:
Shouldn't be hard to trim them down. If you plan it out...and go slow, it should turn out nicely!

Nice stuff btw... I respect someone that's willing to go the distance, to get what they want.

..and +, but not that big of a deal...value of the 500 module will certainly increase.

My plan so far is to go ahead with the surgery. I am still waiting on a response from David as i am trying to get all the docs for the L-Bracket so i can have some new ones made. If he doesn't want to give it up then i might just have to go the 19" rack option.
 
Either way, I'm sure you'll be able to get em in there.  ;)

Dremel, file, hacksaw....blowtorch.  ;D

Just be conscious of epoxied windings  that exit the coil, and come out up through the termination plate. They're easy to break...but difficult to fix.
I know, I've had to dig out the epoxy, find the little broken winding and reconnect it up through the termination plate on one of my 1166's.

Worked well after that!
 
desol said:
Just be conscious of epoxied windings  that exit the coil, and come out up through the termination plate. They're easy to break...but difficult to fix.
I know, I've had to dig out the epoxy, find the little broken winding and reconnect it up through the termination plate on one of my 1166's.

Jeez don't scare me. I was really confident about going to the operating table before!
 
i would ditch the board, splice the xfmr to run at the Z that you want on pri and sec,

and then attach flying leads and shrink wrap to your 2 pri and sec leads,

this way you upgrade any terminations that are ready to snap,

and you then have tons of room,

scrape the insl off the wires with a razor blade being careful not to stress the leads,

if you do hack the board, be careful as that board material is nasty stuff to breathe if you grind it,


CJ said:
i would ditch the board, splice the xfmr to run at the Z that you want on pri and sec,

and then attach flying leads and shrink wrap to your 2 pri and sec leads,

this way you upgrade any terminations that are ready to snap,

and you then have tons of room,

scrape the insl off the wires with a razor blade being careful not to stress the leads,

if you do hack the board, be careful as that board material is nasty stuff to breathe if you grind it,

Thanks for your insight but i ended up going the original route and after a long recovery time the poor 1166s came out of surgery looking better than ever. Also got my metal work done just need to get the faceplate colored and screened. The metal work was done with all stainless steel since it looked nicer and was stronger than the aluminum. Also picked up some 70's Neve transistors to go with the build. 2N3055, BC109C, BC107, and BC184C's.  Pics for you guys.

5o3k.jpg


8f93.jpg


e0m3.jpg


ooaz.jpg


r1qq.jpg


Nice transistors.  Where did you get them?  The Motorolas look vintage and the right ones.  Is the 107 another 184 substitute?  Have you tried them?  That's a nice bag of 109c's.  Where did you get all the small ones, they are so hard to find.  Where did you get the Motos?

Good job cutting the transformers.
 
tommypiper said:
Nice transistors.  Where did you get them?  The Motorolas look vintage and the right ones.  Is the 107 another 184 substitute?  Have you tried them?  That's a nice bag of 109c's.  Where did you get all the small ones, they are so hard to find.  Where did you get the Motos?

Good job cutting the transformers.

Nope the BC 107 was used in conjunction with the 109C on the BA283 and BA183. They were used together or not at all and replaced both with 184Cs which is what people are used to seeing on all the clones. The truth is that a lot of older Neves use the 107 and 109C combo and no 184Cs at all. You can see what im talking about below
Neve BA283 preamp section variations
neve_b2.gif

Original Neve Pre Amp Component Variations to this circuit
C1 = 6.8uF or 10uF or 22uF Tag Tantalum Capacitor
C2 = 100pF Polystyrene Capacitor
C3 = 1000pF or 1200pF or 1500pF Polystyrene Capacitor
C4 = 680pF Polystyrene Capacitor
C5 = 22uF 25v to 63v Electro Capacitor
C6 = 125uF  to 150uF 4v Electro Capacitor
C7 = 22uF 16v Tag Tantalum Capacitor
C8 = 22uF 16v Tag Tantalum Capacitor
C9 = 400uF 4v Electro Capacitor
C26 = 1000pF Polystyrene Capacitor
T1 = BC109 or BC184C picked for gain higher than 600 to minimise input noise
(BC109 = BC549C)
T2 = BC107 or BC184C (BC107 = BC547)
T3 = BC107 or BC184C (BC107 = BC547)


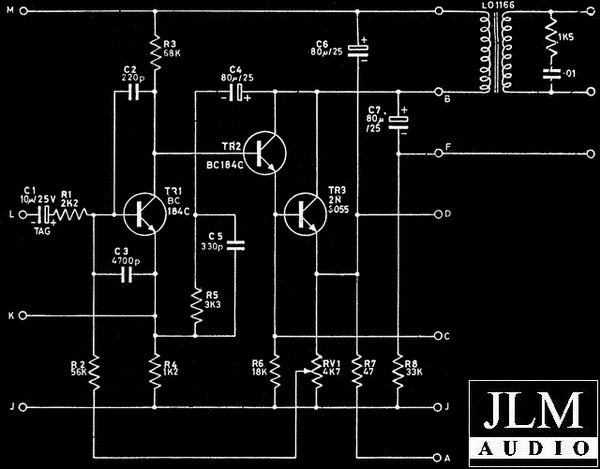
Neve BA283 Output Stage section
neve_b2.gif

Original Neve Output Component Variations to this circuit
C1 = 10uF or 22uF Tag Tantalum Capacitor
C2 = 220pF Polystyrene Capacitor
C3 = 4700pF Polystyrene Capacitor
C4 = 80uF or 100uF 25v Electro Capacitor
C5 = 330pF Polystyrene Capacitor
C6 = 80uF or 100uF 25v Electro Capacitor
C7 = 80uF or 100uF 25v Electro Capacitor
T1 = BC109 or BC184C picked for gain higher than 600 to minimise input noise
(BC109 =  BC549C)
T2 = BC107 or BC184C (BC107 =  BC547)
T3 = 2N3055
 
tommypiper said:
Nice transistors.  Where did you get them?  The Motorolas look vintage and the right ones.  Is the 107 another 184 substitute?  Have you tried them?  That's a nice bag of 109c's.  Where did you get all the small ones, they are so hard to find.  Where did you get the Motos?

Good job cutting the transformers.

Funny you asked i've been pulling the 2N3055's from anywhere and everywhere. I went as far as building a time machine and went back and tore them out of Rupert's hands himself  ;D. The other day I was ripping them off a old Atari Arcade machine's power supply. Im a purist when it comes to this Neve stuff so im trying to get it all correct on these builds.
qjap.jpg
 
KDE said:
Thanks for your insight but i ended up going the original route and after a long recovery time the poor 1166s came out of surgery looking better than ever. Also got my metal work done just need to get the faceplate colored and screened. The metal work was done with all stainless steel since it looked nicer and was stronger than the aluminum. Also picked up some 70's Neve transistors to go with the build. 2N3055, BC109C, BC107, and BC184C's.  Pics for you guys.

Nice job. Done deal...

I could use a few of those round 10468's. If you have any more kickin around... ;)
 
tommypiper said:
tommypiper said:
Where did you get them? ...  Where did you get all the small ones, they are so hard to find. 
I got the 109C's from Price Lynx but i bought them all out of Motorola brand ones.
http://www.pricelynx.com/

The 2n3055's from Ebay but the vintage 70s rarely show up unfortunately. Your best bet are to look up old power supplies because thats what the 2n3055's were used for and steal them off that like i did.

You can use the ST Micro's though and AMS Neve uses ST Micro for transistors today. ST Micro is the brand the bought out New Market Transistors which were used in a lot of the old neves if Motorola's were not used. Although there has been some testing as well as debate on this forum about how ST Micro transistors consistently under preform for audio circuit use. You need transistors with high gain mentioned by JLM and the ST stuff tends not to do very well in that department so I would buy a bunch of them an sort out the bad ones.

desol said:
KDE said:
Thanks for your insight but i ended up going the original route and after a long recovery time the poor 1166s came out of surgery looking better than ever. Also got my metal work done just need to get the faceplate colored and screened. The metal work was done with all stainless steel since it looked nicer and was stronger than the aluminum. Also picked up some 70's Neve transistors to go with the build. 2N3055, BC109C, BC107, and BC184C's.  Pics for you guys.

Nice job. Done deal...

I could use a few of those round 10468's. If you have any more kickin around... ;)
If you got a yellow sticker Marinair like i have in my picture i'll trade 1 for 1 for that round fatty. My yellow sticker is still looking for his twin brother lol
 
KDE said:
Nope the BC 107 was used in conjunction with the 109C on the BA283 and BA183. They were used together or not at all and replaced both with 184Cs which is what people are used to seeing on all the clones. The truth is that a lot of older Neves use the 107 and 109C combo and no 184Cs at all.

Interesting.  I've never heard of this before.  Have you actually seen these parts in old BA283 and BA183 cards?  Original condition, not repaired or modded?  What evidence do you have?  (I'm not questioning your honesty -- just wondering where this info comes from.)  Have you ever seen those parts on an original schematic?  It's very possible they used 107 & 109s as substitutes or equals, or the supplier gave them a batch of those instead of 184s as subs -- etc.  Many possibilities there to explain why they may have shown up in originals, or repaired, or modded originals.  But I've never seen them spec'd as the original design.  Are you just quoting Joe Malone or is there other info?
 
tommypiper said:
KDE said:
Nope the BC 107 was used in conjunction with the 109C on the BA283 and BA183. They were used together or not at all and replaced both with 184Cs which is what people are used to seeing on all the clones. The truth is that a lot of older Neves use the 107 and 109C combo and no 184Cs at all.

Interesting.  I've never heard of this before.  Have you actually seen these parts in old BA283 and BA183 cards?  Original condition, not repaired or modded?  What evidence do you have?  (I'm not questioning your honesty -- just wondering where this info comes from.)  Have you ever seen those parts on an original schematic?  It's very possible they used 107 & 109s as substitutes or equals, or the supplier gave them a batch of those instead of 184s as subs -- etc.  Many possibilities there to explain why they may have shown up in originals, or repaired, or modded originals.  But I've never seen them spec'd as the original design.  Are you just quoting Joe Malone or is there other info?

My friend this is not an urban myth just ask anyone who know techs Neves. They are original transistors used by the original factory to original Neve specs. I posted that from Joe Malone because he ended up documenting their places in the circuit very well. But as stated this is not some ponzi scheme lol. They are the older metal head transistors that Neve used in their original builds. The 184c shows up in much of the documentation which is why all these cloners have over looked the metal heads. But truth is Neve used all of them. From my own study of old Neve's i've found the early 70s and 1960s modules (if not replaced) have the 109c and 107 combo while the later batches were almost all 184cs. Which leads me to think they were original original transistors. Which is why i am going the 109c and 107 rout for my build. But hey i know you were asking for some evidence and so here is a BA183 card from one of my early 1272s with the metal heads i speak of. They are definitely original and look as old as the old school New Market 2n3055. Obviously the card has been recapped but everything else on the card is original. But anyways just give any of the older neve heads a email like Geoff Tanner, Joe Malone, ect... If i come across other info ill post it but it outs there and ive seen it before and joe's is the only one mentioning this.

0bun.jpg


0r68.jpg


w4d9.jpg


wuia.jpg

 
Thanks.  Nice pics.  Yes, as I wrote, I can imagine many possibilities to explain those transistors on early amp cards.  And in that sense, one can consider them "original" I'm sure.  I guess that's what it boils down to: what is one's definition of "original?"  I'm sure they work great and sound great.  So the discussion becomes a bit philosophical, academic and historical, really.

However.  Bottom line is my question: if they are indeed the original spec'd parts, then why aren't they in the original documentation and schematics?

Maybe they are?  Have we looked at all the historical Neve schematics in the post-germanium period? That would be interesting.
 
Yep, pretty sure that's normal. When I did my build I was looking for those older transistors (107/109), but they
were hard to find in large numbers...so i went the bc184 route. I think I did get some bc107's...which had
lower hfe values. Not sure how much of a sound difference it makes. Maybe a little more distortion on the older units.
 
Back
Top