Stripped down transformerless 1176 workalike project

GroupDIY Audio Forum

Help Support GroupDIY Audio Forum:

This site may earn a commission from merchant affiliate links, including eBay, Amazon, and others.

Would you be interested in building something like this?

  • Yes

    Votes: 67 97.1%
  • No

    Votes: 2 2.9%

  • Total voters
    69

grrrunge

Well-known member
Joined
Nov 8, 2012
Messages
61
Location
CPH, DK
I really dig the 1176's compression on drums, so I'm considering building enough of those to use them on every drum channel and -bus across the board. A typical session for me would then require 17 comps strapped across 4 stereo busses and 9 mono tracks.

I'm well aware that output transformers are the best and easiest way to add differential output, and come with an added sonic bonus in terms of harmonic distortion, LF saturation, funny gain/phase relationships and whatnot. The fact that they also cost quite a bit of money is enough for me to rule them out for now.

I also find that i rarely use metering besides the mixers meterbridge, so i  could do away with those as well.

The goal of this project is to get as many compressors as possible - I'm thinking 6 or preferably 8 - into a 3 unit rack enclosure, in the cheapest manner possible.
All pots and switches should be board mounted to keep the wirejob to a minimum.

With the two most expensive parts of the circuit gone, my calculations say that I'll be able to build these for about $10-$12 per comp, including professional PCB manufacturing but excluding power supply circuitry.

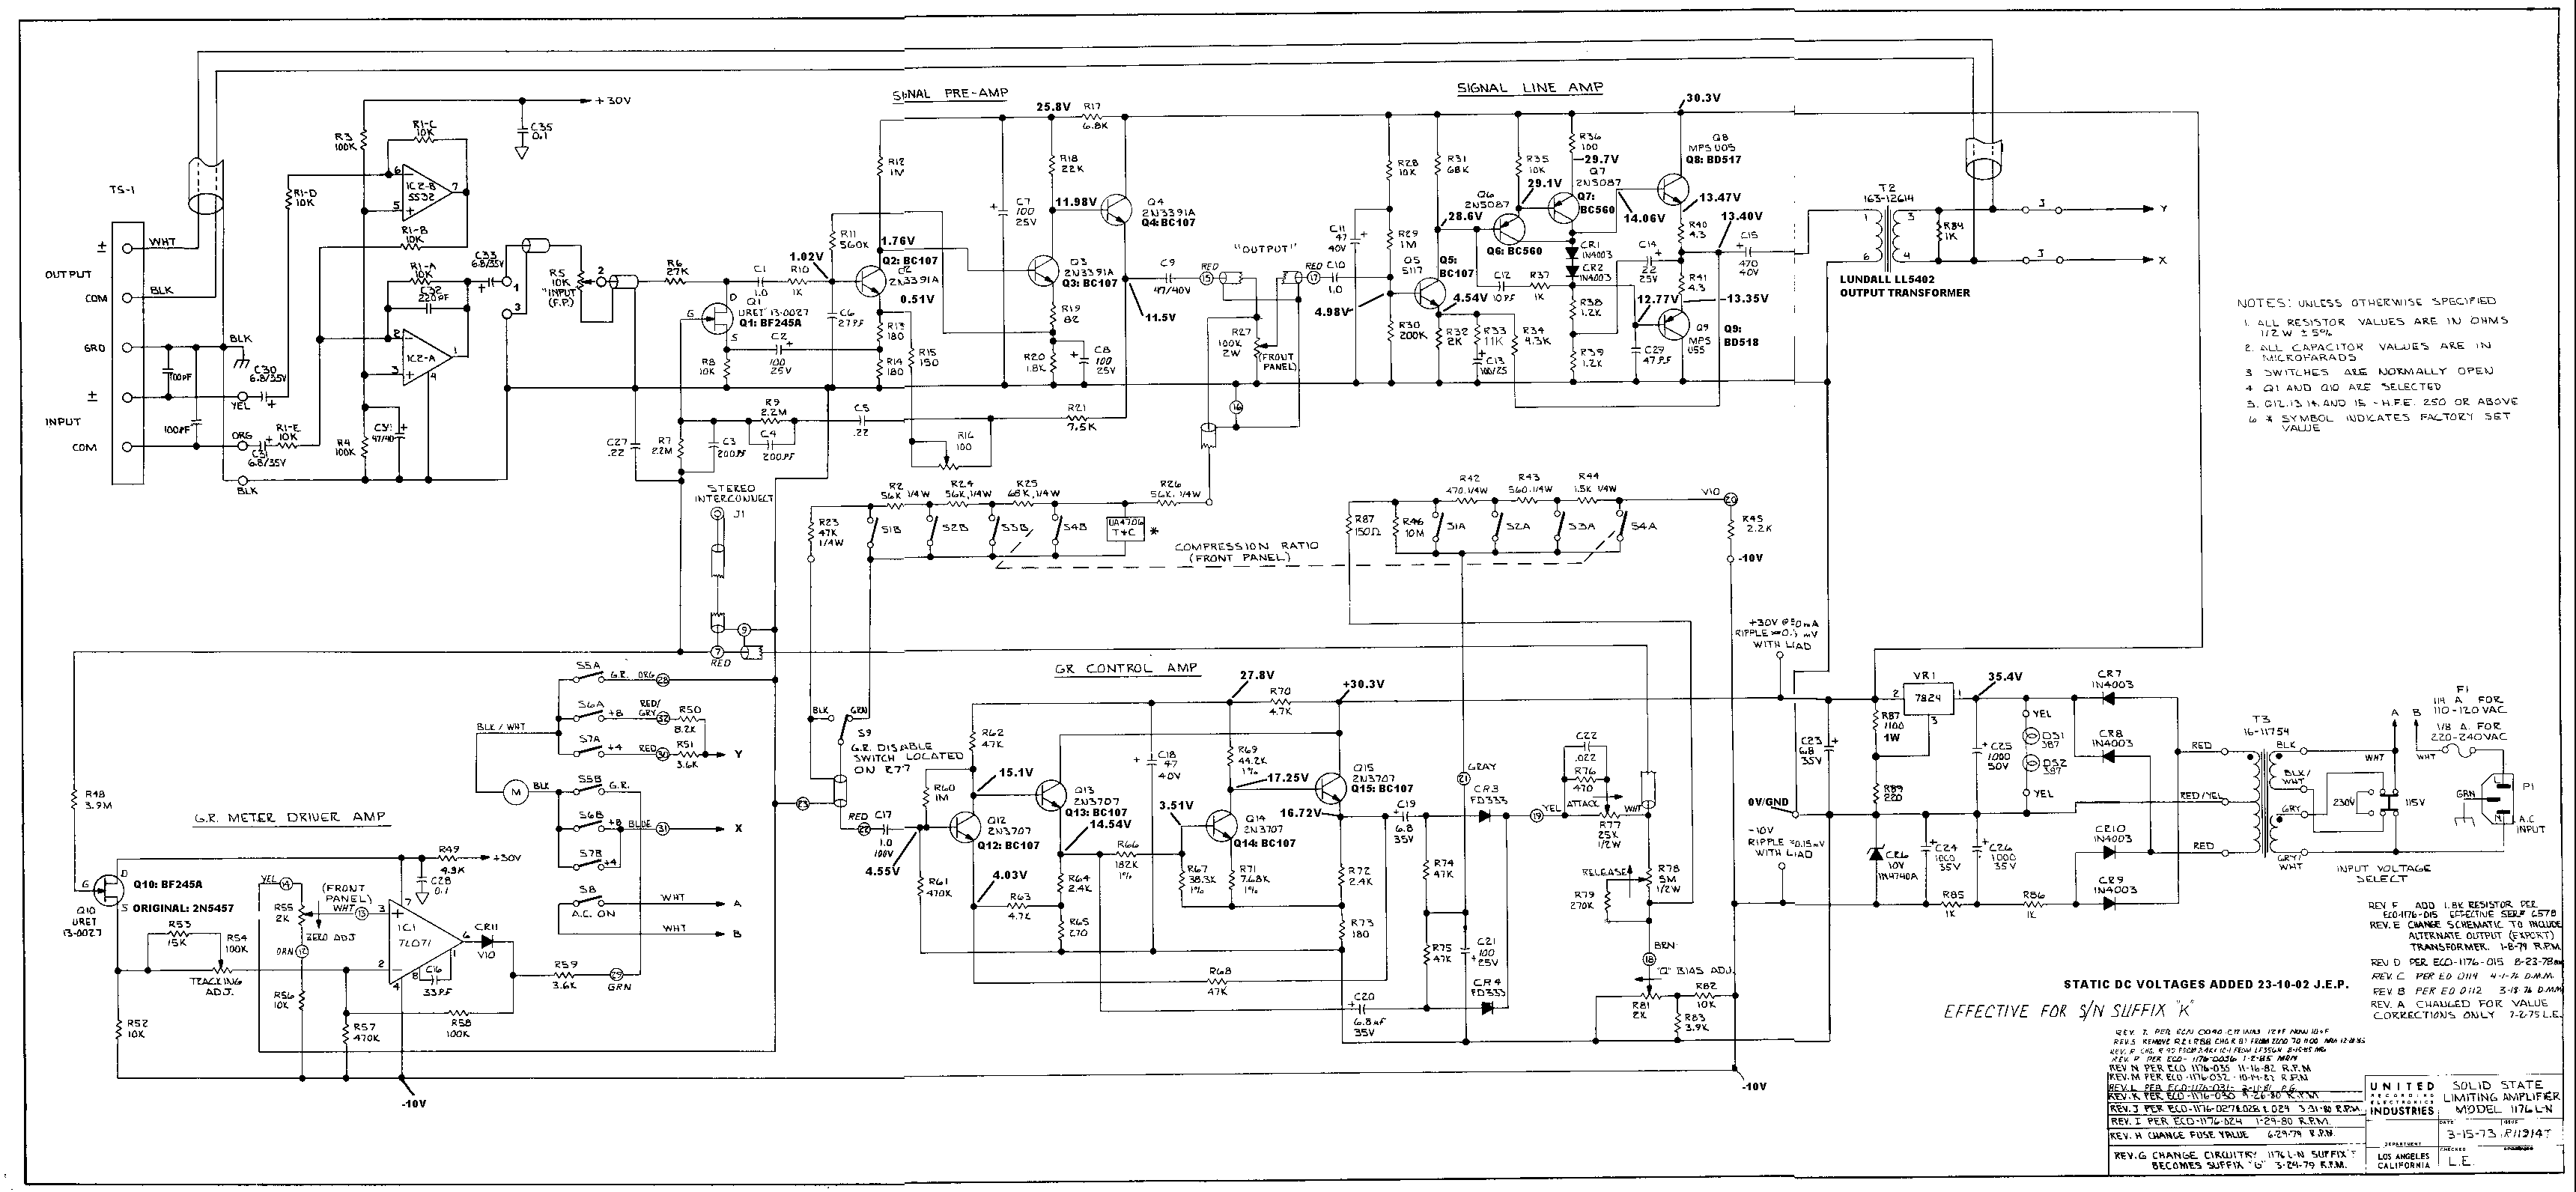
And now for the fun part. I'll start with Gyraf's 1176 project, and strip down from there :)

Since the input is debalanced via op-amps, there's no reason why the output couldn't be rebalanced with op-amps. Essentially the last part of the circuit is just an amplifier with a gain of roughly 11dB and enough power to drive the output transformer.

Since the transformer is long gone, I'd figure I might as well replace the output amplifier circuit with op-amp based circuitry for the sake of simplicity.
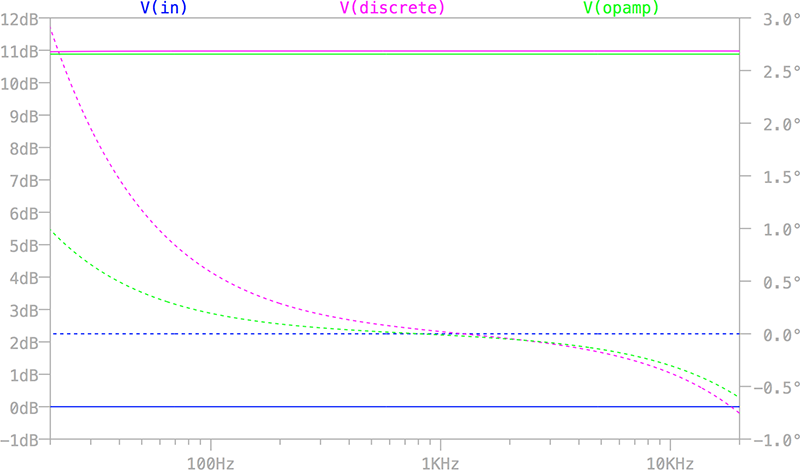
Simulations show that both circuits behave very linear from about 100Hz and well into MHz territory. For low frequencies the op-amp stage replacing the discrete output has even wider bandwidth and with that less phase change in the lowest audible frequencies - just about 1° at 20Hz compared to 3° at 20Hz with the discrete output stage.

With the input- and output circuitry taken care of, there's just the discrete GR-amplifier and input preamp circuits left, which will remain (relatively) untouched.

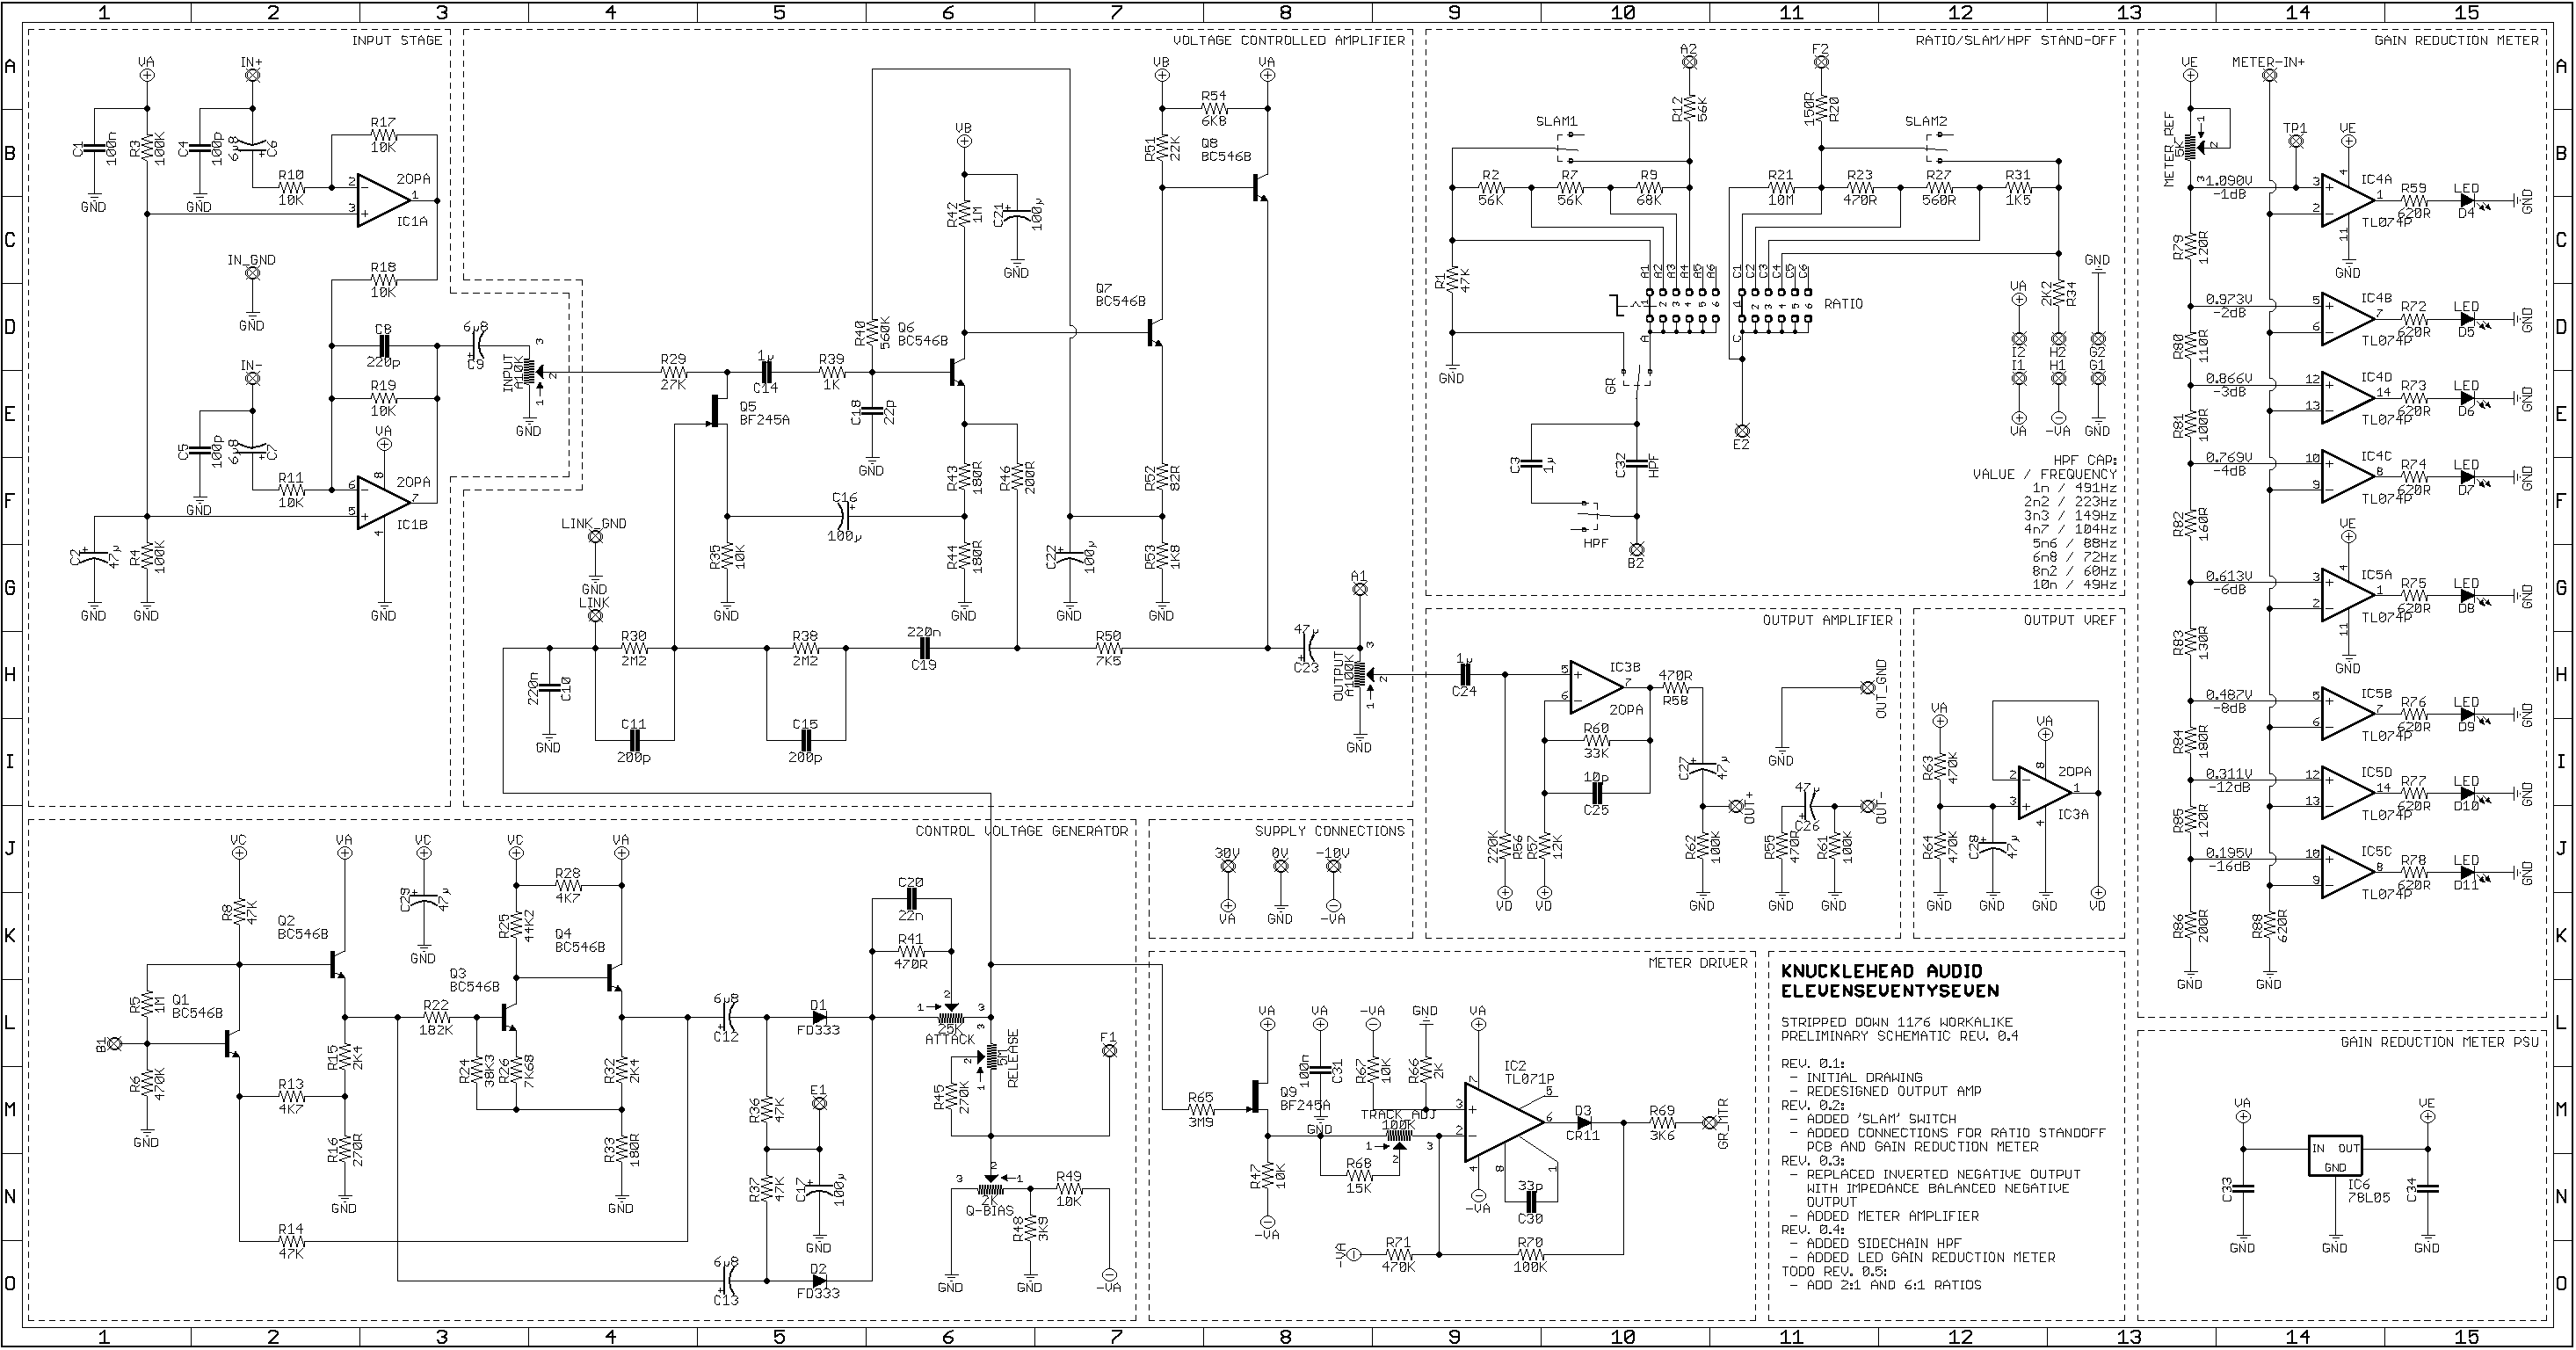
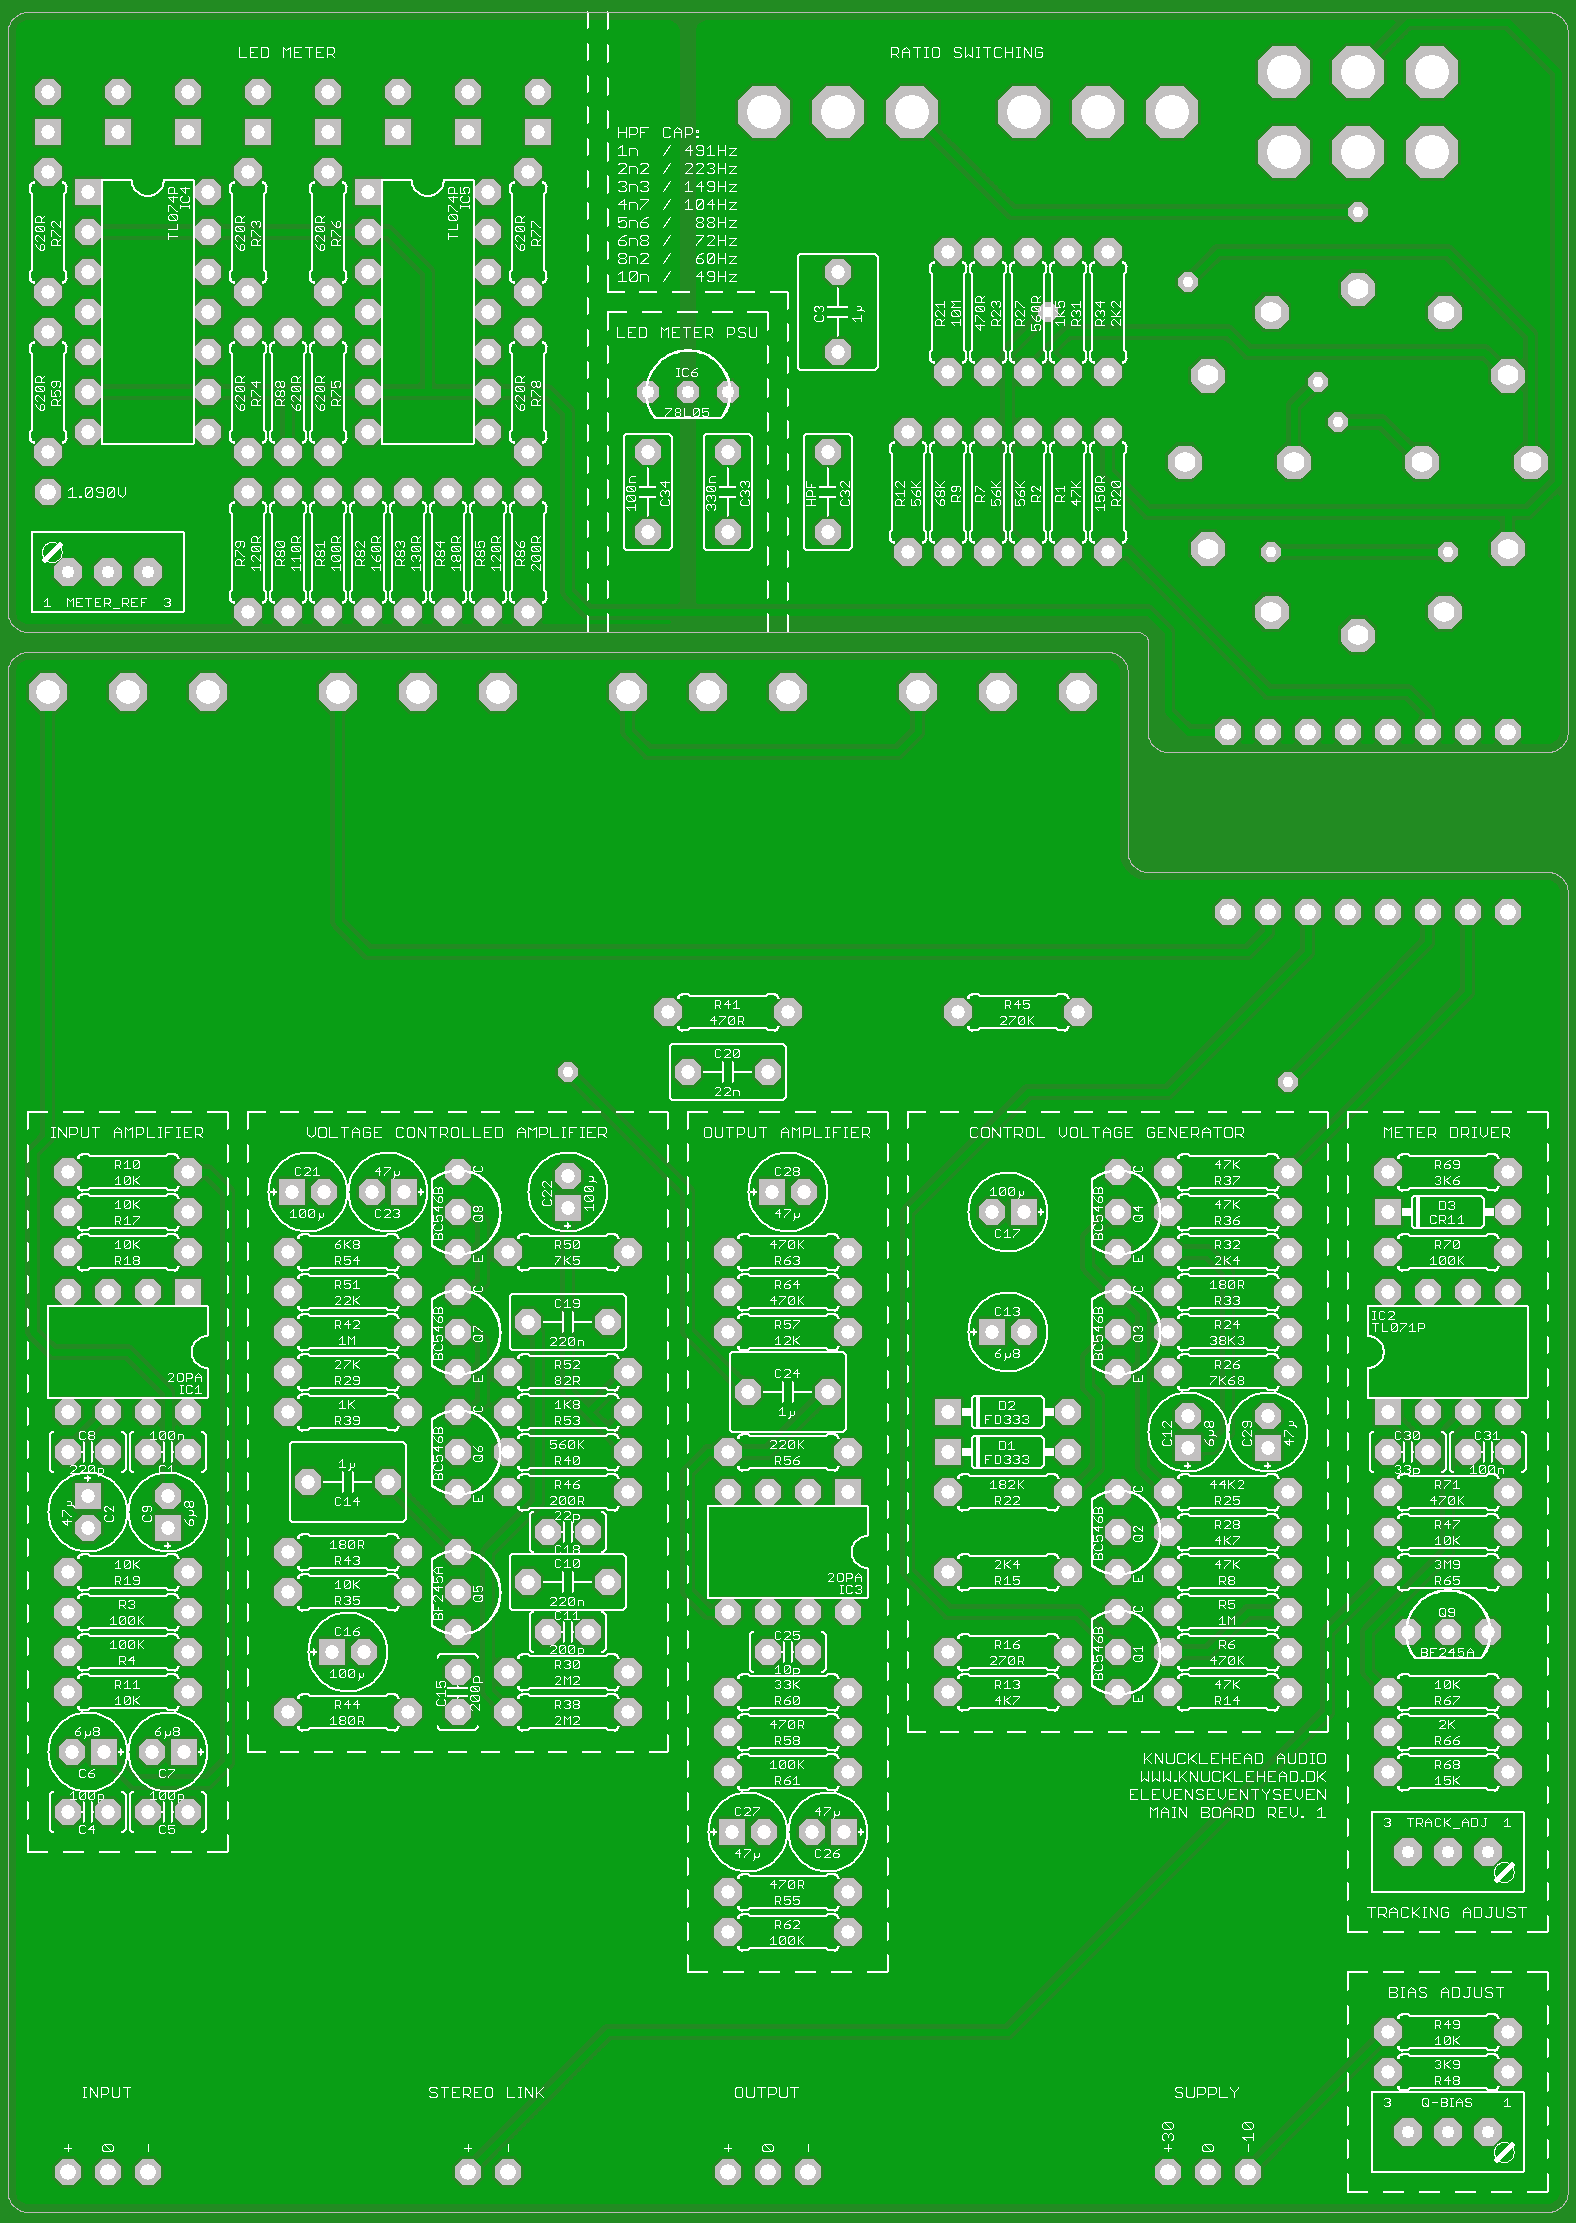
Here's the gain/phase plots from LTspice along with gyrafs schematic and my work in progress. Let me know if your eyes catch anything suspicious. Any thoughts and help is greatly appreciated!

/Hans

Output amp gain/phase @ 0Hz-10MHz:
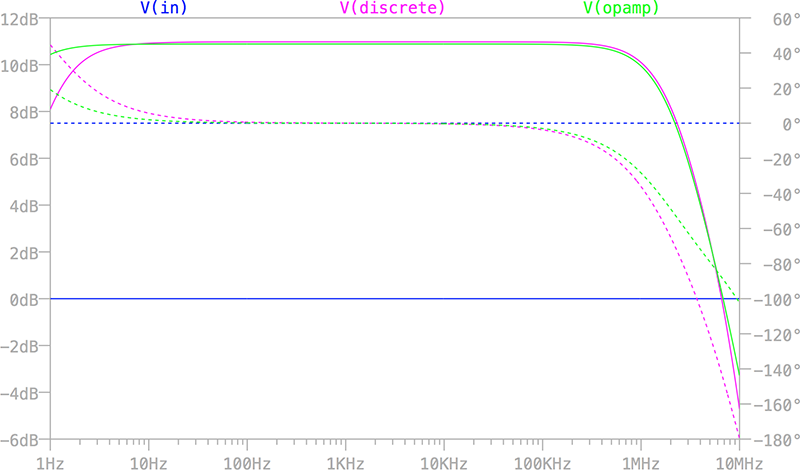
1176_output_gain_phase.png


Output amp gain/phase @ 20Hz-20KHz:
1176_output_audible_gain_phase.png


Original schematic:
1176sch.gif


Working schematic in progress:
1176schem.png


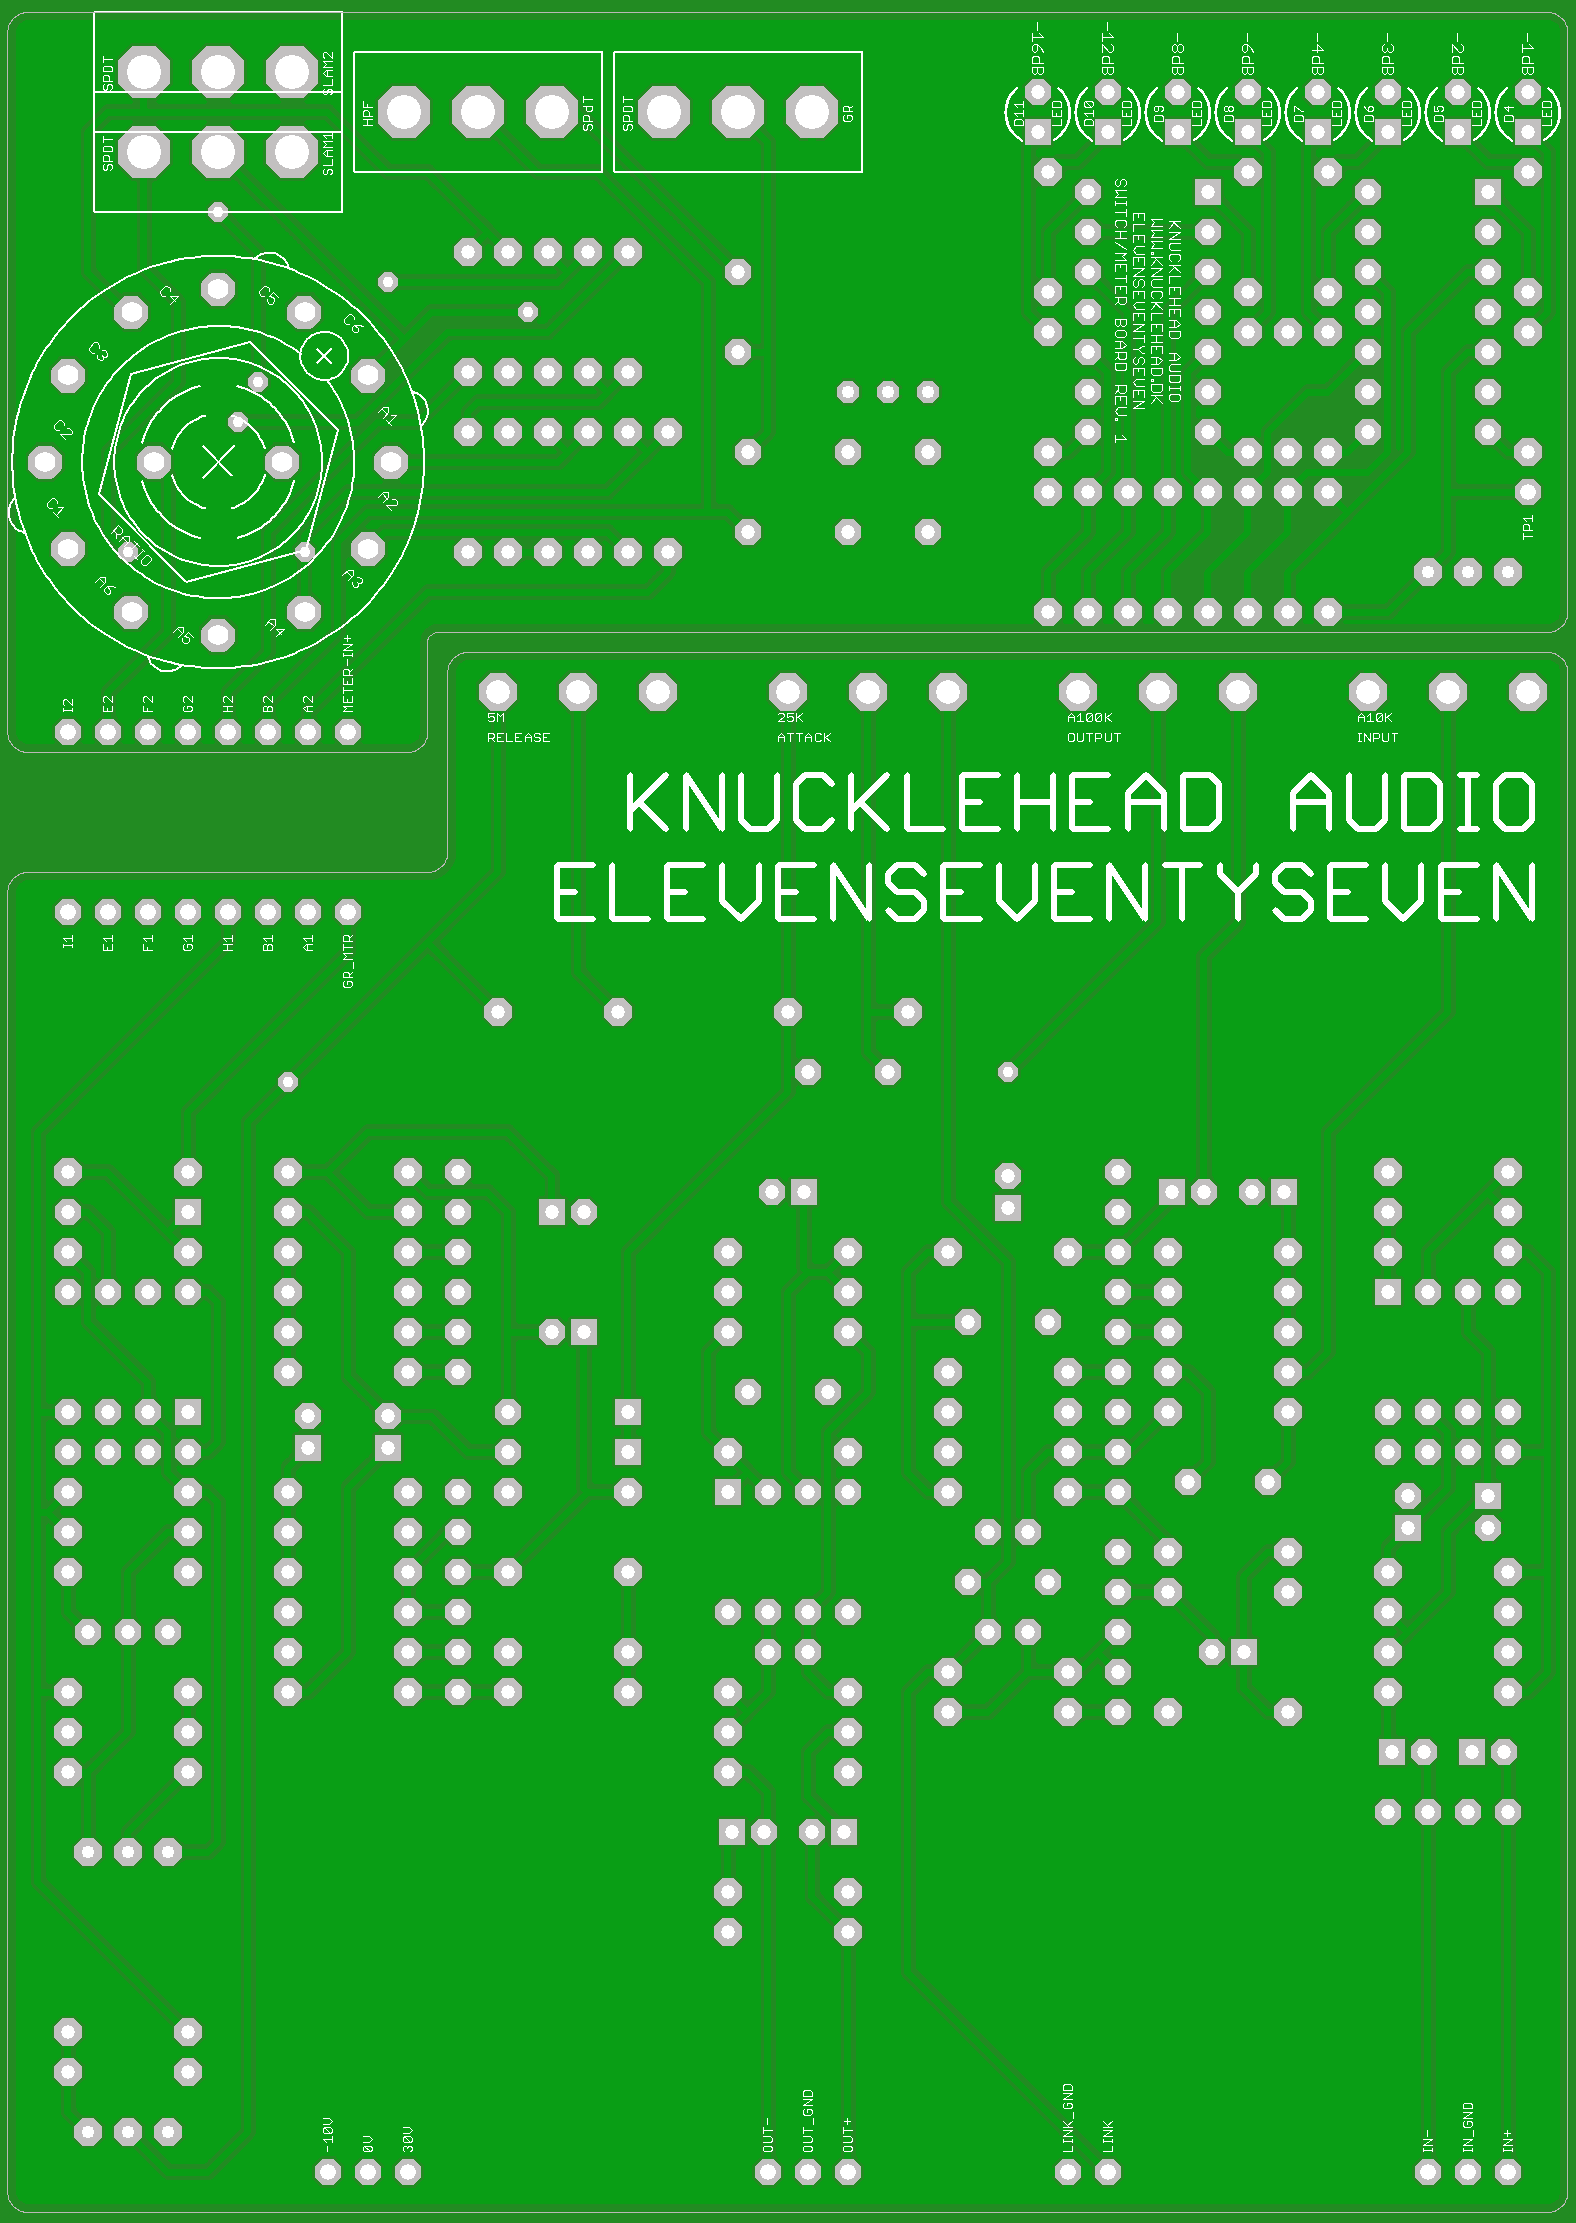
Boards top:
1177_top.png


Boards bottom:
1177_bottom.png
 
Sounds like a great idea. I'd build one!

You could use THAT chips for differential input & output. If there's room on the board I would suggest leaving a footprint for a transformer "just in case"

I only ever use the meter on GR but would be a bit lost without one

How are you going to configure the stereo link? It might be interesting to see what happens if all the comps are linked to some degree when recording drums

Maybe add a really vicious low-pass filter to stop cymbals from compressing the kit, and a subtler high-pass filter to stop the kick & toms doing the same?

Nick Froome
 
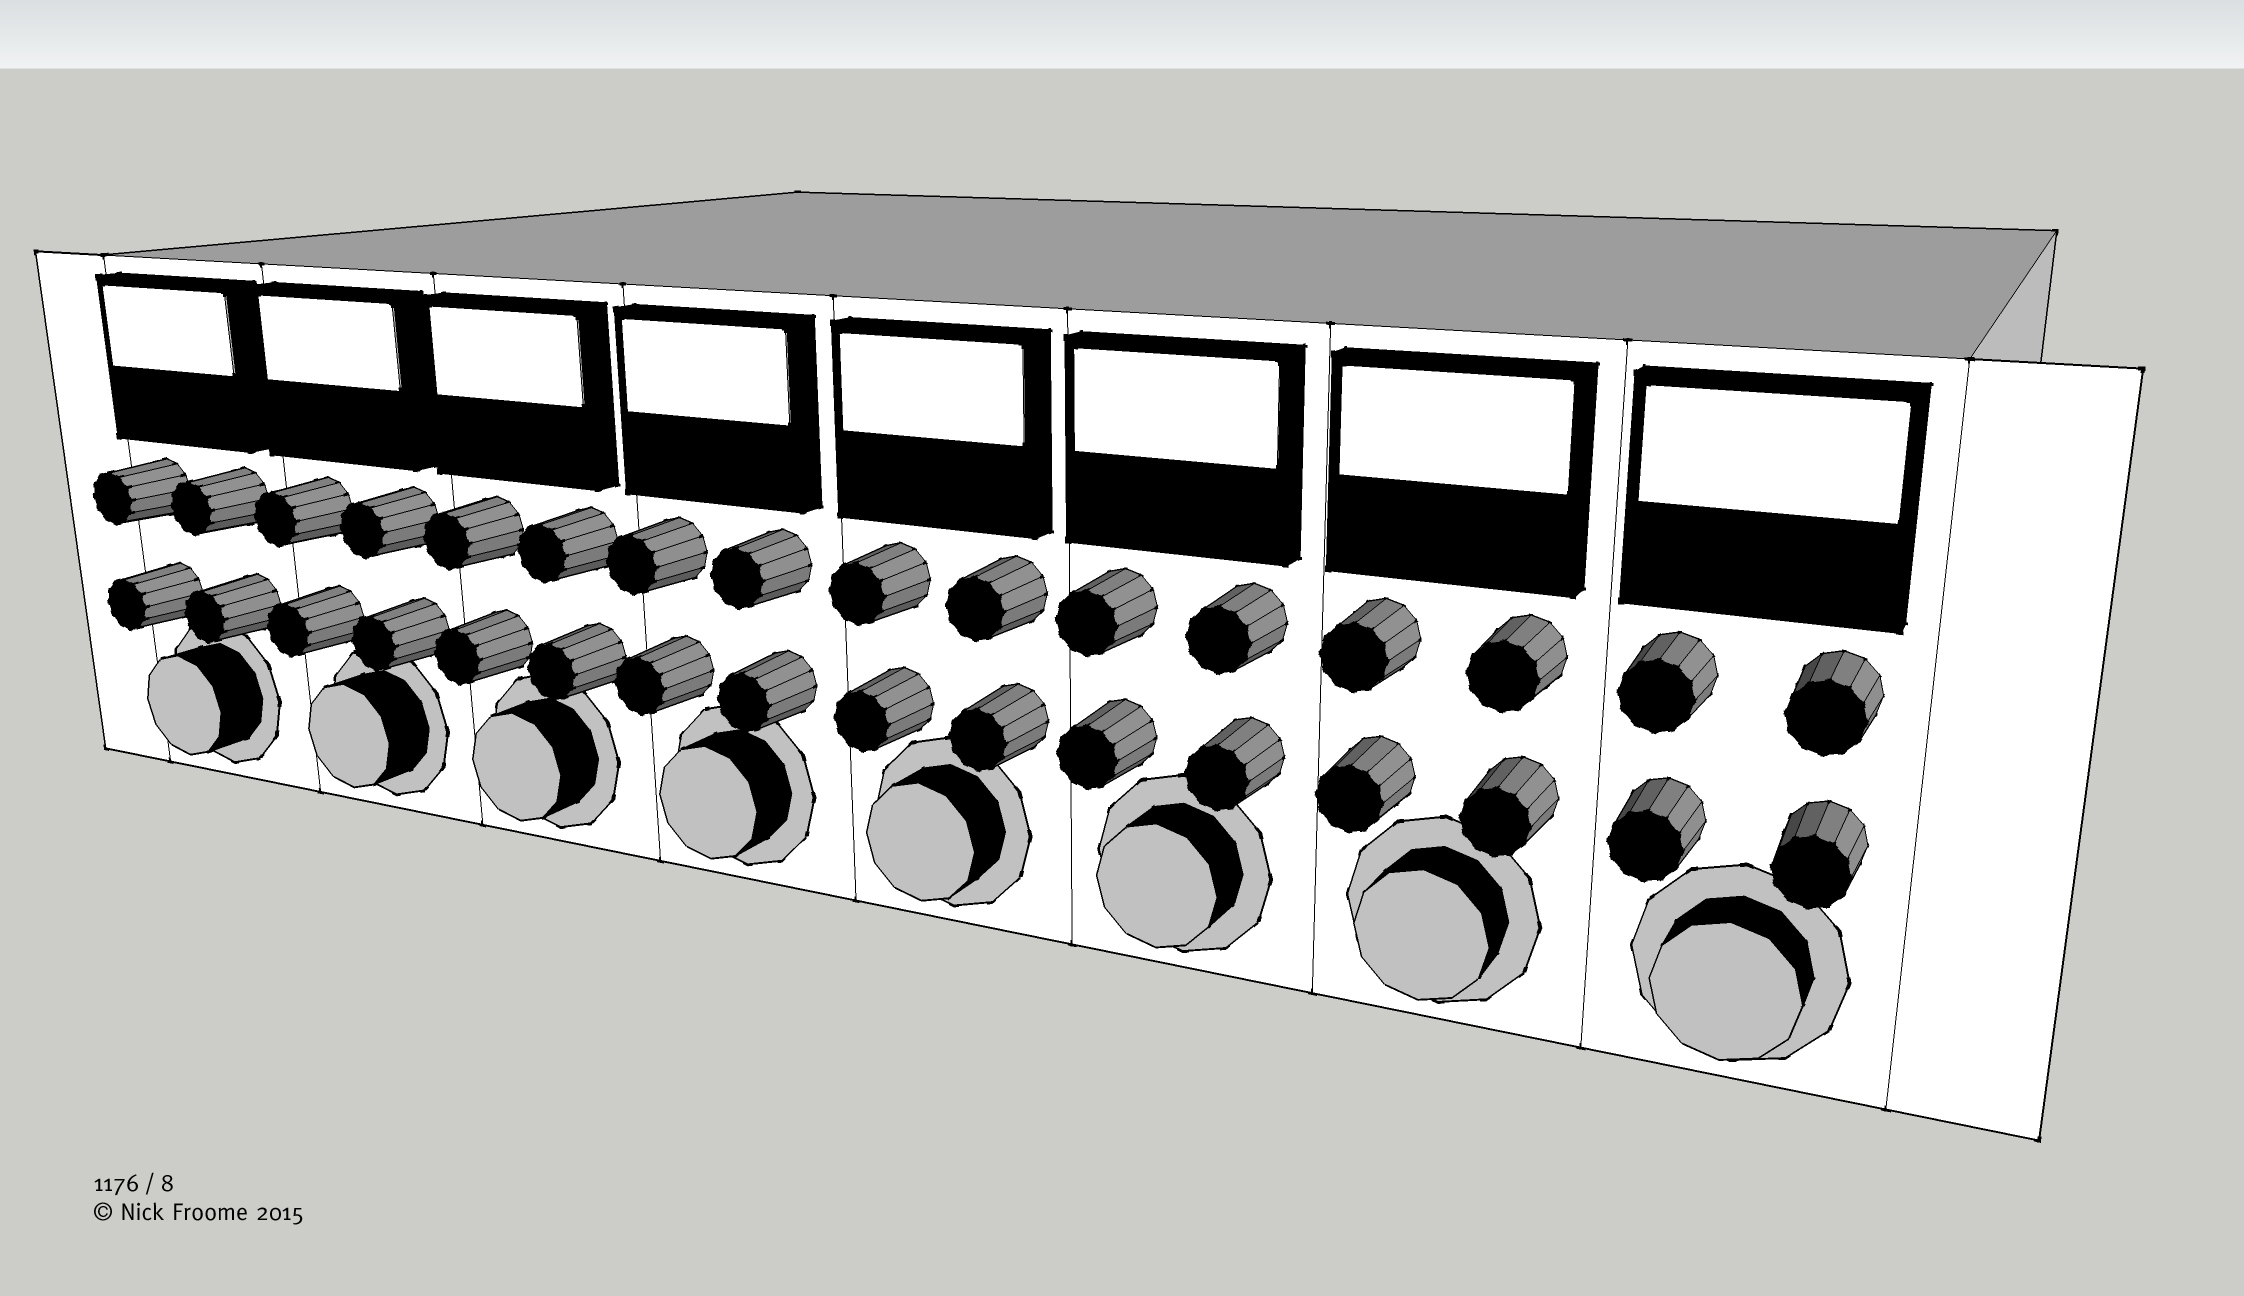
Here's a quick render of a 3U box with 8 channels. I've put a meter per-channel, four pots / switches and an original-size 1176 Input knob at the foot of the panel

version-2-copyright.jpg


There's not much height on a 3U panel. Even if you lose the meter I think you'd have to have two columns  of pots / switches per channel

I used pot / switch centres of about 26.5 mm. A Lorlin switch is about 26.2 mm diameter and I imagine you could get pots of similar / smaller diameter

I scaled the 1176 input knob from a diagram so it may not be accurate. The meter is the black-face compression meter from Hairball / Don Audio though a VU would be more accurate style-wise. The other knobs are 14 mm Sifams

With four controls, plus input, you could have attack, release, compression ratio and an output pot

The meter could be pushed right to the top of the panel or omitted completely. The input knob could be another 14 mm knob but I've shown a 1.5" UREI knob with skirt

Just a few ideas to throw into the pot!

Nick Froome
 
Thanks for your responses guys!

I don't like the idea of adding mechanical meters to this project, as the cost of one meter quickly surpasses the build-cost of several channels. They look dead-sexy though :D
Maybe i should look into adding a fixed GR-mode LED meter down the road. If anyone's got some good ideas on that, let me know!

The idea for now is that if i use 16mm pots and a lorlin switch, I'll be able to keep the controls for one comp-strip in one line on a 100mm tall board. Top to bottom: Input, output, attack, release and ratio. The GR and "slam" switches will sit right next to the ratio switch. I'll post a screenshot once i've got most components placed, to give you a better idea of what I'm tinkering with.

Adding a variable high-pass on the side-chain would definitely be a cool addition, but at this point I'm not sure i can make it fit.

Making room for the output transformers down the road isn't a bad idea either. There will certainly be room for them in the box, but then maybe i should make separate pcb's for the transformers and the original driver amplifier, as it will probably handle quite a bit more current than any NE5532.

I thought about THAT-chips for balanced in/out, but then again. Just like different input/output transformers have their sound, different op-amps in the input/output might sound slightly different. More experimentation equals more fun, you know  ;D

Regarding stereo linking, I was actually just thinking about matching the FET's and then connect two channels via a jack connection on the backside. Switches on the front would be cool too though.

Thanks again guys! I'll keep you posted.
/Hans
 
I was wondering if you could use a 12 Volt car bulb to indicate gain reduction. The dynamics of the original VU are poor - it's a pretty slow-responding instrument - but I only ever use it to establish that there's 3-6 dB of gain reduction going on

I am sure an incandescent bulb has a slower attack & decay than a VU but it might work to show average GR, which is what the VU shows anyway

That way you can add a bit more UREI DNA with a hint of 813B in with the 1176!

Nick Froome
 
I was thinking about something like that too, but 12V car lamps would draw a lot of current.
A compression indicator using an LED somehow coupled to the control voltage would be better i think. Then again, i might as well do an LED meter at some point ;)
 
I did some rough component placement last night. Not quite there yet, but you get the idea.
The PCB's  measure 50x100mm for the main board, and 50x50mm for the ratio switch stand-off board, to match the smallest size categories available from seeedstudio. That's about $28 for 10(!) sets of boards ;)
---
UPDATE:
Board prototypes are ready for manufacturing. Board layout image was updated and moved to my initial post to reflect the progress ;)
 
Looking good. Would definitely be interested in some of these.
It would be good if these could be made to fit a 1u enclosure.

Nice work though
 
I have not seen any shared projects like this one, hence the effort ;)

I'll see if the standoff can be laid out, to make this fit in a 1RU enclosure as well.
As it is now, the assembly will take up 50x100mm on the front panel. That's just about 8mm to much to fit the module sideways on 1RU.
 
grrrunge said:
I have not seen any shared projects like this one, hence the effort ;)

I'll see if the standoff can be laid out, to make this fit in a 1RU enclosure as well.
As it is now, the assembly will take up 50x100mm on the front panel. That's just about 8mm to much to fit the module sideways on 1RU.

just mount (four?) side by side to a 1ru bottom plate and call it done :) should the switch pcb fit vertically
 
Yes. The switch PCB should be mounted to the main PCB with angled pin headers, just like on Gustavs Phat Phet boards.
I suppose you could just mount the board flat instead, and draw wires from the pcb to the switches.

I'm thinking about extending the switch PCB to 50x100mm and then include an LED gain reduction meter. Even though I said I don't really need the meters, I really like watching them do their thing :D

When that's done, I'll try and see if i can shave it down to 40x100mm, so it will fit vertically in 1RU when assembled as intended. No promises though ;)
 
Alrighty! First prototype boards are laid out. Check out my first post in the thread for pictures.
I chose to expand the main board size, as it would facilitate a cleaner looking component layout, and the the price only went up around $3 for the ten main boards.

As of now it looks like 10 board sets from seeedstudio will end up costing $32. On top of that comes the PSU boards, that i haven't started designing yet.
 
I should probably add the meter driver amplifier as well, now that there's room for it on the main board. I'm not gonna use it myself, but since i plan on sharing the board layout once it's done and tested, someone else might want to build it with meters at some point.

Boy, this is good fun! :)
 
I really like this project  :) Just wonder why you use the phase splitter at the output? In case of 'bad debalancing' (outphase to gnd) that circuit would probably distort. I guess you could  get away with an impedance balanced unsymmetrical out and even save one opamp in the proccess.

Michael
 
The only thought behind it was that it was the easiest way to add a fully differential output without having to use output transformers.
I'll look into impedance balancing too. Do you have any good information on it?
 
It has been discussed here somewhere at length, hasn't it? You feed the output from the opamp through a resistor, maybe 10 to 47R to inphase (xlr pin 2) and a resistor of the same value goes from gnd to outphase (pin 3).  My bottom line about the topic is that it has only one downside which is 6 dB less max output swing (which could be overcome with a higher supply voltage). Apart from that is is just simpler, has the same noise suppression if fed into a differential input but will not cause any funny distortion if fed into an unbalanced input (unlike - more or less - any electronically balanced output). Some smart guy called Massenburg has already used it in his gear some decades ago - his stuff also runs on +/- 28 Volts, so max output swing won't be a problem there.

Michael
 
I'm certain it has been discussed at length somewhere here. I just hadn't heard about it.
Anyway. I found it described in one of the Jensen app-notes.
Thanks for the heads-up! I'll revise the output stage, as this certainly saves both components and board space, while being a more user-fool-proof solution ;)
 
You can use such a topology as the output balanced driver. This will shave some components from the circuit.

It's easy to simulate but a little quirky to find the exact values for gains and simmetry, but it certainly can be done.

R3 = R2 + R1
 

Attachments

  • balout.png
    balout.png
    4 KB
This is a functional equivalent of your current balanced out should you decide to go this route.
 

Attachments

  • balout.png
    balout.png
    5.7 KB

Latest posts

Back
Top