[BUILD] CAPI LC53A~500 Series~Love Child EQ Kit~Official Support Thread

GroupDIY Audio Forum

Help Support GroupDIY Audio Forum:

This site may earn a commission from merchant affiliate links, including eBay, Amazon, and others.
Golgoth said:
Hi Jeff,

I just revised the sorting sheets I had prepared before rev B for my build.

So R5 and R6 have been swapped on the CB board right?

What is it to test during the build on rev B?
Passing audio before installing the filter board I assume (Can I just plug it into my lunchbox with the extension jig for that?).
What else?
Hi Martin, yes some R's were swapped around during the layout so please use the Rev B BOM as your guide to part placement.

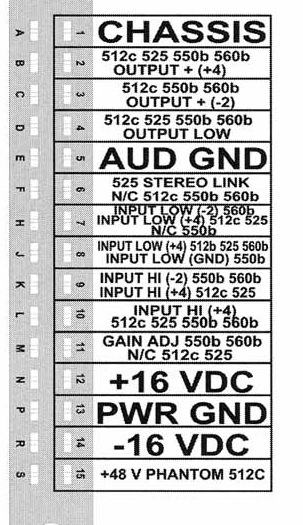
The CMRR adjustment is no longer needed. I have 2 working units here at the present so I plan to get the Test Points guide completed and published today. You can just plug into your LB but it may be easier to have the jig so the module can be flat in front of you. Reaching all of the test points when inside the rack will be a challenge to say the least  ;) But if there are no problems and audio passes at unity, you would not need the test points.  :eek:
 
Just received the LC53A kit which I'm going to start working on within a few weeks but was wondering if I'll need an OP amp test jig to test my 1731's and voltage followers when I have them all soldered up? 


Thanks.
 
Sorry if this has been asked before -
I have a Rev A LC53A.  The low frequency band gain knob doesn't change the output anymore (I can't tell if the low frequency selector's sonic operation has been affected).  The upper two bands work fine and the low one did last time I checked.  The unit passes signal properly otherwise.  Between checking it last and now it had been loaned out and (I'm guessing) opened by someone who shouldn't have opened it. 
Can someone please suggest a good place to start troubleshooting?  Unintentional grounding on either PCB? Blown cap? Voodoo?

Thanks in advance.  D
 
Hi Jeff,

Just got my 2 rev B Love Children together last night, and had a chance to test today. All is great, except on one of them the 10k band produces what sounds like a full band pure boost (pretty sure I was just testing in shelf mode). I'm guessing this points at a cap problem. But where should I be looking (which cap)?

FWIW, one of the polystyrene caps came with three leads...but it was one of the bigger ones, and both my kits appeared to have an extra resistor (I forget which bag...either the main pcb, or the cb one).

In my build I managed to install the output transistors in one of my GAR2520's reversed (PNP where the NPN should be and vice versa), and this made the 15 ohm build out resistors release their magic smoke, but I replaced them with 10 ohm resistors that I had handy and that unit is otherwise fine.

Any help on the 10k band issue would be much appreciated.

Cheers

Kris
 
Hey Kris

10k shelf is C28 in parallel with C29 and then to R14.

The supply rail damping R's are all 10Ω.
 
I posted previously about problems I was having with a build.

Just finished my first LC53A build. Everything seems to be working, except the signal is about 20dB quieter on the output than the input (also, inserting the EQ causes another approximately 2.5dB drop in signal). I followed Jeff's instructions of tracing the signal through the circuit, and found everything to be OK until the 4th reading, the output pin of A4. I then swapped the two DTO5s and the same problem persisted. Thoughts? Anything else I should be checking? I believe I've scoured this entire thread, but apologies if I've missed something and a similar problem has already been addressed.

I've since revisited, and while the same problem persists (minus the above described drop in signal when instantiating the EQ), the voltages readings I'm getting are different: previously when I swapped the DTO5s, the voltage dropped off at A4 regardless; now, no matter their position, once is consistently reading ~6V on the output while the other reads ~0.1V. I've double and triple checks for shorts, bad solder joints, and wrong components and I can't seem to find the source of the problem.

Anyone have any ideas?

Cheers

Ian
 
Finally got my LC53A working after I changed out one of the 1731's I built with an already assembled Red Dot from my VP312 after I kept burning up the 10R resistors PR1 and 2  ???

Oh man does this thing sound amazing!  I ran my Dean 6 string fretless bass through it and through my Waves L2 Ultramaximizer and  what a difference does it make!  :D

Thanks to Jeff of CAPI for making this possible!!  :)
 
I've pulled C28 and it is shorted internally...

I also noticed on the same board that I managed to get PR3 & PR4 rather warm, as well as the output resistors of the GAR2520 that's the input receiver. This was the one that I had the output transistors swapped on. Probably not a coincidence. Funny thing is, that it sounded ok. There's no other signs of trauma inside this 'problem child'.

Jeff, I figure I'll buy a pre-built GAR2520 from you. Can you toss a replacement C28 in along with it?

Cheers

Kris


jsteiger said:
Hey Kris

10k shelf is C28 in parallel with C29 and then to R14.

The supply rail damping R's are all 10Ω.
 
Not sure if this is the right place for this question...

I am building a pair of LC53A's and want to to the CMMR adjustment using a bench top power supply, DMM, and signal generator.

I can follow along nicely with the instructions provided by CAPI...BUT...how which card edge contacts would I connect DC power to the card and at what voltage?

I can't seem to find an answer to this question just by searching around.
 
16907d1142092019-api-lunch-box-15-pin-edge-connector-pin-out-12-13-14-15-picture-23.jpg
 
I'm trying to complete the CMRR adjustment on the pair of LC53A's I'm building and need a little help troubleshooting some funky stuff. I built 4 gar1731 op-amps for these guys but 2 of them were giving me some weird results during the CMRR adjustment.

The attached photo shows my CMRR adjustment setup and the 2 test points I was measuring while adjusting the trim pot. O-scope is currently out of service so used my Fluke 87. Function Generator was set to produce 100 Hz sine wave with ~1.0 VAC amplitude. Bi-polar power set to 16.9VDC (to match the chassis power supply it's going into).

Issue 1) One of the gar1731's heated up extremely fast when power was switched on. Specifically one of the large power transistors Q7. I checked over and over for bridged joints both under a magnifying glass and with my meter.

Issue 2) With another one of the gar1731's installed, I could adjust the trim pot all the way CW or CCW and almost no difference was measurable on the meter (set to AC voltage) between the 2 test points.

The other two gar1731's adjusted just fine. Both were able to be adjusted down to 8.5mVAC.

Are these common issues? Any ideas? I know the build guides say to start with known good op amps first so maybe I need to order a set of pre-built/tested op amps?
 

Attachments

  • LC53A CMRR setup.png
    LC53A CMRR setup.png
    1.7 MB · Views: 21
hey bsconz,

it's been some time, have you solved the problem already?

it looks to me, that the CR1 diode on the left module is in the wrong direction.
but the pic is quite small, so i can't really see it ;)

maybe that helps, if you haven't solved it alread!
 
When I built the gar1731's, I was drinking beer and it was late at night... 2 strikes already.

2 of the 4 op-amps happened to be built correctly and those were the ones I used to complete the CMRR adjustment.

The other 2 had various issues each including flipped power transistors, backwards FET's , and backwards diodes....what an idiot I thought to myself.

Moral of the story: don't drink and solder.

They're completed and installed in the studio...Sounding phenomenal too!!!
 
I posted previously with no luck about a problem I was having with a build. I believe I've narrowed the problem down to one of the DTO5 opamps. When measuring DC voltages  at both the inputs and output of one of the DTO5s I got approx -1.8VDC at both IN+ and IN-, and -3.6VDC at OUT. This behaviour is specific to the particular DTO5 (voltages follow the particular opamp when I swap the two), and is only observed when the opamp is in the circuit.

Am I correct in thinking this is where the (or a least a) problem lies? I've double and triple checked for shorts and dodgy solder joints, but to no avail. Not quite clever enough to pinpoint the source of the problem on the opamp itself, despite the existence of a published schematic. Any help/guidance/thoughts would be much appreciated.

Cheers

Ian
 
This sounds like an error on the DTO5 build. There should be very little DC offset present at the in/out of any of the active subassemblies. I would first check for swapped transistors on the particular opamp. Also make sure the 470R and 4k7 were not flipped. That has happened to folks before as well.
 
Hey Jeff, thanks for the reply. Have double and triple checked all components are in the correct places and oriented correctly. R2 and R4 aren't swapped, diodes are all the correct way, transistors are all where they should  be, etc. Also double and triple checked for shorts and dodgy solder joints. At a bit of a loss.
 
Hello, everyone!

So I spent about 17 hours on my day off in a hotel room working on a pair of these. When I got to the gig, I was able to find time and start doing some testing. One of the them burned a 10 Ohm resistor by the op amp closest to the transformer. Classic! So I will have to wait till I get home since I don't have any more 10 Ohm guys out here with me.

The other one is working. Mostly. There are just three strange things happening that I was wondering if anyone else has had something similar happen.

The high band with the peak mode selected is just a gain knob, and set to -10dB it mutes the audio.

Same with the low band, plus it happens when 300 Hz is selected, but I may have an errant solder joint.

Lastly, the low band in shelf mode behaves like a high shelf EQ.

The thing that makes trouble shooting a little more difficult is that my test jig is at home. I'd love to try to figure this out on my next day off, but I'm not quite sure how the peak/shelf function switch works without a schematic. Any insight would be greatly appreciated.


Thanks!

Paul
 
So....

I seemed to miss the part in the build documents about cutting everything as close to the PCBs as possible since there was very little clearance with the enclosure.

I cut the leads down on the one that was partially working and now it seems to work, at least testing with pink noise. Probably this is also the cause with the resistor burning out on the other one. Still have to wait till I get home to repair that one.

DIY is great!

Thanks!

Paul
 

Latest posts

Back
Top