[BUILD] CAPI VP2X~500 Series~Preamp Kit~Official Support Thread

GroupDIY Audio Forum

Help Support GroupDIY Audio Forum:

This site may earn a commission from merchant affiliate links, including eBay, Amazon, and others.
jsteiger said:
As I packaged up a kit with a raw face-plate yesterday, I got to wondering how you guys who have the raw plates have finished them.

I would quite enjoy some pics if you have any.

...

jeff,
my faceplate design is still not "perfected", but here is the "pre-release"...  ;D ;D ;D
cheers, alex

26-1.jpg


26-2.jpg


Hey everyone,

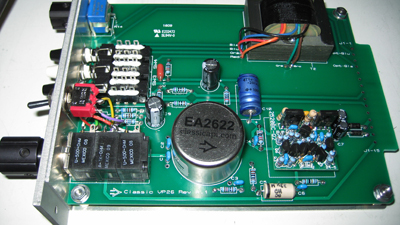
I just finished building a pair of pre's for a friend. He wanted a more authentic 312 card instead of the "console" version that is the VP2x. After completing the assembly, I thought I would take a few pics and add the info to my site. It is very easy to do, actually easier than one of my regular VP2x builds. Basically, you just leave off a few components, add 2 jumpers and change the feedback cap value.

That's it! Instant 312...just add milk. I will start including a VP25.312 schemo in the zip with the support docs.

So, here's the skinny:

  • Leave out R3
  • Leave out R13
  • Leave out C5
  • Leave out C6
  • Leave out C10
  • Leave out C11
  • Use a 120pf cap for C4 instead of 82pf cap (feedback cap)
  • Jumper across C10 (bottom of PCB)
  • Jumper from the top of R3 to the left side of C6 (bottom of PCB)

VP25.312-side-close.jpg


VP25.312-back.jpg


FWIW, 3nity is working on a straight up 312 clone that will include a DI with a switch to select Mic/DI. 500 series also.

Cheers all!
Jeff  :)
 
hey guys, this must be winner of the stupid question of the year award, but how do I put the pushbutton switch caps on? I've fiddled with them for awhile now, there's no installation information on the datasheets. I feel like they must just push on, but I've tried and don't wanna push any harder unless I'm sure it's right.  Other than that assembled my VP25 in the better part of a day, nice and easy! Thanks Jeff!
 
Brolik said:
hey guys, this must be winner of the stupid question of the year award, but how do I put the pushbutton switch caps on? I've fiddled with them for awhile now, there's no installation information on the datasheets. I feel like they must just push on, but I've tried and don't wanna push any harder unless I'm sure it's right.  Other than that assembled my VP25 in the better part of a day, nice and easy! Thanks Jeff!
I have noticed the same thing with the switch caps. The old ones are almost too loose. They will just push on. I use a jewelers screw driver and slightly pry open the cap where the 2 slots are at. I engage the the pushbutton then push them on. Sometimes the rubber handle of a pair of pliers makes for better leverage. I small drop of dish soap will help a little too. I little pressure and they will snap right on.

Please don't ask how to get one off!  ???  :eek:

Cheers, Jeff
 
jsteiger and others, sorry for off-topic question but can you explain difference in the classic api's 4 versions of output transformers? Does all of them have same inductance and freq. response? What about sonic differences?
 
all three 2623 types are the same electrically, just different mounting options.  the core is a 1/2 inch size, EI shape, steel lamination.  this is bit smaller than most common "modern" output transformers, but was very common in older consoles.

the 2503 is a 5/8 inch size, EI shape, steel lamination.  this is the same size as the common transformers from jensen, cinemag, etc, and the same type of transformer that you'd find on a vintage 312 or a new 512 module. 

though the 2503 is physically larger, it has fewer turns than the 2623, so the inductance is actually lower.  frequency response is similar, as they are both flat well beyond the audio band.

ed

 
Hey guys,

I have some info below that pertains more to the actual "sound" of the VP2x preamps. I have noticed a few threads over at GS pertaining to them.

Mark Linett has has posted some very kind words that make me all warm and fuzzy inside!  ;D 8) :)
First thread in "High End" is here.
Second thread in "So much Gear" is here.

This is very cool to see, especially coming from an engineer with Mark's ears and credentials. Clapton, Red Hot Chili Peppers, Santana, Brian Wilson, The Beach Boys, and on and on...More Mark info is here.

Cheers all, Jeff
 
Jeff- just want to thank and congratulate you on a fantastic preamp kit! i've been using my pair of VP25s for a few weeks and i can tell i'm going to want more as soon as i can afford them. they were so easy to put together - awesome.

i used them today for DI'ed bass (via a diy passive cinemag transformer DI box) and they won out over all my other preamps (including oep G9, cinemag baby animals etc) for the sound i wanted - the tone is very nice, clear and punchy but not harsh at all.

on drums they sound awesome too. also, the output attenuator works wonders on drums, you can really drive it and the distortion character is crisp and upfront.

if anyone is looking for a 500 series preamp kit - this one get's my vote.
thumbs up!

Haima
 
Thanks for the very kind words Haima!  :)

Your passive DI definitely gives you the benefit of the EA2622.  ;)

Continue enjoying!
Jeff
 
SERIOUSLY

These pres ROCK!


I just finished a vocal session using a Blue Cactus > VP25 > Lucid 8824 > DAW.

Magnificent vocal sound.

These amps really made the Cactus mic come to life...I wasn't really liking the mic until I used it with the VP25.
(previously I had used the Cactus with my G9, Seventh Circle N72, Octopre, and my own BA283-based pre)

Holy Geez.


By the way, I'm using Pier's APP2050 DOAs.


As you can see, Jeff, I need to buy two more channels from you at some point!


Attachments

  • VP25-rack.jpg
    VP25-rack.jpg
    222.7 KB
Hi, I'm building two of these VP25 preamps and I was wondering if a stepped switch like a 12P Grayhill would fit to use for gain? Has anyone tried this?
 
dmp - i'd say you MIGHT be able to fit one of those small blue elma switches. like the ones used in the helios channel strip on this page:

http://recforums.prosoundweb.com/index.php/m/291238/0/

dunno if grayhill make something similar. they probably do...

you'll probably have to get your calipers/ruler out, look at the switch datasheets and see if it'll fit. if it looks promising - buy one and see.

good luck!

 
Thanks Haima, I measured the board and there's about .350" from the center of the mounting hole to the board. That's smaller than all the rotary switches I've found so far, but I haven't found a datasheet yet for a elma or grayhill switch. I'll see if I find something...

Holger, what is the red-orange flip mod? looking at the datasheet and schematic it looks like it flips one lead of the primary to secondary. I don't understand that...
 
dmp said:
Thanks Haima, I measured the board and there's about .350" from the center of the mounting hole to the board. That's smaller than all the rotary switches I've found so far, but I haven't found a datasheet yet for a elma or grayhill switch. I'll see if I find something...

Holger, what is the red-orange flip mod? looking at the datasheet and schematic it looks like it flips one lead of the primary to secondary. I don't understand that...
I am not sure about the rotary switches and layout. I only had the Bourns pots in mind when working things out.

The orange/red mod is for polarity reverse. Depending upon which Rev PCB's you have, there needs to be a polarity correction made. I have that noted in the READ ME file of the docs zip. BTW, all the polarity pushbutton is doing is flipping these 2 leads of the output transformer's primaries.

Cheers, Jeff
 
Thanks, the polarity flip makes sense. I was confused because of a different color coding of the primary leads.
 

Latest posts

Back
Top