[BUILD] GIX-51X tube preamp

GroupDIY Audio Forum

Help Support GroupDIY Audio Forum:

This site may earn a commission from merchant affiliate links, including eBay, Amazon, and others.
BruceO,
Thanks, I have 4 kits to build,
It was late and I was looking in the wrong column.
Much better.

Toure14
The bass roll-off seems to be the standard complant of the G9.
IMHO, I don't think tubes will change the roll-off, If that's what your looking for.
 
@Winetree: it was me who measured the bass roll off and i was not complaining. i was just surprised to see this special frequency response... i fact i really love the sound of the GIX :)
 
100WChris said:
GIX_2.jpg

frequency-plot with old tubes i had lying around (made with fuzzmeasure).

Tubes so old, they're invisible!  :p ;D
 
100WChris said:
HV board with Cap installed across R503 and R504

put the cap across R503 and R502 as shown in pictures by bruce on side 3 of this thread, reply 45.
Might solve your hum-problem.

Cheers
Chris

I just read the thread in preparation to my built and I think there's some confusing information about how to do the Rodney Cap Mod.
Reading the info in the thread I assume you have to put the cap across R503, R504. So looking at the schematic, this would mean to solder one end to R503 and the other end to R502. Just a Chris explained in my quote.
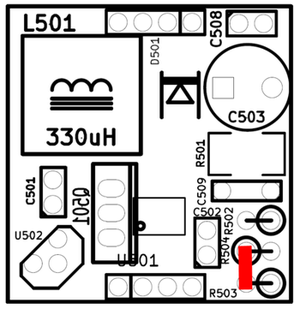
The picture at the start of this thread however has a red bar from R503 to R504. It's actually a picture from post 258 where Benny is describing how NOT to solder the cap.
Am I right in thinking that the picture in the first thread is bit confusing and that the right way to do the Rodney Cap is how Chris describes it in my quote?
I'm really looking forward to building this unit!

Thanks!
 
tzman said:
100WChris said:
HV board with Cap installed across R503 and R504

put the cap across R503 and R502 as shown in pictures by bruce on side 3 of this thread, reply 45.
Might solve your hum-problem.

Cheers
Chris

I just read the thread in preparation to my built and I think there's some confusing information about how to do the Rodney Cap Mod.
Reading the info in the thread I assume you have to put the cap across R503, R504. So looking at the schematic, this would mean to solder one end to R503 and the other end to R502. Just a Chris explained in my quote.
The picture at the start of this thread however has a red bar from R503 to R504. It's actually a picture from post 258 where Benny is describing how NOT to solder the cap.
Am I right in thinking that the picture in the first thread is bit confusing and that the right way to do the Rodney Cap is how Chris describes it in my quote?
I'm really looking forward to building this unit!

Thanks!

That is exactly why mine was off at first because i got confused on that drawing
 
Am I right in thinking that the picture in the first thread is bit confusing and that the right way to do the Rodney Cap is how Chris describes it in my quote?

It is confusing. I think the graphic in the first post is not correct... or at least my units also didn´t work properly, until i changed the position of this cap as shown by bruce in reply#45 (page 3). maybe rodney can confirm the position and change the picture?

by the way: don´t get confused by the bass roll off! Its a 3.5 dB roll off from 100Hz to 30Hz. That´s something you´ll probably do during mixing anymway. I think i like this pre, because they take off some work from me ;)

kind regards
Chris
 
So this cap is one of the last few remaining steps for me.  To clarify,  the instruction in step 9 of the first post is incorrect.  Instead,  the cap needs to connected between r502 and r503,  NOT r503 and r504.  correct?

also,  I can confirm the mouser cart i posted in post 234 seems correct,  except my electrolytic at c11 was too big.
 
Okay, what you're trying to do with the cap mod is to bypass the feedback pin to ground. Here's the pic from the 1st post:
3poOPeJ.png

This picture is illustrating what pads to connect the cap across. If you put a resistor into R504's position the way the silk screen shows, then it's going to be hard to solder the cap to that point, so that's why some have made the mistake of essentially soldering the cap across R503 only. The next best place is to solder to the leg of R502, which is up in the air. That leg is connected to the pad you want to be connected to.

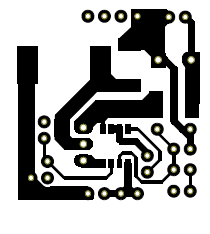
Here's a look at the copper layer, looking from top down:
v9RTqUQ.png


Hope that makes more sense.

***by the way, I received a PM from a fellow DIYer who has mentioned, and I thought it was clear, but again maybe it's not, that this is a bandaid to fix the instability problem with the converter. The feedback network is not an ideal layout and is picking up current noise from the ground, likely because there's a huge ground plane right under it on the bottom of the pcb. If I were a more experienced man, I wouldn't have designed it this way. Live and learn***
 
Hi Rodney!
Thanks for clarifying! Now i understand... when you are young and impatient, you don´t read precise, you just look at pictures and than you solder the cap "on top" of R504 and after that you wonder why you have a hum-problem  :D

is a bandaid to fix the instability problem
we have great sounding preamps! when it takes a bandaid to work... give me a bandaid :)

Chris
 
100WChris said:
we have great sounding preamps! when it takes a bandaid to work... give me a bandaid :)

I agree! But I just wanted to make sure everyone understood that this is not the correct approach to fix this kind of problem. A better layout would be the way to handle it, but the boards were already produced and the masses were hungry. R&D on a poor mans budget is not an easy thing to do.
 
I thought I'd mention that on my builds I have those resistors on the underside of the board, with the cap on top. It's a bit cleaner looking.
 
gemini86 said:
Okay, what you're trying to do with the cap mod is to bypass the feedback pin to ground. Here's the pic from the 1st post:
3poOPeJ.png

This picture is illustrating what pads to connect the cap across. If you put a resistor into R504's position the way the silk screen shows, then it's going to be hard to solder the cap to that point, so that's why some have made the mistake of essentially soldering the cap across R503 only. The next best place is to solder to the leg of R502, which is up in the air. That leg is connected to the pad you want to be connected to.

Here's a look at the copper layer, looking from top down:
v9RTqUQ.png


Hope that makes more sense.

***by the way, I received a PM from a fellow DIYer who has mentioned, and I thought it was clear, but again maybe it's not, that this is a bandaid to fix the instability problem with the converter. The feedback network is not an ideal layout and is picking up current noise from the ground, likely because there's a huge ground plane right under it on the bottom of the pcb. If I were a more experienced man, I wouldn't have designed it this way. Live and learn***

Thanks! Glad to know I wasn't going crazy :).
 
gunpoint recording said:
also,  I can confirm the mouser cart i posted in post 234 seems correct,  except my electrolytic at c11 was too big.

Can you elaborate on how C11 was too big?  pin spacing?  too large a diameter?  too tall? 

I copied your cart and updated it with parts that were in stock and also filled in the Customer Part Number fields for everything.  Other than selecting transformers and tubes, i'm ready to build this guy! 

http://www.mouser.com/ProjectManager/ProjectDetail.aspx?AccessID=A43D9472B6

I found this for C11: 

https://www.mouser.com/Search/ProductDetail.aspx?R=EEU-FR0J471Bvirtualkey66720000virtualkey667-EEU-FR0J471B
the case diameter & length was 6mm x 11mm, respectively, compared to the one in your cart, which was 12.5mm x 20mm. 

Can anyone explain the different transformer options and their relative color?    Also, where did you guys get tubes and which tubes, and why that particular tube?

also, in case anyone was curious about transformer prices and where to buy:
Code:
Input xfmr options

A262A2E				$17.64		http://www.newark.com/oep-oxford-electrical-products/a262a2e/audio-frequency-transformer/dp/02M8356
CM-75101APC
LL1538				$82 each	http://www.kandkaudio.com/prices.html
EA2622				$45 each	http://classicapi.com/catalog/product_info.php?products_id=80
JT-110K-HPC			$78.51ea	http://www.jensen-transformers.com/prices.html
LL1576				$82 each	http://www.kandkaudio.com/prices.html
LL1578				$82 each	http://www.kandkaudio.com/prices.html

Output:
A262A3E				$17.64		http://www.newark.com/oep-oxford-electrical-products/a262a3e/audio-frequency-transformer/dp/24M0686 
LL5402				$65 each	http://www.kandkaudio.com/prices.html
 
Back
Top