Green pre woes....

GroupDIY Audio Forum

Help Support GroupDIY Audio Forum:

This site may earn a commission from merchant affiliate links, including eBay, Amazon, and others.
Allright, more info for those who have built this before.

I'm almost 100% certain that he problem is on the PSU, go figure since i made it first...

I took my multimeter and tested the 4 way connector on the PSU, when i touch the ground and the +48, I get +48, sweet, but when i go ground and +15 or -15, i get +0.6 and -0.6, i worked backwards away from the 4 way and once i got to the other side of the 317 and 337, respectively, i get +21 and -21. so what the hell is or has happened.

Thanks, I really would like to get this working.
 
Well,
we're only talkingabout 8 parts or so. Check the values of all the caps, etc on the PS between the voltage regulators and the connector. If they are all correct, replace the voltage regulators and see. Maybe you blew them up when you smoked the resistors before?

Joel
 
Ptown...

I think you have a winner! Something is VERY wrong with your PSU. My Greens use Peters PSU and I get +14.7, -14.7, 0 and 48V. Let us know how things turn out.

Check your tracks as well as the components. Also make sure the voltages on your Electro Cap, for example I used 16V Caps for the 4 x 1000uF caps, which in retrospect was risky since that didn't allow for voltage spikes. I have upgraded those to 32V, which should be fine. Likewise all the caps on the Phantom rails should be at least 63V.

Just trying to prevent you from further despair, but def look at that PSU!

Cheers

Matt
 
Ptown,

This might sound stupid but I thought I?ll put it out there... Are you sure
you have the regulators the right way round on the board? Here is pic of mine
if it helps... Not sure what you used to build it.

greenpsu.jpg


Post a clear pic of yours and I?ll try and see if there is anything visually
different.

Cheers

Matt
 
Before buying new parts, what do you get for the PSU voltages wothout the pre's connected? There might still be a short on the pre PCB which is pulling down the PSU.

Also do a resistance check on the pre board. Measure the resistance from GND to +v & GND to -v & make sure there are no shorts.

Regards
Peter
 
When I tested the psu, i did it without the pres connected, just the power supply.

Matta - Yeah, I'm sure I have them the right way, I was very careful with orientation when I was assembling, thank you though, I appreciate the effort.
 
No Problem,

I didn't want to sound condescending, I am am Newbie myself. The Greens were my first DIY build, but I know we all make mistakes, most of the time they are right under out noses. Let us know if you find anything on the board.

Cheers

Matt
 
Well, considering the info I provided about the voltages in my previous posts...I'm pretty sure when i had that short that I fried the voltage regs...

The voltages are correct right up to the regs, so that's gotta be it.
 
well, my psu seemed fine, so i decided to give it a go, plugged er in, check the voltages again, everything seemed to be in order so i hooked it to the pres. Within a few second, the 10r resistors between the 20k and 100k trimpots started to smoke.

May absolute lack of electronics expertise and know-how is definitely getting the better of me.

Please help

and if you respond, please include HOW to check what you tell me to check, I'm really novice...

Thank you
 
In this day of age, with the components involved, it is unlikely that there will be bad parts from a good supplier. If we take the parts out of the equation (expect those that might have been fried by a mistake) we find ourselves with the board, and the solder job. Peter makes GREAT boards, so that is probably not the problem. Get a magnifying glass and start looking. Don't look where you think the problem might be. Look everywhere. Start from one corner, and work your way across the entire board. Check every solder joint and every trace. Patience here will save you much more madness down the road. In fact, this is a good step before you fire up ANY project, even with years of experience. Tiny shorts can always pop up. Once you verify solder/traces, check each componant. Check the value and orientation, replace anything that might have been fried, and follow along with the schematic. Start to learn how the circuit works. You don't need to fully understand everything, but learning in general where the audio path goes is a good place to start learning. Good luck, and stick with it, eventually it will be working, and you're gonna feel damn good about it!

Andrew
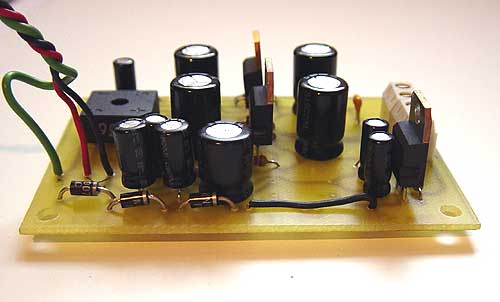
 
Before you plugged in the psu to the boards, did you do as Peter suggested, and check the board for shorts?

You are running yourself in circles. A short can cascade and wipe out lots of stuff-as you have learned. Don't fix the few resistors-think it's all fixed-plug it in-and fry more stuff. When there's a problem, you now need to check through the WHOLE circuit and make sure everything is good and there are no more shorts.

Good luck-Troubleshooting is the hardest part of this. Think of it as an oportunity to learn what this circuit is doing (I'm certainly still learning it!)

Joel
 
Back
Top