Help with substituting through hole with SMD

GroupDIY Audio Forum

Help Support GroupDIY Audio Forum:

This site may earn a commission from merchant affiliate links, including eBay, Amazon, and others.
Hi everybody,

I'm trying to "convert" a through hole layout to SMD and don't know what footprint to use with some components in a PSU. Could someone advise me please?
This is the PSU schem:
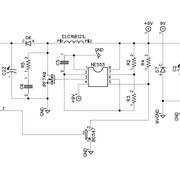

I'll be substituting resistors and caps with 0805 SMD footprint when possible (not the big electrolytics, of course). The components I don't know what hand solderable SMD footprint to use with are the following:

-100uH inductor
-7806 Voltage Regulator
-NE555 clock
-50mA self resetting polyfuse
-IRF740

Also, does anyone know what I could use to substitute these, please? They're for a cabsim.
BC547, BC337, BC327, TL072

Thanks a lot for your time and help
Cheers
Sono

When I do a conversion to SMD, I lay down dual footprints, so I can put on either. Sometimes thruholes in the SMD pads can suck away solder, it's worth it, and larger caps above 100uf can get quite large, so sometimes thru is better, especially with non-polar caps.

The 7806 regulator can have a footprint that includes the SMD heatsink and the large screw hole for the regular one. I make the hole in the PCB small enough that a 4-40 screw has to thread into the board, so it holds the regulator easily.
Thanks for your input, FIX, but the thing is that I'm fitting this circuit inside a 1590BB box. Initially I had the tube outside but I want it inside now and I've added the cabsim and the DI out so TH is simply a no go because components and trace end up REALLY close and packed. So I saw a guy called Sushibox that uses 0805/1206 resistors and C0P/X7R caps (except for big caps and it fits nicely. Now I just want to scale down the PSU as much as I can, hence the components I mentioned in my first post.

Cheers ;)
Sono
 
Hi everybody,

I'm trying to "convert" a through hole layout to SMD and don't know what footprint to use with some components in a PSU. Could someone advise me please?
This is the PSU schem:


I'll be substituting resistors and caps with 0805 SMD footprint when possible (not the big electrolytics, of course). The components I don't know what hand solderable SMD footprint to use with are the following:

-100uH inductor
-7806 Voltage Regulator
-NE555 clock
-50mA self resetting polyfuse
-IRF740

Also, does anyone know what I could use to substitute these, please? They're for a cabsim.
BC547, BC337, BC327, TL072

Thanks a lot for your time and help
Cheers
Sono
1) I completely agree with Khron about your schematic. It can be done much better than what you are currently showing.

2) I would get rid of using DipTrace and go instead with KiCAD for your schematic and PCB-design tool. The KiCAD PCB tool has "tons" of Surface-Mount PCB-footprints already available in their libraries and it has also become somewhat of a "standard" already in the DIY and hobbyist markets. And, should there -- NOT -- be any footprints for a part you are looking for, I am more than certain that you will be able to find whatever you need here at this link:

componentsearchengine.com

And, here is the link to download the -- FREE -- KiCAD PCB-design software:

https://www.kicad.org
3) Khron is also correct about providing sufficient space between your high-voltage routes and anything else. > "Arc's and Sparks" < you know!!! There is a UL-listing requirement that specifies 0.250" spacing for 120VAC PCB routing. I don't know what the UL requirement is for 250VDC off-hand.

Back in 2006/2007, I spent a year working at an aerospace/avionics firm converting/re-designing "Thru-Hole" PCB's to new Surface-Mount PCB's for BOEING 737's and 757's and some UK "Royal Air Force" fighter jets. In several cases, I could reduce 3 or 4 old "Thru-Hole" PCB's down to a single new Surface-Mount PCB!!! That was always a really fun feeling!!!

I need to take-off right now to run some errands before the stores close around here, but sometime later, I will include some PDF files on the details of how to properly design PCB's and stuff for you to read up on things that you will need to know about.

/
 
1) I completely agree with Khron about your schematic. It can be done much better than what you are currently showing.
I don't disagree with him AT ALL, please don't get me wrong, but I've used this PSU in other guitar pedals and it works. If I had the knowledge to improve the design I would probably do that, but I'm a BUILDER not a designer..... nevertheless I'm eager to learn and very open to suggestions :)

2) I would get rid of using DipTrace and go instead with KiCAD for your schematic and PCB-design tool. The KiCAD PCB tool has "tons" of Surface-Mount PCB-footprints already available in their libraries and it has also become somewhat of a "standard" already in the DIY and hobbyist markets. And, should there -- NOT -- be any footprints for a part you are looking for, I am more than certain that you will be able to find whatever you need here at this link:

componentsearchengine.com

And, here is the link to download the -- FREE -- KiCAD PCB-design software:

https://www.kicad.org

Thanks for the suggestion and the link. Actually, I used Kicad some years ago but went to Diptrace cos I was looking for a CAD that would allow me to layout tubes and stuff but what you say in this context makes a lot of sense. Thanks for the ideas :)

3) Khron is also correct about providing sufficient space between your high-voltage routes and anything else. > "Arc's and Sparks" < you know!!! There is a UL-listing requirement that specifies 0.250" spacing for 120VAC PCB routing. I don't know what the UL requirement is for 250VDC off-hand.

Back in 2006/2007, I spent a year working at an aerospace/avionics firm converting/re-designing "Thru-Hole" PCB's to new Surface-Mount PCB's for BOEING 737's and 757's and some UK "Royal Air Force" fighter jets. In several cases, I could reduce 3 or 4 old "Thru-Hole" PCB's down to a single new Surface-Mount PCB!!! That was always a really fun feeling!!!

I need to take-off right now to run some errands before the stores close around here, but sometime later, I will include some PDF files on the details of how to properly design PCB's and stuff for you to read up on things that you will need to know about.

/
Please DO. I love reading and learning :)

Cheers
Sono
 
Thanks for your input, FIX, but the thing is that I'm fitting this circuit inside a 1590BB box. Initially I had the tube outside but I want it inside now and I've added the cabsim and the DI out so TH is simply a no go because components and trace end up REALLY close and packed. So I saw a guy called Sushibox that uses 0805/1206 resistors and C0P/X7R caps (except for big caps and it fits nicely. Now I just want to scale down the PSU as much as I can, hence the components I mentioned in my first post.

Cheers ;)
Sono
Why not go with two PCBs? One for the guitar effect stuff, and one for the power supply, then you can put one PCB on top of the other with spacers in between. If the tube is in the way (I imagine you'd be laying it horizontally inside the enclosure), just add a hole cut out in the power supply PCB so the tube body can protrude. Likewise, if the big capacitor for the power supply is in the way, add a hole cut out as well in the other board.

This is a much better choice in my opinion, compared to stuffing everything on the same board. You have to think about how you are going to troubleshoot it later (soldering/removing parts) when it's not working. A cramped board is difficult for the soldering iron to navigate. When looking at an empty board you may not realize this, but as you start to solder parts one by one, you will see what I'm talking about. Better to revise your design now while you can, rather than regretting it later.
 
You mean the 7806 voltage regulator? It will have a heatsink or will be screwed to the aluminium enclosure. Heatsink for the IRF740 too btw
Not sure what the current draw is for that regulator and if it will get quite hot, but you can enlarge the middle tab solder pad and put at least two tiny vias for thermal relief. If that is still not enough to dissipate the heat, stick a mini aluminum heatsink on top of the regulator with thermal glue.
 
I don't disagree with him AT ALL, please don't get me wrong, but I've used this PSU in other guitar pedals and it works. If I had the knowledge to improve the design I would probably do that, but I'm a BUILDER not a designer..... nevertheless I'm eager to learn and very open to suggestions :)


Thanks for the suggestion and the link. Actually, I used Kicad some years ago but went to Diptrace cos I was looking for a CAD that would allow me to layout tubes and stuff but what you say in this context makes a lot of sense. Thanks for the ideas :)


Please DO. I love reading and learning :)

Cheers
Sono
1) I completely agree with Khron about your schematic. It can be done much better than what you are currently showing.
[I don't disagree with him AT ALL, please don't get me wrong, but I've used this PSU in other guitar pedals and it works. If I had the knowledge to improve the design I would probably do that, but I'm a BUILDER not a designer..... nevertheless I'm eager to learn and very open to suggestions] -- I was only referring to -- HOW -- the schematic was drawn and/or laid-out and NOT anything about how the circuit is designed!!! I am also a "BUILDER" of electronics, but in my "day job", a part of what I do is to take the "scrambled drawn mess" that many electronic engineers create of their schematics and re-draw them into a form that can be more easily read as a circuit flow and also can be more easily understood. Your schematic could use a re-draw, that's all.

After I had installed the new KiCAD 6.0 version, I was rather amazed at the extent of not only the included KiCAD libraries, but also the extent of the accessible "User" libraries. And, within the KiCAD "User" libraries, you will find lots of vacuum-tube schematic symbols and PCB-footprints. Another possible reason to switch-over to KiCAD is the fact that it is both sponsored and supported by the CERN organization (as in the European "Large Hadron Collider" (LHC), the world's largest and most powerful particle accelerator" project)!!! I don't think that you will this amount of "OOMPH" behind the DipTrace program.

And, finally.....you will find attached some PDF files about the design and engineering of PCB's from a variety of industry reputable sources that you can spend your evenings on reading and learning about PCB's instead of lurking around dark streets at night looking to steal the hubcaps off of vintage cars!!! Eventually.....you could become a professional "PCB Designer"!!! YA-A-A-AY!!!
 

Attachments

  • CADENCE -- Routing eBook On PCB Layout.pdf
    948.6 KB
  • Are you ready for tomorrow’s PCB industry.pdf
    7.6 MB
  • Top-10-Circuit-Board-Design-Checks.pdf
    1.9 MB
  • The Printed Circuit Designers Guide To Documentation.pdf
    5.4 MB
  • TELEDYNE -- 100+ PCB Design Guidelines to Minimize Signal Integrity Problems.pdf
    397.8 KB
  • Producing The Perfect PCB Data Package.pdf
    6.5 MB
  • PCB_Application_Guide.pdf
    6.4 MB
  • PCB Design Rules for Analog Circuits.pdf
    133.8 KB
  • Optimum PCB Design Handbook.pdf
    1.9 MB
  • OHMITE -- How To Select A Heatsink.pdf
    476.7 KB
  • Fundamentals of PCB Technologies.pdf
    7 MB
  • ESSENTRA -- The Ultimate Guide To PCB Hardware.pdf
    685 KB
  • Creating Documentation for Successful PCB Manufacturing.pdf
    3 MB
  • ADVANCED Assembly -- Cost Saving PCB Design Tips.pdf
    5 MB
Thanks for your input, FIX, but the thing is that I'm fitting this circuit inside a 1590BB box. Initially I had the tube outside but I want it inside now and I've added the cabsim and the DI out so TH is simply a no go because components and trace end up REALLY close and packed. So I saw a guy called Sushibox that uses 0805/1206 resistors and C0P/X7R caps (except for big caps and it fits nicely. Now I just want to scale down the PSU as much as I can, hence the components I mentioned in my first post.

Cheers ;)
Sono
Once you get to a point where you have figured out everything that you want to cram inside your HAMMOND 1590BB enclosure, you could let me know all of what you are using and I could help you out with -- visualizing -- how everything fits together inside the 1590BB by virtue of 3D CAD-modeling!!! YA-A-AY!!! Here is an "exploded view" of the HAMMOND 1590BB enclosure:

1665039994086.png


/
 

Attachments

  • 1590BB - Exploded View.pdf
    188.6 KB
-- I was only referring to -- HOW -- the schematic was drawn and/or laid-out and NOT anything about how the circuit is designed!!!
Oh I see what you mean. You're both most definitely right hahaha, I found this circuit initially on a veroboard pic and traced it to a schem myself....that was a long time ago. I'm pretty sure I could redo it much clearer now hehe :)
After I had installed the new KiCAD 6.0 version, I was rather amazed at the extent of not only the included KiCAD libraries, but also the extent of the accessible "User" libraries.

I'm downloading it as I'm writing ;)
Thanks for the suggestion. I'll definitely check it out, especially if tube libraries exist too ;)

And, finally.....you will find attached some PDF files about the design and engineering of PCB's from a variety of industry reputable sources that you can spend your evenings on reading and learning about PCB's instead of lurking around dark streets at night looking to steal the hubcaps off of vintage cars!!! Eventually.....you could become a professional "PCB Designer"!!! YA-A-A-AY!!!

I will most definately read through those. Thanks again! :)
 
You mean the 7806 voltage regulator?

No, I meant that you have two vacuum tubes and power supply circuitry crammed into a closed box. Vacuum tubes have a heater specifically because they have to get hot to work. Most vacuum tube designs have the tubes exposed to air circulation, but in a closed box that heat just builds up inside the box until the air trapped in the box heats the box enough that the heat flow through the box equals the heat going into the trapped air. Because air is not great at heat transfer the temperature of that trapped air will probably be quite high by the time that heat flow equalizes.
 
Oh I see what you mean and you're totally right of course: the enclosure will have vents :)
 

Attachments

  • IMG_20221006_195044.jpg
    IMG_20221006_195044.jpg
    202.5 KB
Oh I see what you mean and you're totally right of course: the enclosure will have vents :)
Should you include vents into your enclosure, then I would also add-in either some kind of a "screen" material or perhaps a "foam-mesh" material like that used with small fans mounted inside a chassis. Otherwise, dirt and debris and/or the final ends of joints will find their way into the enclosure and that's not a good thing!!!

1665088732487.png
1665088847068.png

Hope this helps!!!

/
 
Keep in mind that some of those parts have significant DC across them (for example, the first feedback resistor R7), and a common voltage specification for 0805 is roughly 50-100V. You either need to a) move up to bigger package like 1206, or b) use several 0805's in series.

Also, finding high voltage, low ESR caps in SMD can be an issue (critical for C22), so again you might need to break C22 into multiple caps in parallel.

Well spotted, Matador!!.....I didn't have any problem with my veroboard prototype using 1/4w metal resistors except the plate resistors (rated at 1w), but maybe I should use 1206s rated for 1W for R3, R4, R5, R7, R12 and R13?

Cheers
Sono
 
The issue was more about the voltage rating of those resistor packages, rather than the power they might need to dissipate.

If they're physically too small, and the voltage between the two terminals is too great, it might arc over and cause... trouble.
 
Back
Top