My Full Metal Enclosure For a 500 Series Module

GroupDIY Audio Forum

Help Support GroupDIY Audio Forum:

This site may earn a commission from merchant affiliate links, including eBay, Amazon, and others.

jsteiger

Well-known member
White Market Member
Joined
Apr 11, 2008
Messages
3,586
Location
Nashville TN
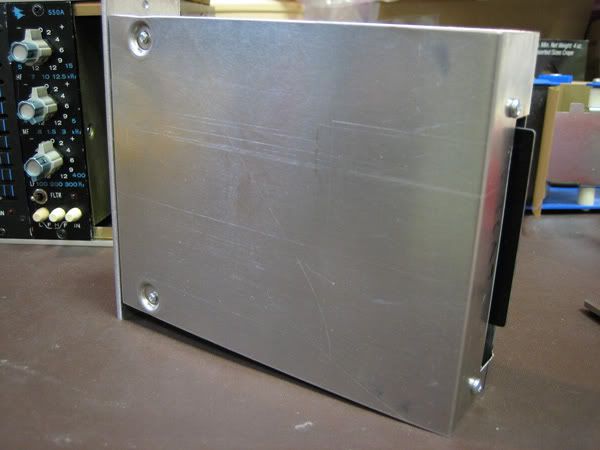
So, I decided to challenge myself a little on my next 500 series module. I went for the full metal enclosure. The frame is .05” steel and the cover is .025” steel. The parts shown are the proto’s from my metal shop. The final version will be cleaned up a little and yellow zinc plated.

We are having a custom tool made up since my embossed hole design is not exactly stock. That tool isn’t ready yet so they used the next bigger size for the proto parts. That’s why the embossed holes look a little big.

I am just happy as my layout for both parts worked the first time out. I have no changes to make for either part. Now, if the boards were right on the first Rev.....I would really have something!!

Anyhow, here are a few pics.

Front, right side.
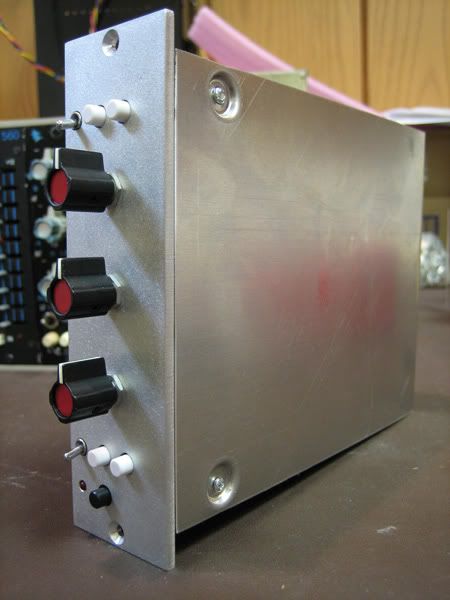
2_553F.jpg


Rear, right side.
5_553F.jpg


Ass-end. Note that the notch is large enough to slip over the 18-pin connector in a 51x rack.
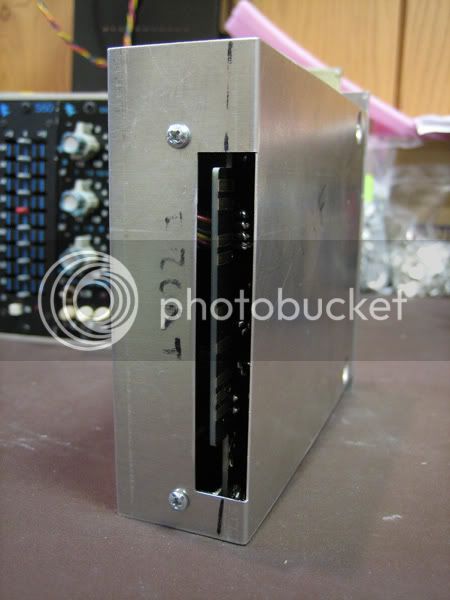
1_553F.jpg


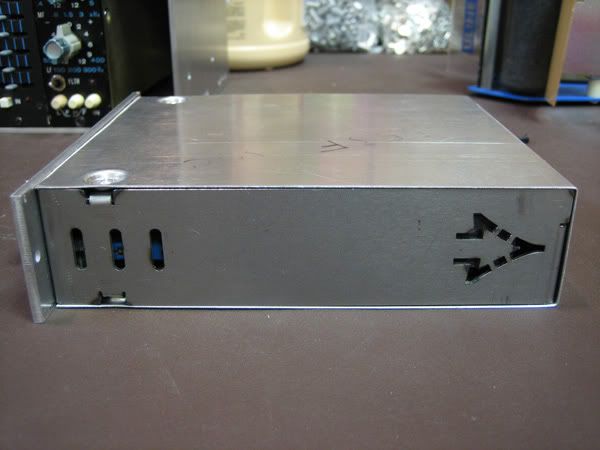
Top. I couldn’t resist using my logo for vent holes. The space in the middle can be for a product ID tag.
3_553F.jpg


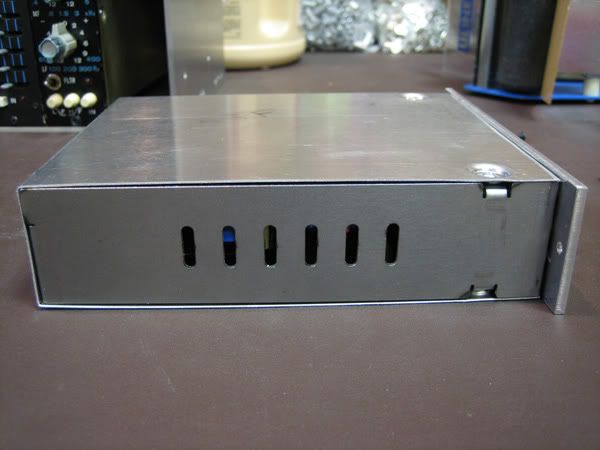
Bottom, vent holes.
4_553F.jpg


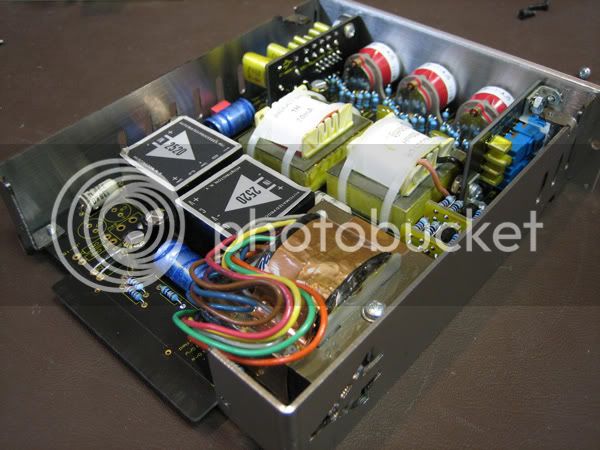
Inside. I see a 2503 that needs a haircut. This is a vintage transformer as I was out of Ed’s version when I built this. I saw no need to cut the leads for a proto build.
6_553F.jpg


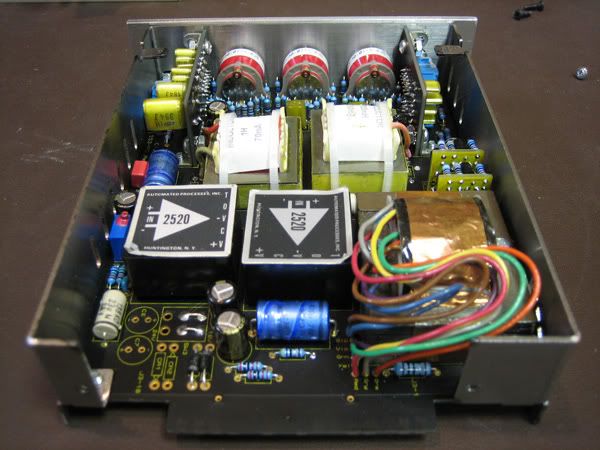
Leaving the back of the frame open makes it easy to drop the PCB in. The frame flexes in and out pretty easily.
7_553F.jpg


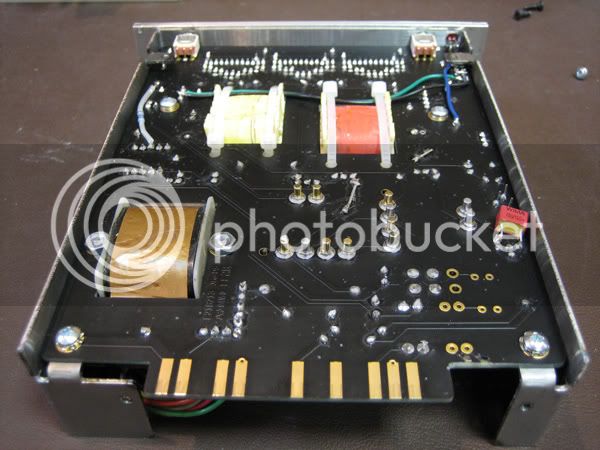
The board fastens in the rear with a couple of 4/40 screws to the steel frame. This PCB was my first Rev so that’ll explain a few components, jumper wires and cut traces here and there.  ;)
8_553F.jpg


Cheers, Jeff  :)
 
You ARE a machine !  Yeah looking good whatever it is ............... 553 ish eq ?

btw It's my preference to install the opamp socket pins in from the top as I
feel there's more pressure pushing in , than pulling out and i find it a little easier
why do you put them in from the bottom ?
 
okgb said:
...Yeah looking good whatever it is ............... 553 ish eq ?
Thanks Greg. Yes, it is a 553-ish EQ. I have been referring to it as the 553F, "F" being for filters. I have added a discrete opamp receiver stage as well as 3 frequencies each for LP and HP. Much like the Missing Link, each filter has a -6dB or -12dB toggle. I have the 3 transistor discrete followers between the filters and one after the LPF. The rest of the EQ circuit is pretty true to a vintage 553 except I have made this one switched cut/boost. The steps are small though. Typically 1.25dB up to 7dB max boost and 9dB of cut. I am using all 12 steps of the 71's. This PCB, the 553-PC is made specifically for Peterc's sweet, massive inductors. I bought 8 inductor sets from him with his PCB's. They have been sitting in a box ever since. I was working on another EQ when this one seemed like a "stripped down", easy version so I thought I would give his inductors a home. This particular version is mainly for me. I did get a few extra boards but not many.

After spending some time on this, I have asked Ed to supply me with .1H and 1H toroidal style inductors so I can offer a kit. I will have a fully variable version too for those who don't care about the stepped cut/boost.

btw It's my preference to install the opamp socket pins in from the top as I
feel there's more pressure pushing in , than pulling out and i find it a little easier
why do you put them in from the bottom ?
To each his own. I have been doing this for more room above the component side like gemini86 mentioned. For a 500 series module, there is plenty of room below so I figure why not put the unnecessary height there. Also, for my VP312DI, if you have the Jensen DI transformer, you need every bit of height you can get or the top of the Jensen will encroach into the next module space. From the bottom is mandatory. So, I just like to keep it consistent.

The ones you see in the pic above have been in and out of countless prototype builds. That's why some are fully covered in solder and look like hell!  :D FWIW, I don't think there is any difference in strength between top or bottom. Especially with the double sided plated thru hole. I bet you could stand on an opamp and the PCB will break at the standoffs long before any socket issues come up.

Cheers, Jeff
 
Looks great and I bet that next evolution of the 553 sounds sweet. I've been wondering, does the full enclosure interfere with the jumper pins on the 51x backplane?
 
Denyle Guitars said:
Looks great and I bet that next evolution of the 553 sounds sweet.
Oh yeah. I have done some really cool special stuff on that one. Not quite ready to start talking about it though.

I've been wondering, does the full enclosure interfere with the jumper pins on the 51x backplane?
Well, the overall depth of my enclosure is the same as a 550A, B or what have you. With my new 508 backplane, I removed one side of the rack so I could see exactly what the deal was. If the 3M header is dead tight to the backplane, you will have between 25 and 35 thou clearance from the top of the pins to the rear of the enclosure. That is .025" to .035". Not a lot but should typically be fine.  If you look at the 508 backplane pics on my site, I am recommending installing the headers from the rear. That will gain around another .1" of clearance space. I would also recommend this for a 51x backplane build.

15_side-open.jpg


Cheers, Jeff
 
These are getting close, as are the LC53A's. I am not sure which will be done first.

I have received a pair of ferrite core toroids from Ed to audition for the 553F. He has an mpp set coming too. Once those are here, I will choose. The circuit and PCB is 100% set and I have my ones here that Peter's inductors will go on (for me). Once I choose the toroidal inductor version, I just need to add them to the PCB layout and order boards.

The metal covers with embossed holes have been ordered for both EQ's. They should be at the plating shop around now. Once I confirm the .05" frame proto's for the LC53A, I will order the frames for both EQ's. I am expecting those proto's in a few days or so.

I have also ordered some center detent Bourns pots for the fully variable version. Placed that order about 2 weeks ago. They are 10% tol pots to help keep the detent more "centered". I actually complained to my factory rep about the location of the detent on some samples I received a while back. He checked into it and says they remade the mold they use for the detent so it should be very close to 50% now. He seems very excited about it so I guess I am too!

All of that said, I am hoping to have the kits for release before the end of the year.

Like Chuck said, I put some pics up on FB the other day of the front panel artwork for both modules.

Cheers, Jeff
 
Moving forward at a slow pace. I think the LC53A will be done first, shortly after the first of the year. I have a large supply of GH's ordered along with all the multi-tap inductors. I got what should be the final Rev of boards in last week. Just need to build and test.

I am still waiting on Ed to send me the mpp core samples for the 553F. I think he just did that.

Cheers, Jeff
 
johnnyscotch said:
sweet!
Do you have a price in mind yet? They're going to be kits, correct?
No prices yet. That is the last thing I put together for my stuff. I build them the way I want, then I figure out what it will cost. Crazy.  :eek:

Kits indeed!! I prefer kits and only build on special request. Takes too much time away from product development and so on.

Cheers, Jeff
 
No prices yet. That is the last thing I put together for my stuff. I build them the way I want, then I figure out what it will cost. Crazy.  :eek:

Kits indeed!! I prefer kits and only build on special request. Takes too much time away from product development and so on.

Cheers, Jeff

Hi Jeff,
Do you have a "notify me" mailing list or will you just post in this thread when they're available?
Thanks!
Kind regards,
Frank
 
Back
Top