


Just sharing the details and lessons learned about a few methods to restore those beautiful and ergonomic RCA/Viz/Daven knobs for you Jurassic pro audio lovers. Each of the methods below can work equally well, but one or the other may be faster or slower depending on the tools you have. In the end, you can even do it all by hand if you don't have any tools. But you can get the tools for cheap at Harbor Freight Tools (in the US) or on Craigslist, etc. Nothing fancy.
**Before using any of the polishing/finishing methods below, apply the acrylic or enamel paint of your choice to the indicator groove (if necessary). I use white and add a tiny bit of tan paint to it to give it a more vintage look. If you do this first, you don't have to be very accurate and stay completely inside the lines, because the polish will take off any paint that's outside the lines. But it does pay to at least try to stay in the lines, because etched phenolic can absorb enamel fairly deeply, and it'll take some time to polish out. So I recommend acrylic. You can pretty much wipe off most of any that gets outside the lines while it's still wet. Someone else may have a better suggestion. I've heard nail polish works well, but I've never used it. Whatever you use, use a couple of coats and wait until completely dry to start the steps below.**
Method 1 (my current favorite and quickest):
Use a bench grinder or dedicated bench rotary buffer with a series of 8 or 10 inch buffing wheels and various grits of jeweler's rouges. 1 sisal wheel, 2 or 3 spiral-sewn buffing wheels and a soft polishing wheel will give you everything you need. The appropriate rouges for phenolic plastic (bakelite), from coarsest to finest are: 1) brown tripoli rouge (coarse grit), 2) white rouge, 3) red rouge and 4) blue all-purpose rouge (finest). Don't use black emory or green stainless on plastics.
Dedicate one buffing wheel to each grit you use (don't just apply a different rouge over another to save bucks - wheels are pretty cheap). Based on the depth of scratches/blemishes on the knob, choose an appropriate rouge to start with (don't always go for the coarsest automatically. You just create more work for yourself). It'll take some experimenting to get the feel of which to start with. For badly blemished knobs, I usually start with brown tripoli. Polish the knob until the scratches are all a uniform depth and the knob has a consistent look about its surface (at this point, it will be very dull matte). Then move up to the next finer grit of rouge and do the same, working through each grit all the way up to blue all-purpose (a wheel change or two will probably be required at some point).
Tips:
1. Don't skip grits as you work your way up. It actually ends up taking longer that way, as the finer grits will take quite a bit longer to grind out the deeper scratches left by coarser grits. It's quicker to just move up through each grit, even if a wheel change out is needed.
2. Any kind of buffing wheel throws rouge/polish off of it once you load it up. Don't put the buffer anywhere you don't want nearly-impossible-to-clean-off gunk/shrapnel thrown onto anything around the wheel. Wear a shop apron, smock or ratty clothes. If your buffer/grinder has guards on it, use them. If not, you may want to get a large cardboard box and put the buffer/grinder about halfway into the opening. It'll at least prevent the worst of the mess.
3. For the shiniest finish, finish up with a super fine car polish or Maguire's Plastic Polish.
4. Wear safety glasses or use a full-face mask if you prefer
5. A dedicated bench buffer runs at a lower RPM than a bench grinder does, which is more appropriate for this type of work. But I've used a bench grinder and it can be done with one. Just don't leave the knob sitting still in the same place for long. Keep it moving to keep patterns and ditches from forming on the surface of the knob. Low RPM is your friend.
Method 2:
Similar to the above, but for when you don't have a bench grinder and don't want to/can't get one. Use a Dremel or similar rotary tool or a power drill with smaller cotton and sisal buffing attachments. There are some caveats with this method (see below)
(You can also use a wood lathe like a buffing wheel if you have access to one. You can get lathe arbors that allow you to attach smaller buffing wheels to them at Harbor Freight (in the US) for cheap. Use a medium speed on the lathe and work through grits just as above).
If you use a Dremel, you can use rouges with the little buffer attachments that are available. But preferably use the little softer buffing wheels as opposed to the shaped, hard cotton polishing attachments that look like little cones. The problem with the latter is that the speed a dremel runs at (much higher RPM than a bench buffer) makes it too easy to leave indentions, swirls and variations in the surface of the knob. It takes a lot of care and attention to detail to keep that from happening with a Dremel or similar rotary tool.
A power drill would be a better choice. Preferably one with plug-in AC power (the process takes a while and Lithium Ion batteries will get pretty hot and run out quickly when using the drill this way). You can easily find chuck-able buffing attachments for power drills at any hardware store. The slower RPMs and wider surface area of attachments don't require as much care as doing this with a Dremel, and the results are usually better.
You may find that using a series of car or plastic rubbing compounds works better with these smaller power tools than jeweler's rouges. Maguires makes a series of progressively finer grit compounds that will be easier to apply to a buffer on a hand drill or rotary tool. But these are pretty pricey.
Whatever you use, the same tips apply here as above.
Method 3:
Buy a headlight restoration kit from an automotive supply shop, Amazon or a home store. These come with various grits of sandpaper (some attach using velcro to a drill attachment which is usually included, while the cheaper kits are intended to be used by hand. Either will work, but obviously the hand method will take longer). You work your way through the various grits of sandpaper and finish up with one or two included final polishes using a hand drill or other rotary tool. These kits can work well if you follow directions and don't get impatient. Probably the cheapest way to go here, but results vary by kit.
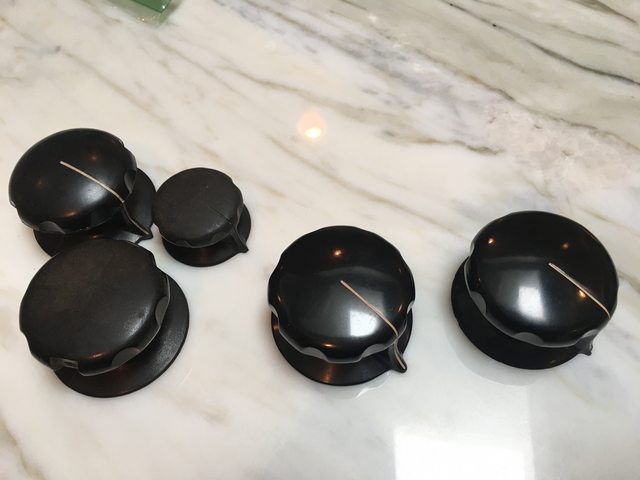
A few pictures below.
On the left are a group of 3 vintage knobs in the "before" state.
The large knob just to the right of those three is one I restored using method 1, above. It was every bit as bad or worse than the three on the left when I started.
The large knob on the right is a NOS knob from a box of 10 I bought a while back for comparison to the restored knob. I can't tell any significant difference.
So there ya go. Have fun.
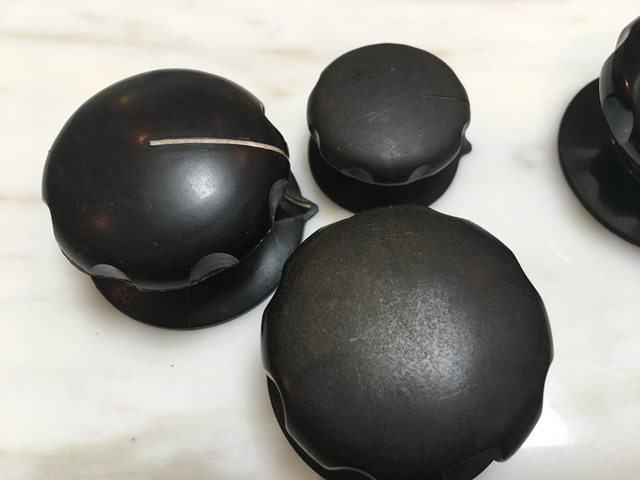
Closeup of "before" state:
Restored knob using method 1 next to a NOS knob. Restored knob is on the left:

**Before using any of the polishing/finishing methods below, apply the acrylic or enamel paint of your choice to the indicator groove (if necessary). I use white and add a tiny bit of tan paint to it to give it a more vintage look. If you do this first, you don't have to be very accurate and stay completely inside the lines, because the polish will take off any paint that's outside the lines. But it does pay to at least try to stay in the lines, because etched phenolic can absorb enamel fairly deeply, and it'll take some time to polish out. So I recommend acrylic. You can pretty much wipe off most of any that gets outside the lines while it's still wet. Someone else may have a better suggestion. I've heard nail polish works well, but I've never used it. Whatever you use, use a couple of coats and wait until completely dry to start the steps below.**
Method 1 (my current favorite and quickest):
Use a bench grinder or dedicated bench rotary buffer with a series of 8 or 10 inch buffing wheels and various grits of jeweler's rouges. 1 sisal wheel, 2 or 3 spiral-sewn buffing wheels and a soft polishing wheel will give you everything you need. The appropriate rouges for phenolic plastic (bakelite), from coarsest to finest are: 1) brown tripoli rouge (coarse grit), 2) white rouge, 3) red rouge and 4) blue all-purpose rouge (finest). Don't use black emory or green stainless on plastics.
Dedicate one buffing wheel to each grit you use (don't just apply a different rouge over another to save bucks - wheels are pretty cheap). Based on the depth of scratches/blemishes on the knob, choose an appropriate rouge to start with (don't always go for the coarsest automatically. You just create more work for yourself). It'll take some experimenting to get the feel of which to start with. For badly blemished knobs, I usually start with brown tripoli. Polish the knob until the scratches are all a uniform depth and the knob has a consistent look about its surface (at this point, it will be very dull matte). Then move up to the next finer grit of rouge and do the same, working through each grit all the way up to blue all-purpose (a wheel change or two will probably be required at some point).
Tips:
1. Don't skip grits as you work your way up. It actually ends up taking longer that way, as the finer grits will take quite a bit longer to grind out the deeper scratches left by coarser grits. It's quicker to just move up through each grit, even if a wheel change out is needed.
2. Any kind of buffing wheel throws rouge/polish off of it once you load it up. Don't put the buffer anywhere you don't want nearly-impossible-to-clean-off gunk/shrapnel thrown onto anything around the wheel. Wear a shop apron, smock or ratty clothes. If your buffer/grinder has guards on it, use them. If not, you may want to get a large cardboard box and put the buffer/grinder about halfway into the opening. It'll at least prevent the worst of the mess.
3. For the shiniest finish, finish up with a super fine car polish or Maguire's Plastic Polish.
4. Wear safety glasses or use a full-face mask if you prefer
5. A dedicated bench buffer runs at a lower RPM than a bench grinder does, which is more appropriate for this type of work. But I've used a bench grinder and it can be done with one. Just don't leave the knob sitting still in the same place for long. Keep it moving to keep patterns and ditches from forming on the surface of the knob. Low RPM is your friend.
Method 2:
Similar to the above, but for when you don't have a bench grinder and don't want to/can't get one. Use a Dremel or similar rotary tool or a power drill with smaller cotton and sisal buffing attachments. There are some caveats with this method (see below)
(You can also use a wood lathe like a buffing wheel if you have access to one. You can get lathe arbors that allow you to attach smaller buffing wheels to them at Harbor Freight (in the US) for cheap. Use a medium speed on the lathe and work through grits just as above).
If you use a Dremel, you can use rouges with the little buffer attachments that are available. But preferably use the little softer buffing wheels as opposed to the shaped, hard cotton polishing attachments that look like little cones. The problem with the latter is that the speed a dremel runs at (much higher RPM than a bench buffer) makes it too easy to leave indentions, swirls and variations in the surface of the knob. It takes a lot of care and attention to detail to keep that from happening with a Dremel or similar rotary tool.
A power drill would be a better choice. Preferably one with plug-in AC power (the process takes a while and Lithium Ion batteries will get pretty hot and run out quickly when using the drill this way). You can easily find chuck-able buffing attachments for power drills at any hardware store. The slower RPMs and wider surface area of attachments don't require as much care as doing this with a Dremel, and the results are usually better.
You may find that using a series of car or plastic rubbing compounds works better with these smaller power tools than jeweler's rouges. Maguires makes a series of progressively finer grit compounds that will be easier to apply to a buffer on a hand drill or rotary tool. But these are pretty pricey.
Whatever you use, the same tips apply here as above.
Method 3:
Buy a headlight restoration kit from an automotive supply shop, Amazon or a home store. These come with various grits of sandpaper (some attach using velcro to a drill attachment which is usually included, while the cheaper kits are intended to be used by hand. Either will work, but obviously the hand method will take longer). You work your way through the various grits of sandpaper and finish up with one or two included final polishes using a hand drill or other rotary tool. These kits can work well if you follow directions and don't get impatient. Probably the cheapest way to go here, but results vary by kit.
A few pictures below.
On the left are a group of 3 vintage knobs in the "before" state.
The large knob just to the right of those three is one I restored using method 1, above. It was every bit as bad or worse than the three on the left when I started.
The large knob on the right is a NOS knob from a box of 10 I bought a while back for comparison to the restored knob. I can't tell any significant difference.
So there ya go. Have fun.
Closeup of "before" state:
Restored knob using method 1 next to a NOS knob. Restored knob is on the left:


