8 Channel, 3U NEVE 1073 completed

GroupDIY Audio Forum

Help Support GroupDIY Audio Forum:

This site may earn a commission from merchant affiliate links, including eBay, Amazon, and others.
Ah, great reply Colin!! Digikey UK also has the BC184C's and 2N3055's btw, so you can one-stop shop. :)

Skal1, if you just need a LINE-IN module only, I'd do the following:
1) buy: CA-18-VTB9046 from www.audiomaintenance.com
2) buy: 71BD30-01-1-AJN (but preferably -AJS if in stock) from Digikey
3) leave the second pre-stage empty on the EZ1290 (closest to switch), and leave off the onboard rotary switch and surrounding resistors
4) point to point wire according to "Neve EH10023" - that's R1, R7, R9, R24, R25, R26, R27, R28, T2, C6 on www.technicalaudio.com/neve/neve_pdf/1073-fullpak.pdf (page 2). You'd connect to "U" of the first pre-stage, which on the PCB is to the right of the horizontal 18K resistor near the bottom.
The switch should be very simple to wire up because there's only one deck/pole and 7 positions; you'll also want to "stop-pin" it after the 7th position.

As I've said before, if there's enough demand it would be easy for me to do a line-in version of the EZ1290, but so far almost everyone wants a mic pre. The point to point work described above is really so pedestrian it's hardly worth sticking the rotary on the PCB. Different story for the mic-pre however. :)

Enjoy the preamps Sam!!! :)

M.
 
Hi Mitsos,

Sort of. If you wire like above, you'd basically have a 1272 with line-input (31267) only. A true 1272 has the 10468 transformer to match the impedance of a passive summing bus (like NYD's design) and provide about 40dB of makeup gain. If you built an EZ1290 per my instructions, but omitted the 2nd pre stage, stopped the PCB mount rotary after 50dB you'd essentially have a 1272 - with adjustable gain from 20-50dB.

HTH,

M.
 
trancedental said:
Just powered up one channel & tried it out with a few different mics, this pre sounds fantastic , even tried it with a cheapo T Bone Ribbon mic which cost £50 ;D Doesn't even need much gain, plenty on tap here. It also likes my knackered old Sennheiser MD441D as well! What a great larger than life sound especially on bass frequencies :eek: Thanks to Madriaanse for all his hard work for making this possible ;D

Hi trancedental, sorry I missed you post!! Congrats on the successful build!! Happy tracking!

M.
 
Whats up!

Is anyone still producing the ez1290 boards? If so I may be interested in four or so.

Thanks,

Eric
 
Hi Zachs,

Did you ever did a FPD file from your design? Would you share it?
I would like to build a 4 channel, and I think you design is awesome!

Thanks,
Luis

zachs said:
Updated a few of them, yea I'm really liking the #2 in the 2U, made some tweaks to fonts etc, if everything can actually go together like that I'll be very pleased, it's gonna be a freaking tight squeeze though.

neve-mockup-2.jpg


I'm trying to decide what would be the best way to make these:

1) FPE
2) Laser Engrave
3) Silk Screen

I think I'm leaning towards silk screen for a nice authentic look, anyone know how that compares to FPE?

Just thinking about this more and more, I think I'm going to try and add the Trim Pot to this as well. That's gonna mess with my space! Maybe I do need the 3U  ::) Anyone know where the get the grey small Neve knobs?
 
Hey Martin,

I'm in the process of putting my two 1290s together.  Just waiting on some transistors and transformers.  After stuffing the boards tonight I've got to say I'm really impressed with how you laid the circuit out.  It's nice to see each gain stage separated and spaced out.  No issues yet, I just wanted to give a thumbs up!
 
I still havent started building it, but was wondering if it was possibile to have both configuration (LINE IN as explained by Martin above) and original MIC IN in the same unit.

ciao..
 
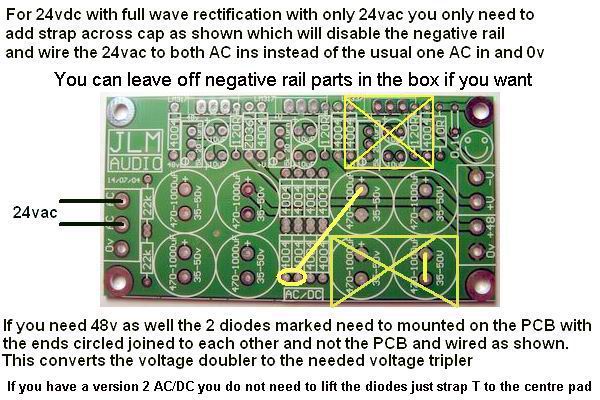
Okay, I finally have everything ready to go with my 4-channel EZ1290 but I'm second guessing how I populated the PSU after seeing this...

JLMACDCneve.jpg


I used a JLM Powerstation - which I realize isn't what's being shown there - which I just fully populated and added heat sinks to the transistors. However, looking at that picture, should I have not fully populated it? Do I have to remove those caps and add those extra jumpers? Am I still using the jumper for the voltage doubler (not the tripler)?

I have +V1 heading to channels 1 & 2 of the EZ1290, and +V2 heading to channels 3 & 4, so I'm not using the negative rails. Even though I still populated them. I'm itching to fire this up.

Thanks!!!


rmccam said:
Okay, I finally have everything ready to go with my 4-channel EZ1290 but I'm second guessing how I populated the PSU after seeing this... Do I have to remove those caps and add those extra jumpers? Am I still using the jumper for the voltage doubler (not the tripler)?

How is your secondary set up on the transformer? Series or parallel? If your using a series connection(12x0x12v) to get your 24 volts, the answer is no to the above question. If your secondary is in parallel(24v-0v) then you would want to make the necessary changes for full wave rectification and tie the two diode legs as Joe suggested for the 48v rail as well.

( I think i sort of know what i'm saying... :) I'm learning too. Someone correct me if i'm wrong)

How you populate and which voltage multiplier u use...depends on how you connect and what your secondary winding is. Double check the JLM website for instru. Voltage multiplier is where our 48v comes from, simply input voltage doubled or tripled.

Make sure to use the largest heatsinks you can or install rectifiers 'underneath' the pcb, bend backwards and attach to to bottom of the case with insulation. You could attach the rectifiers off-board with wires as well, instead of bending the legs. Make sure to test all voltages in and out of powerstation before hooking anything up...and be sure to attach a fuse to the secondary of the transformer before powering up, just in case something smokes. Always have a fuse hooked up...and spare fuses to boot.

Maybe Joe will chime in here. Again, I think i know how this works, but be sure and double check with Joe.

D.
 
Well, thus far, i've completed populating 8 cards(nearly passing out a few times)...and managed to get one hooked up.

.....Punchy as 'hell'....with just vocals, full sound, lots of gain...sounds really good.
Everything is pretty much on hold until i get frontpanel done. $220...youch...


3nity said:
220$ i get the front panel engraved for 15$ locally...

I used frontpanel express...this was the pricing in the software quote...not sure if it's actual pricing.

Wondering if there's any way i can swing this somewhere else, with frontpanel express..cheaper?
Or maybe import into other software, for local engraver? hmm

I need to contact them, to find out what the deal is on pricing. Maybe that prices includes panel, etc.
Or maybe just have another look at the pricing list in the software...

Edit: nOPE. Just looked at price list. That's the price for just engraving and infill. actually $204...darn pricey as suggested.

 
Back
Top