[BUILD] 1176LN Rev D DIY

GroupDIY Audio Forum

Help Support GroupDIY Audio Forum:

This site may earn a commission from merchant affiliate links, including eBay, Amazon, and others.
Hairball Audio said:
kerrymckenna14 said:
Hairball Audio said:
Has to be a measuring error. Are you measuring DC? The unit is on?

The collector of Q14 is connected directly to the 30V DC rail. You should be seeing 30V DC there.

I'm kind of lost. Did you test you power supply?

We do offer a repair service.
http://www.hairballaudio.com/build-support-services


Mike

Sorry Mike I didn't realise the unit had to be power on.  Did the measurements again and I can't get any reading from Q14 and the B & C of Q3?

Would this shed any light on what may be wrong?

Test your power supply. The +30V DC and -10V DC rail. Described in the "Building the Power Supply" section of the guide, at the end.

Mike

+30 reading 29.85 and -10 is reading -9.6!
 
kerrymckenna14 said:
Hairball Audio said:
kerrymckenna14 said:
Hairball Audio said:
Has to be a measuring error. Are you measuring DC? The unit is on?

The collector of Q14 is connected directly to the 30V DC rail. You should be seeing 30V DC there.

I'm kind of lost. Did you test you power supply?

We do offer a repair service.
http://www.hairballaudio.com/build-support-services


Mike

Sorry Mike I didn't realise the unit had to be power on.  Did the measurements again and I can't get any reading from Q14 and the B & C of Q3?

Would this shed any light on what may be wrong?

Test your power supply. The +30V DC and -10V DC rail. Described in the "Building the Power Supply" section of the guide, at the end.

Mike

+30 reading 29.85 and -10 is reading -9.6!

That's fine.

Yet you have no V DC at the collector of Q14? That's the middle leg, it's directly connected to the +30 test point.  Look under the PCB, you'll see it.
 
That's fine.

Yet you have no V DC at the collector of Q14? That's the middle leg, it's directly connected to the +30 test point.  Look under the PCB, you'll see it.
[/quote]

Yup, seems to be the case.  I'll test again tomorrow, maybe the joint needs to be a bit more solid.  I'll let you know as soon as.
Thanks Mike :)
 
kerrymckenna14 said:
That's fine.

Yet you have no V DC at the collector of Q14? That's the middle leg, it's directly connected to the +30 test point.  Look under the PCB, you'll see it.

Hey Mike,

I desoldered and re-soldered all those joints, did them in a rush trying to complete a college assignment.

These are the DC readings now.

Q2
B = 1.05V
C = 1.79V
E = 0.54V

Q3
B = 1.79V
C = 11.5V
E = 1.17V

Q14
B = 11.5V
C = 29.8V
E = 10.8V

So yeah I'm getting the reading +30V :)

Seems normal.

I'll come up with some more test points later today. You may have an issue with your output wiring, clean that up.

Mike
 
Like see this on your input.  Your ground wire is all frayed and almost touching your signal. If those touch your signal is dead. The output looks sketchy too.

Mike
 

Attachments

  • Screen Shot 2015-12-10 at 7.14.44 AM.png
    Screen Shot 2015-12-10 at 7.14.44 AM.png
    486.2 KB
Hairball Audio said:
Like see this on your input.  Your ground wire is all frayed and almost touching your signal. If those touch your signal is dead. The output looks sketchy too.

Mike

I fixed that Mike.  Re-striped it and resoldered it.  Attempted the q-bias again and I'm finally getting signal in, although the needle seems to be jumpy and takes a good bit of welly to get signal up high.  I tried measuring the XLR output too and the highest I can get it 1.3VAC.


Also Mike is there another position I can put the output ground at pad 16? There is no traces underneath but i can't clean the hole enough.
 
Hairball Audio said:
felix1988 said:
Hi everybody,

I went through the whole thread and also found similar cases which helped me a bit to narrow my search but i'm still not able to solve my problem.

I'm troubleshooting a hairball rev d a friend of mine built. I can't complete the first calibration step - I'm not able to get a volume drop via the bias control.

the unit is passing audio in full bandwidth and I can get about 42 dB of gain with both pots at max. GR meter doesn't move to zero and I don't get any compression.

Power rails are in the 10% margin.
also my voltages are only about 10% off max from the mnats schem so I assume they are fine?

at pin 19 on the pcb I get 0 VDC and it doesn't change when turning the pcb bias trim. same for G at Q1 and Q11.

I reheated all the solderpoints and redid the wiring - all seems correct to me.

could it be that Q1 or Q11 are dead?
or maybe the bias-trim pot?

How could I find out which of the two is the culprit? the trimpot being stuck would explain the q-bias not changing but not being non-existant, right?

or maybe something else is the problem? but i assume somewhere in the GR control circiut?

I would appreciate any help or hints!

thanks!

felix

I would be suspect of the attack/release/ratio PCB wiring.


well you were right haha... after i completely took the wiring and ratio pcb apart and redid it i was able to get it working. although i don't really know what the exact problem was which is somehow frustrating :D anyways… thank you very much mike, your the best!

the compressor seems to be working know but there are a few things that seem weird to me:
during the calibration procedure it took a lot of attempts to get the meter to show the right amount of GR. at the beginning i kinda ran out of trimpot turns and was at the end of the pot before i got the meter even close to 10 dB. but maybe the unit wasn't powered on long enough before that… but in the end i got the 10 dB on the meter.
now when i send a snare sample to the compressor and loop just the one sample hit and i get my pro tools meter to show a difference of 10 dB between compression on and compression off, the unit will only show 7dB. when i switch to a sinewave the reading is correct again. is it because the snare hit is too short for the meter to follow? or is it something to worry about?

also the attack and release times seem to fast to me. even on the longest release setting the meter moves to 0 very fast again. on the other units i know and all the plugin emulations i know, the release seems way longer.
i know that the  attack is still super fast in its longest setting but i'm used to being able to get quite a nice "knock" out of drums with an 1176.  this one slams down the transient really fast. sounds more like an L1 to me :) the cap and resistors on the pots have the correct values. and i know the 1 on the pot is the slowest setting :)
maybe another newbie mistake?
Is there a way to actually measure those times?

but it sounds dope on rock vocals!! :)

thanks!!
 
The 1176 attack is super fast. Real fast. It's 20 MICRO seconds to 800 MICRO seconds. That's 0.00002 to 0.0008 seconds. The plug-in may be altering it a little because they can.

The pro-tools meter is a different scale and there is no direct calculation between dBu and dBFS.  The trimpots can run out of room, you need to start centered and when you adjust, anticipate how they will effect one another.

Thanks,

Mike
 
kerrymckenna14 said:
Hairball Audio said:
Like see this on your input.  Your ground wire is all frayed and almost touching your signal. If those touch your signal is dead. The output looks sketchy too.

Mike

I fixed that Mike.  Re-striped it and resoldered it.  Attempted the q-bias again and I'm finally getting signal in, although the needle seems to be jumpy and takes a good bit of welly to get signal up high.  I tried measuring the XLR output too and the highest I can get it 1.3VAC.


Also Mike is there another position I can put the output ground at pad 16? There is no traces underneath but i can't clean the hole enough.

You can attach to any other ground point. See attached. See the pads with "+" through the pad? Those are connected to the ground plane.  You'll need to extend the drain wire of your output wire, but you can attach it to any of those points or even the enclosure.

Mike


Attachments

  • Screen Shot 2015-12-11 at 9.58.02 AM.png
    Screen Shot 2015-12-11 at 9.58.02 AM.png
    329.7 KB
Try this Kerry:

Start by setting up your compressor as follows:
-Input and output at 12 o'clock.
-Attack to "GR OFF".
-Release fully CW
-Ratio 20:1
-Meter in GR

Now, don't touch any of that stuff after it's set or you need to start over. Now feed a 0dBu, 1KHz signal. Confirm with a DMM that you have 0.775V AC between pin 2 and pin 3 of the input. Feed as much signal as you  need to get 0.775V AC. Again don't touch those knobs!

Now placing your common/black probe on CT/0V measure the AC signal at these points and fill in the AC value.

Input XLR Pin2:
TPad in +: 
TPad out +:
Input Tx In +:
Input Tx out +:
Main PCB Input:
Q1 Drain:
Q2 Base:
Q3 Base:
Q14 Base:
Q4 Base:
Q5 Base:
Q6 Base:
TX Out Brown wire:
XLR Out Pin 2:

The Base is generally the lead on the right, facing the flat side of the transistor. See the datasheet to confirm. For Q6 it should be the middle lead.

Mike

 
Hairball Audio said:
Try this Kerry:

Start by setting up your compressor as follows:
-Input and output at 12 o'clock.
-Attack to "GR OFF".
-Release fully CW
-Ratio 20:1
-Meter in GR

Now, don't touch any of that stuff after it's set or you need to start over. Now feed a 0dBu, 1KHz signal. Confirm with a DMM that you have 0.775V AC between pin 2 and pin 3 of the input. Feed as much signal as you  need to get 0.775V AC. Again don't touch those knobs!

Now placing your common/black probe on CT/0V measure the AC signal at these points and fill in the AC value.

Input XLR Pin2:
TPad in +: 
TPad out +:
Input Tx In +:
Input Tx out +:
Main PCB Input:
Q1 Drain:
Q2 Base:
Q3 Base:
Q14 Base:
Q4 Base:
Q5 Base:
Q6 Base:
TX Out Brown wire:
XLR Out Pin 2:

The Base is generally the lead on the right, facing the flat side of the transistor. See the datasheet to confirm. For Q6 it should be the middle lead.

Mike

Hi Mike,

Sorry for the late reply and the email I sent you, I've been getting email's to notify me of replies and I haven't gotten any about these ones!

These are my measurements.

Input XLR Pin2: 0.775
TPad in +:  0.775
TPad out +: 0.228
Input Tx In +: 0.227
Input Tx out +: 0.128
Main PCB Input: 0.128
Q1 Drain: 0.110
Q2 Base: 0.110
Q3 Base: 0.110
Q14 Base: 0.112
Q4 Base: 0.033
Q5 Base: 0.044
Q6 Base: 0.041
TX Out Brown wire: 0.745
XLR Out Pin 2: 0.750
 
kerrymckenna14 said:
Hairball Audio said:
Try this Kerry:

Start by setting up your compressor as follows:
-Input and output at 12 o'clock.
-Attack to "GR OFF".
-Release fully CW
-Ratio 20:1
-Meter in GR

Now, don't touch any of that stuff after it's set or you need to start over. Now feed a 0dBu, 1KHz signal. Confirm with a DMM that you have 0.775V AC between pin 2 and pin 3 of the input. Feed as much signal as you  need to get 0.775V AC. Again don't touch those knobs!

Now placing your common/black probe on CT/0V measure the AC signal at these points and fill in the AC value.

Input XLR Pin2:
TPad in +: 
TPad out +:
Input Tx In +:
Input Tx out +:
Main PCB Input:
Q1 Drain:
Q2 Base:
Q3 Base:
Q14 Base:
Q4 Base:
Q5 Base:
Q6 Base:
TX Out Brown wire:
XLR Out Pin 2:

The Base is generally the lead on the right, facing the flat side of the transistor. See the datasheet to confirm. For Q6 it should be the middle lead.

Mike

Hi Mike,

Sorry for the late reply and the email I sent you, I've been getting email's to notify me of replies and I haven't gotten any about these ones!

These are my measurements.

Input XLR Pin2: 0.775
TPad in +:  0.775
TPad out +: 0.228
Input Tx In +: 0.227
Input Tx out +: 0.128
Main PCB Input: 0.128
Q1 Drain: 0.110
Q2 Base: 0.110
Q3 Base: 0.110
Q14 Base: 0.112
Q4 Base: 0.033
Q5 Base: 0.044
Q6 Base: 0.041
TX Out Brown wire: 0.745
XLR Out Pin 2: 0.750

If you have 0.775 VAC at the input between pin 2 and pin 3, you cannot have 0.775 VAC at the input between pin 2 and ground (you should have 1/2 the VAC). But I see where you made the error in set up, so this info is still useful.

Your Q2/Q3 seems messed up.  You may want to replace them. Tripple check all of the resistor color codes, and cap codes around them.

Mike
[/quote]

I thought it was a mistake at first but its the only reading I am getting from XLR Out Pin 2. 
Checked them all again, I can't see anything out of place. 

Do you think it would be a good idea to do what I emailed you about and start most of the build from scratch? I'm not happy with the build altogether.  I feel like I may have a better crack at it now having a better understanding of signal flow and the functionality of each area.  Or do you think that wouldn't be worth my time?
 
kerrymckenna14 said:
If you have 0.775 VAC at the input between pin 2 and pin 3, you cannot have 0.775 VAC at the input between pin 2 and ground (you should have 1/2 the VAC). But I see where you made the error in set up, so this info is still useful.

Your Q2/Q3 seems messed up.  You may want to replace them. Tripple check all of the resistor color codes, and cap codes around them.

Mike

I thought it was a mistake at first but its the only reading I am getting from XLR Out Pin 2. 
Checked them all again, I can't see anything out of place. 

Do you think it would be a good idea to do what I emailed you about and start most of the build from scratch? I'm not happy with the build altogether.  I feel like I may have a better crack at it now having a better understanding of signal flow and the functionality of each area.  Or do you think that wouldn't be worth my time?
[/quote]

No you're misunderstanding. The set up is to get 0.775 VAC between pin 2 and pin 3. Red DMM lead on 2 and black on 3 (or whatever). That measuring a differential signal. Then on the next step you measure between pin 2 and ground. That's measuring only half the differential signal so the voltage is halved.

I'll respond to you tomorrow morning with some options once we open shop again.

Thanks!

Mike
 
Hairball Audio said:
kerrymckenna14 said:
No you're misunderstanding. The set up is to get 0.775 VAC between pin 2 and pin 3. Red DMM lead on 2 and black on 3 (or whatever). That measuring a differential signal. Then on the next step you measure between pin 2 and ground. That's measuring only half the differential signal so the voltage is halved.

I'll respond to you tomorrow morning with some options once we open shop again.

Thanks!

Mike

Thats what I did, input 0.775 between XLR Pin 2 and Pin 3, then I measured from ground (the CT point) and XLR out Pin 2, and thats where I'm still reading 0.775. I don't know why. (Unless I'm still misunderstanding you)

Thanks Mike! :)
 
Hello,

My name is Miguel, I live out in LB, CA.
I recently completed two of the revision D builds from hairball audio.
I fallowed the instructions 100%, making sure to check all the components.
After completing the calibration I plugged it into my DAW and ran signal thru it with strange results.

It seems to have a weird background noise the whole time.
When the output is pushed past 3 o'clock it start to oscillate to insanity.
The oscillation seems to be focused around 240Hz .
The output transformer also made a whining sound.

I tried moving the wires around to see if it was interference with no success.
My friend at Manley hooked it up to his AP machine and wasn't able to track the problem down.
He said the problem was somewhere in the signal preamp.

Is there anything that sounds like the culprit here?
I'd really appreciate any ideas or advice.

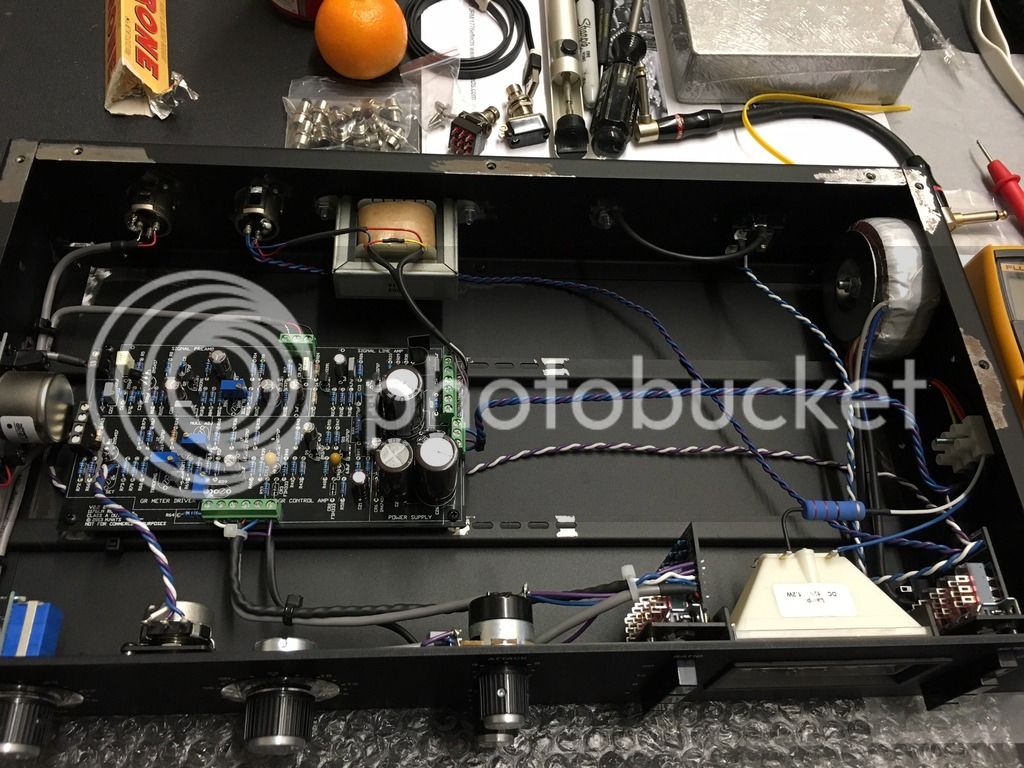
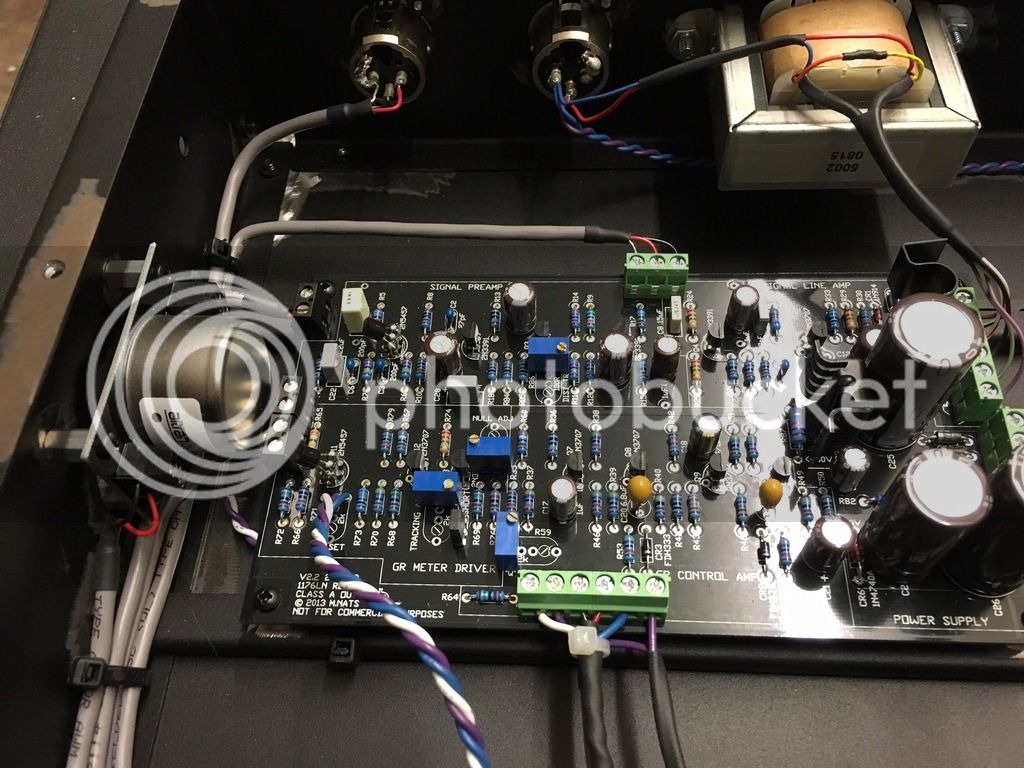
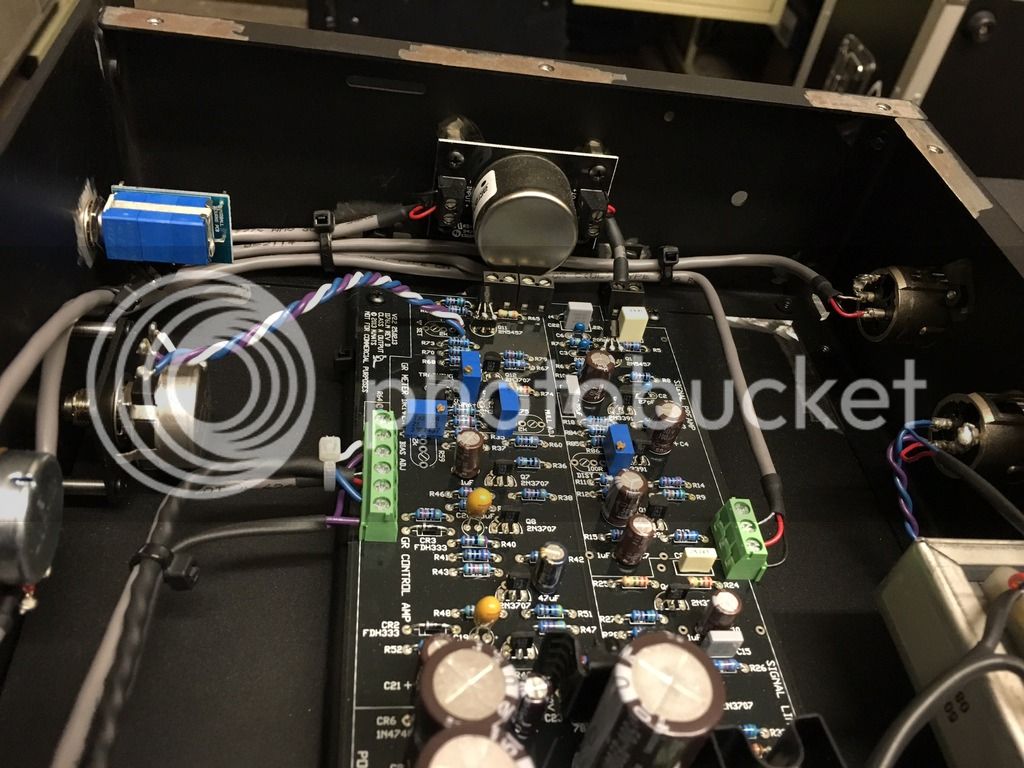
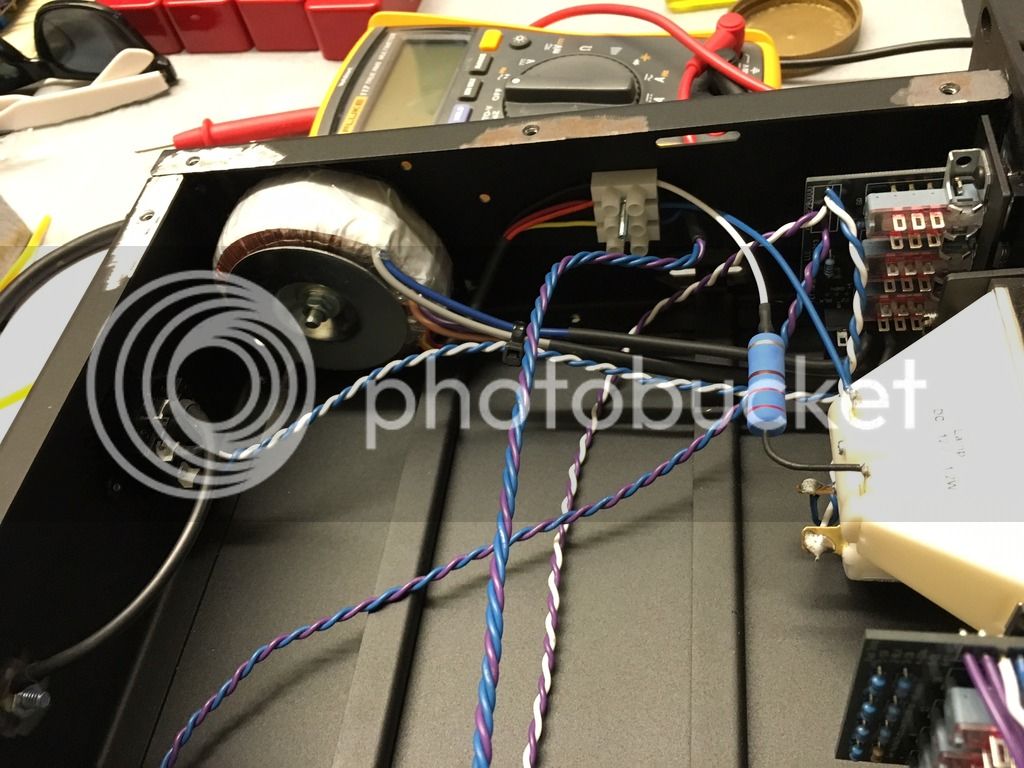
Here's a few pictures of the build.


Stacks Vasquez said:
Hello,

My name is Miguel, I live out in LB, CA.
I recently completed two of the revision D builds from hairball audio.
I fallowed the instructions 100%, making sure to check all the components.
After completing the calibration I plugged it into my DAW and ran signal thru it with strange results.

It seems to have a weird background noise the whole time.
When the output is pushed past 3 o'clock it start to oscillate to insanity.
The oscillation seems to be focused around 240Hz .
The output transformer also made a whining sound.

I tried moving the wires around to see if it was interference with no success.
My friend at Manley hooked it up to his AP machine and wasn't able to track the problem down.
He said the problem was somewhere in the signal preamp.

Is there anything that sounds like the culprit here?
I'd really appreciate any ideas or advice.

Here's a few pictures of the build.


Wow, nice looking neat build.

That's a grounding issue. Though the whining/audible sine at max gain is normal, the oscillation is not.  Do you have ground wire on the neg pad of C25?

Search "C25" here and see:
http://www.hairballaudio.com/blog/resources/post/wiring-your-compressor-

Make sure you get good continuity to the enclosure.

Mike
 
I had an  output signal's level pb that I solved (replace the wrong R9 = 56 k by the good one R9 = 560 k  8)).

Now I try to do the calibration.

But I can have 2.75V at the output but trim R59 (qbias) in all the route doesn't change the value so I can't have 2.44V (-1 dB) by the trimmer ....
Somebody told me to replace the 2k trim by a 5k do you think it could be cause that ? (at this time this is the 5k which is on pcb.)

Could you help me ?

Thanks,

Baba
 
babaorum said:
I had an  output signal's level pb that I solved (replace the wrong R9 = 56 k by the good one R9 = 560 k  8)).

Now I try to do the calibration.

But I can have 2.75V at the output but trim R59 (qbias) in all the route doesn't change the value so I can't have 2.44V (-1 dB) by the trimmer ....
Somebody told me to replace the 2k trim by a 5k do you think it could be cause that ? (at this time this is the 5k which is on pcb.)

Could you help me ?

Thanks,

Baba

Absolutely don't change the trimmer. If you can't get the 2K QBias to work something is wrong with your bias circuit.

Referencing 0V/CT what is your DC V at:
1. Either side of R35
2. Either side of  R60
3. Pad 18 when you turn the Qbias what is the highest and lowest?

Mike
 

Latest posts

Back
Top