JLM Baby Animal

GroupDIY Audio Forum

Help Support GroupDIY Audio Forum:

This site may earn a commission from merchant affiliate links, including eBay, Amazon, and others.
I had a die punch for the rear sockets.. that was 2.5mm to small!
I used a round chainsaw file to make the holes big enough .. worked rough and fast! I want some one to look at it and not want to steal it!
I avoid the whole line in issue by not installing one.

Next kit will be a nice transformer balanced DI from using transformer from lundahl.

Im actually in the process of hunting down the final parts for my stereo gyraf 1176 which should be fun to build the panel for( dual vu , a dozen rotary switches).

For that one I'm thinking of using some kine of transparent laser printable plastic and end up gluing that onto a plain aluminium front panel and punching and drilling it out.

I was also eyeing these cheap ( $99AUS = ~$75USD) drill presses, but I looked at one closely on store the floor and the bit wobbled around , looks like shooting pool with a piece of rope. I will stick to my trusty Makita and drill file for now!
 
Wow the animals are all coming to life!


Jemduff, I like your pad/phase/pantom symbols :green: and hey, a front panel with chickenheads can NEVER look bad :thumb:

Just wondering what the foil on the case bottom is for?
Also you might want to shorten and tightly twist your wires to the gain pot and the transformer wires, as keeping them short and twisted will decrease the possibility of oscilation.


mr.jones, wow nice first post! Welcome to DIY and the Lab.

Your animal looks nice and neat, congrats. The only thing Id say is perhaps shorten the transformer wires, so theyre only just long enough to reach the pads. Also you might want to push those large caps down hard to the board to stop them wobbling around.

Re the oscilation, it definitely shoudnt be happening, but Im not sure where to tell you to look. Joe will reply soon with some clues.

The puffing noise is probably just some DC on the pot that will go away as the circuit warms up and stabilises. Joe will tell you about this too.

Re the DI jack, I agree with you that its not the best feeling thing to screw up, but its the only jack we can find that has enough switching to do what we need on the DI. If we used a different jack there would have to be a sepperate switch to turn phantom power off and switch from mic to DI, meaning more wiring and more hastle for everyone.
When Im putting our DIs in our own pres, Im careful not to overtighten the nut, turning it just until it feels solid. Then I usually squirt a bunch of hot glue between the PCB and the front panel to give it extra strength. Once this is done the whole arrangment is very solid.

You dont need to make a sepperate line input, you can simply plug a line source into the mic in and engage the pad. The 1:4 with that pad can handle about +20 or more. Alternatively you can run a line source into the DI. I use both of these options all the time in my studio with excellent results.


Congrats again on your build guys!


M@
 
How easy/difficult would it be to add meters to the baby animals?

I love the look of those vintage style sifam meters.

al_20.jpg


The lamp option comes in either 6v, 12v or 24v. Is there any way of drawing this off the board or could I even power directly from the PSU?

(I'm new at this although the stupidity of the questions probably makes that pretty obvious :green: ).

Cheers

Nick
 
my kits arrived this morning and I'm just putting them together now.

the photos etc on this thread have been very helpful.

my questions:

* is there a "correct" way around for the green and red wires from the JLM14, obviously the phase switch swaps them, but with the phase switch in the off position, which way is non-inverted? likewise which way around do the secondary wires go? (i think i can see that from the schem)

* does the black CT wire never get connected?

* can anyone post a pic of a well done job of shortening the wires and making them lie flat to fit under the board. could the long transformer wires be causing mr jones' strange noise?

* the spacer washers included hold the transformer well more than 1mm off the board, because the narrow part of the washer doesnt fit into the holes in the board, so it acts as a much thicker washer, is this what was intended?

* am i right in thinking that the low/high ratio jumpers should not be fitted at all with the JLM14?
 
Hi Guys, I can answer some of your questions.

Godders:
Adding meters is easy, but youll need to make some buffer amps to drive them. I just had the thought that it might be possible to drive a VU with the inverting stage of the 2604, and just live with the quasi balanced output. Im not sure if this would work but Joe can tell us.

Otherwise youll need a sepperate little circuit. There might be some clever way to generate a 24v rail for the lamps, perhaps if you hang them between 0V and the half volts rail...not sure if this would work though.

My question would be other than looks, why do you need them? Since youre probably recording to computer (correct me if im wrong) a VU doesnt really tell you what you need to know, which is the instantaneous peak levels. Also because the BA has so much higher headroom than any recorder or other device its likely to be feeding, youll never clip it before you clip the next device in the path.

Still, if you want one dont let me stop you!


greenman:
The color code for the 1:4 is the hot colors (yellow and red) are + and the cold colors (blue and green) are -. Red+green are the primary. The black wire is a CT on the primary and allows you to make the transformer 1:8. How well this works I dont know, I know weve tested it but cant remember the results! :oops:

If youre not using the black wire, cut it short and wrap the end in tape or heatshrink so it cant short to anything.

In order to get the tranformer wires to fit under the board you have to cut back some of the heatshrink around them so its only, perhaps, 5mm long. Then simply bend the wires out to the pad where they have to go, and cut them with just an extra 2mm or so for tinning. Keeping these wire as short as possible, or twisted tightly when they have to be longer, is always good practice and will help you avoid problems like oscilation.

If you trim the thin part of the washer off with a sharp knife, youll be left with just the round doughnut part which will then hold the transformer off the board nicely.

You can fit the jumpers if you want but you dont need to as there is no jumping to do with the 1:4.


Hope this helps.


M@
 
Mr. Jones,
If you were going to use Neutrik combo jacks anyway, why not wire the DI to the 1/4" part of the jack? You'd still need a mic/DI switch and to turn off the phantom, according to what Matt said, which a single DPDT should do the trick.
 
Hats off to Joe and Matt at JLM for this awesome kit! I'll be ordering my baby animals this week... one question though, and I know this may not even be pertinent, but I was wondering which combination of op amp and tranny would sound most like a neve, circa 1083 - 1272 :wink:

I had built a rack of N72's and A12's from Seventh Circle Audio last year and have since gotten rid of them, but I really miss that Neve-ish sound and was wondering if it could be similarly replicated with the BA's. I know everyone says that the "sound is in the iron" and since the babies lack an output tranny would the neve sound be hard to achieve? Regardless of whether it can be done or not I'm still going to order a pair because since I've sold the Seventh Circle rack I've been stuck using *gasp*.... behringer preamps... but I was just wondering if anyone had an opinion about this. And I know back in the black market thread Matt mentioned something to the effect once you hear these you're not going to want to go back to neves... or something like that.

Also, if anyone's looking for some decent, cheap rack cases check out http://www.sescom.com. Never bought anything from parmetal but sescom's prices seem to be about similar.

Cheers,
~Joe
 
[quote author="broccoli"]...I was wondering which combination of op amp and tranny would sound most like a neve, circa 1083 - 1272...[/quote]

If you're interested in a Neve-ish clone, you might check out the JLM Micro 1290. It's basically the exact same preamp as 1073 minus the EQ section. It'll cost a bit more than a Baby Animal, but would probably fit your needs better. I might be wrong on this, but Neve mic pres don't use opamps to amplify, instead using a completely separate topology, so the Baby Animal I think is more akin to an API pre than a Neve.

Also, while the Baby Animal doesn't have an output tranny, you can certainly add one. I believe Matt or Joe mentioned at some point the JLM111 output tranny can be added, but isn't necessary. The JLM14 and JLM111 are the same ones used in the Micro 1290, so I'd think you could probably build a Baby Animal using both and have some of the Neve character.

Cheers,
Chris
 
Weeeeelllll...the 1081 and the 1272/1073/1290 are pretty different circuits but that aside...

If you want close to that sound, our 1290 is definitely the closest. With the two 1:4s on the input and the 1:1:1 on the output it definitely is in the same spirit of the Neve sound. Of course its not exactly the same, but most Neve modules arent even the same anyway. Also the 1290 is more $ and probably slightly more difficult to build, though not much.

In Baby Animal land, the closest to that kind of tone would be a 1:4 input (or if you were really adventurous, 2 of them to make 1:2 ratio) with a 99V opamp and a 1:1:1 output transformer. Personally this is my desert island pre. I prefer this type to Neve because it still has the warmth, but never gets muddy and maintains clarity. Its the benchmark pre in my studio, by which everything else is judged.

Also, and hopefully someone with more knowledge will correct me if Im wrong, but the amp stages in a 1290 arent fundamentally different to the amp in a 312. Its really the type of transformers and the actual amp circuit that makes the difference in sound, not weather either uses 'opamps' or not. A single 99V pre like I describe is a very very simple circuit for a mic pre compared to API or Neve - there are only 3 transistors and 2 transformers in the path. Leave out the output xformer and ...well you cant get much simpler I think.


M@
 
I've pretty much finished building my Baby Animal and DI, and I noticed a couple of things on the schematic that didn't match up with the parts list, or were a little confusing:

RP, which is called "R PAD" on the schematic, shows a value of 100R, while the kit comes with a 120R and the chart on the Baby Animal site also calls for a 120R.

The 330uF/63v cap that goes to the Phantom Power has this note:
"If 62v power suply used
this cap changed to 330uF 63v
[All JLM kits supplied with 330uF 63v cap]"

This implies that if the 48v supply is used, something else should be used (another 470uF/50v, from what I can tell). However, only five 470uF caps are supplied, so I went ahead and used the 330uF. Is this what we are supposed to do?

Also, regarding the ratio jumpers, Matt said on here that no ratio jumpers are needed with the JLM14, but on the schematic it looks like the low position is fitted. Just wanted to confirm that we really don't need a jumper.

Hopefully I'll get it all put together and get some pictures up tomorrow!
 
hey guys, thanks for your input. most of electrical theory eludes me, although i can wield a soldering iron and follow a schematic. so forgive me if i sound like a complete dunce. so then to achieve a neve-ish sound with a baby animal it's not necessarily the iron that gives it the sound, but rather the circuit design, correct? also in the seventh circle 1272 there's no op-amp but rather a huge honkin' 2N3055 transistor.... not sure how that affects sound and if the original neve's even had that...

so matt, what you're telling me is that if i take a baby animal with a 1:4 input tranny, the 99v opamp, and a 1:1:1 output tranny it will be similar to a neve? i mean, in all honesty i don't care too much to replicate it exactly, i'm more looking for the sound qualities of neve, ie. that buttery smooth, warm, round, full sound that it has... not really in love with the api 312 sound... i never really had good luck with it... ymmv... but perhaps what kind of sound can i expect from the opa2604, 1:4 combination?

cheers,
~joe
 
Hey Joe,

Sorry to confuse you with my rantings. To put it more simply, yes that configuration would be the closest way I could think of to get a Neve like sound from the BA. It wont be exactly the same, and if you want to get closer there are many other Neve clone kits available. But to my ears that config is superior to the 1290 sound as it has the same warmth and sweetness but with more clarity and less mud. It just works better or more sources than Neve, for me anyway.

On the 'sound in the iron' question, I think 70% of the Neve sound is in the input transformer, the 10468. Another 20% is the A class single ended circuitry after it and maybe 10% is in the output stage and the transformer is uses. This is a kind of meaninglessly unscientific breakdown of course but thats how I think the Neve character is distributed through that circuit. The big 2n3055 is what the original circuits used too, but I think its probably the least important part as far as getting that sound goes. Others may dissagree (as everyone always does as soon as the N word is mentioned!).


M@
 
[quote author="Pri"]@Godders

for adding a meter check this thread
http://www.groupdiy.com/index.php?topic=16104

Niklas[/quote]
Thanks Niklas. :thumb:
 
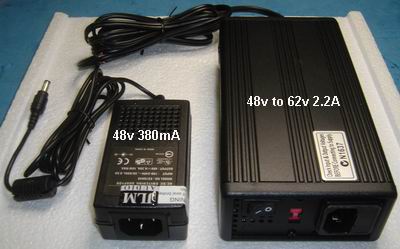
Components and everything look great. Except for the 48v PSU, it's got a puffy JLM audio sticker that is all hazed over and looks cheap. IMHO, having your logo on something that looks cheap is worse than not having your logo on it at all. I mean, after all, it's just a rebranded SMPS
The JLM Logo is only on the SMPS NOT as a rebadge but to remind you what bit of gear it is for powering because if you mistake it for your external hard drive power supply or other audio gear that runs on a DC connector plug pack and turn it on the 48v will kill that device instantly. At $40AUD (roughly $30USD) it is cheap and very hard to beat this supply as it can run at its full current all day due to its clever metal heatsink hidden in the hole pattern on the top of it and handle transient current more than twice its rating. You would be hard pressed to build a world voltage linear supply in a box for twice that price. Not sure why the dome logo is foggy must be due to the Air Mail but I am sure a nice wipe with a cloth and it will be good as new.

SMPS.jpg


I also thought it was a little cheap not including the IEC with the power supply, but I understand that these kits are going all around the world.
The SMPS do don't come with IEC leads when we buy them and since posting a lead would put the postage weight up a lot it would cost more to ship so doesn't make any sense to do so.

My only complaint about the kit is that the plastic 1/4" jack on the DI is pretty cheap, and the nut barely fits. I crossthreaded it maybe 1/16 of a turn, and the plastic threads are shot. Be careful!! The threads also don't extend very far up the bushing, so the nut barely has any thread to grip when it's in the rack.
Yes you do have to be careful with the DI socket. It can only do 3mm panels max and even then you need to make sure the socket is fully forward in the slots on the PCB when soldered in. Also the hole needs to be 12mm so the thread is not deformed when pushed through the panel. Also the hole should be well deburred on both sides and on the front deburring deep so it looks like a slight countersink helps. A drop of hot melt glue on the flat front of the socket can help when putting it in and then doing the nut up finger tight + about 5 to 10 degrees is all that is needed. I have looked everywhere is find a PCB insulated TRS with DPDT switch that is better but there is not much out there with that spec.

First there's a high pitch noise that only occurs when sound is passing through the preamp. It's VERY faint for normal sounds (I can just barely hear it when playing miced acoustic guitar) but quite noticeable, for instance, when applying distortion to the amplified signal. It sounds almost like the very high pitch whining sound you might get when trying to tune a radio. Again, it only happens when signal is being amplified. As soon as you stop playing, the sound goes away. I will post a sound clip later so you can hear what I mean
Umm interesting need more info on this one. Usually is is best to run the 0v coming in from the supply to the case direct or by a 10ohm resistor. But because you have a non insulated TRS output socket you can only wire it direct. Also check that the 0v ground gets to the front panel by all the case screws as often the powder coating can leave a case panel floating. The front panel needs the 0v ground on it to pull all the toggles and pot case to ground to stop noise pickup. And also worth trying the case with the lid on to see if that makes the noise go away. Let me know how you go with this one.

There's also a faint puffing sound when adjusting the gain knob. Aside from those, it is quiet--no hum whatsoever, and only a small amount of hiss at high gain settings.
The faint puffing while adjusting the gain is due to a small amount of DC cap leakage and is normal. The fact you are hearing hiss tells me that you are running the pre into a A/D that is set for -10dBM non pro level. Make sure if your A/D has input level settings that it is set to clip at +18dBM to +22dBM pro levels as this will allow the BA to work at its intended pro levels which will minimise the puffing and hiss to be basically inaudible under normal listening levels.

I'd like to be able to run line-level signals through this preamp which is why I'm using Neutrik combo jacks.
The Pad switch on the BA will allow about +18dBM signals to be run into the BA already so you shouldn't need another pad.

Again, I'd like to stress how awesome this kit is. It is a cinch to build and sounds great. Joe is a great guy and answered my questions very promptly (while politely suggesting I come here and bug you guys.) Send him your money!!
:grin: :grin:

Jemduff, I like your pad/phase/pantom symbols and hey, a front panel with chickenheads can NEVER look bad
I agree and think the lightning bolt should become the standard 48v symbol. :grin:

How easy/difficult would it be to add meters to the baby animals?
You can run real VU meters directly off the output but it will raise the output THD usually one decimal point worse if not buffered. If doing so it is best to run the VU meter tapped from before the 51R output resistors if not buffered as this will lessen the extra THD but you will need a 47uF 35v electro cap in series with the meter to remove the DC offset. For lamps run them in series so 2 x 24v or 4 x 12v = 48v which is perfect to run straight from the SMPS supply if there is enough current left to drive them.

* can anyone post a pic of a well done job of shortening the wires and making them lie flat to fit under the board. could the long transformer wires be causing mr jones' strange noise?
Yes keep wires short and ribbon cables short or well twisted together but don't make them so short that it becomes to difficult.
Best to do noise tests with the case fully assembled as well otherwise there is a big hole in the RFI shielding :grin:

BApreJLM14.jpg

Hard to see but black wire is not connected to anything.

RP, which is called "R PAD" on the schematic, shows a value of 100R, while the kit comes with a 120R and the chart on the Baby Animal site also calls for a 120R.
Yes my typo. Either will work fine but 120R is the supplied value. Will fix the circuit.

This implies that if the 48v supply is used, something else should be used (another 470uF/50v, from what I can tell). However, only five 470uF caps are supplied, so I went ahead and used the 330uF. Is this what we are supposed to do?
Yes all JLM kits have 330uF 63v so it will work with all power supply voltages from 48v to 62v without a problem.

Also, regarding the ratio jumpers, Matt said on here that no ratio jumpers are needed with the JLM14, but on the schematic it looks like the low position is fitted. Just wanted to confirm that we really don't need a jumper.
Yes no ratio jumper should be fitted. The schematic is just a generic layout with the values changed to suit the transformer so the transformer symbol has not changed. I will see if I can update it to make more sense.
 
[quote author="JLM Audio"]I have looked everywhere is find a PCB insulated TRS with DPDT switch that is better but there is not much out there with that spec.[/quote]

Yeah I found this out too when I was looking around for a suitable replacement.

Umm interesting need more info on this one. Usually is is best to run the 0v coming in from the supply to the case direct or by a 10ohm resistor. But because you have a non insulated TRS output socket you can only wire it direct. Also check that the 0v ground gets to the front panel by all the case screws as often the powder coating can leave a case panel floating. The front panel needs the 0v ground on it to pull all the toggles and pot case to ground to stop noise pickup. And also worth trying the case with the lid on to see if that makes the noise go away. Let me know how you go with this one.

I checked for 0V at the case, front panel, and front panel controls and it's there. I'm planning to switch out the uninsulated jacks for insulated ones, just have to order them. Also, I'm using the power inlet you sent me, which pulls 0V directly to the case. I haven't tried it with the top lid on because I still have to file some of the lip away and have been putting off doing it because it'll take 2-3 hours.

I shortened the transformer wires as per Matt's suggestion and I think it helped the problem somewhat. I'll get the case filed and try it out. I'll also post a clip so you can hear exactly what it's doing.

The fact you are hearing hiss tells me that you are running the pre into a A/D that is set for -10dBM non pro level. Make sure if your A/D has input level settings that it is set to clip at +18dBM to +22dBM pro levels as this will allow the BA to work at its intended pro levels which will minimise the puffing and hiss to be basically inaudible under normal listening levels.

I can't do too much about this at the moment, as that's just how my Firebox works. It does have a +12 switch accessible from a software control panel, but I believe it boosts the signal after conversion, and it doesn't work very well.

Thanks for the reply Joe, and I'll post some more info soon!
 
Back
Top