Printing directly on aluminum possible with an ink jet printer? (+ some toner transfer experiments on aluminum)

GroupDIY Audio Forum

Help Support GroupDIY Audio Forum:

This site may earn a commission from merchant affiliate links, including eBay, Amazon, and others.

rock soderstrom

Tour de France
Joined
Oct 14, 2009
Messages
3,577
Location
Berlin
I had the following idea in the bathtub today.😅

Some ink jet printers are able to print directly on CD/DVDs. CDs are usually 1.2mm thick.

CDs are not flexible, which means that the transport of the CD in the printer must be straight and not over a roller.

Couldn't this function be used to print directly on small aluminum front panels? After that I would spray one or two layers of clear varnish over it to make the print durable.

Could work, has anyone tried this before? Is there any experience with it?

PS: Does the ink (like laser toner) resist an etching bath? Then you could print PCBs directly before etching. I don't think that's going to work. PRR said, ink is just dirty water. ;-)
 
Last edited:
I would be worried with a standard ink jet the ink will melt as you apply clear coat.

UV printing works very well and it's quite tough.

Where did you read these printers are modified inkjets ? I could not see that information on their website, maybe I'm just blind.

The company is just half hour drive from where I live, I might give it a try myself as I have been pondering to get a printer for front panels.
 
I would be worried with a standard ink jet the ink will melt as you apply clear coat.
Yes, an for metals optimized ink would be advantageous. That would be feasible, it exists.

Where did you read these printers are modified inkjets ? I could not see that information on their website, maybe I'm just blind.
It is not explicitly mentioned, but it is clearly evident as the devices and technical data are identical. As an example, here is the Epson Stylus S22. See also the technical data online for further proof.
s22-01.jpgaf9066d6-7469-46a4-96e7-bb22f493210c.jpeg
The company is just half hour drive from where I live, I might give it a try myself as I have been pondering to get a printer for front panels.
Interesting, keep us posted!
 
Last edited:
Back in the 70s I printed serial numbers for my kit business using a 7 wire dot matrix printer on thin adhesive backed foil labels. The labels were pre printed with everything but the SN.
===
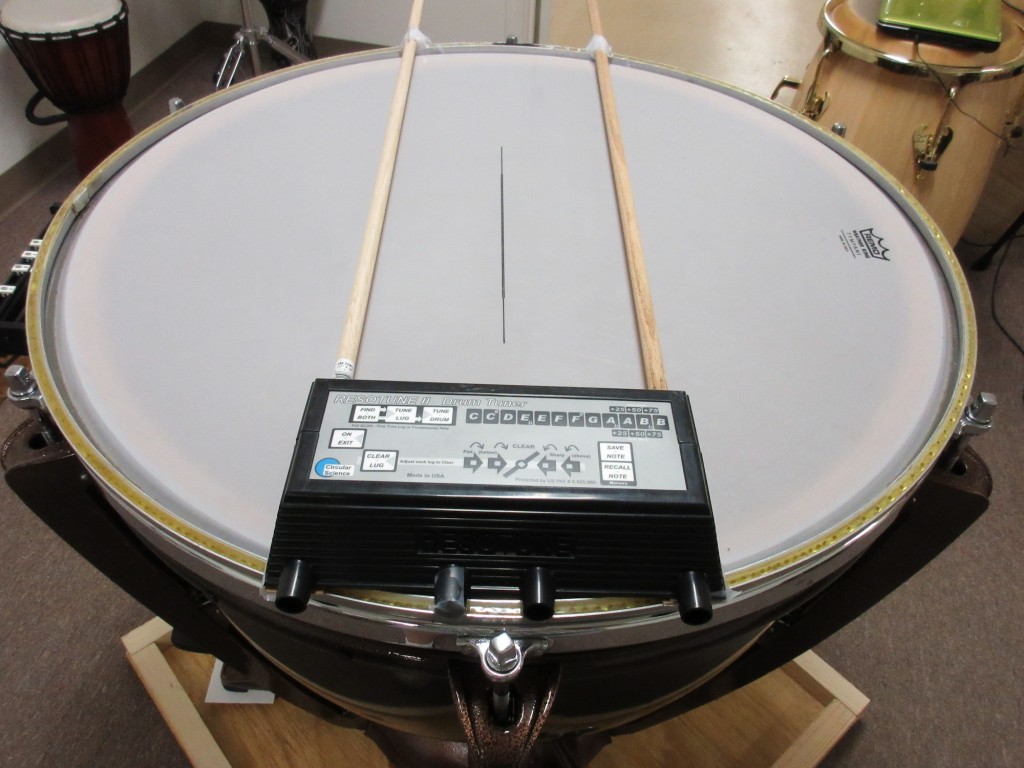
The faceplates for my two generations of drum tuners used back printed mylar escutcheons. The detail and colors were quite good. LED back lighting can illuminate legends from behind, and tact or dome switches can be operated through the thin mylar.

IMG_0107-1024x768.jpg


JR
 
I remember faffing about with inkjets for printing CDs back when you'd provide demos for gigs etc on cdr. Very fiddly and/or expensive. It seems to me that water slide transfers would be easier for front panels, or back printer mylar as suggested by John.
 
It seems to me that water slide transfers would be easier for front panels
I'm not a big fan of water slide decals, then I would go more in that direction.

I just did a test on a raw 20x14cm aluminum plate using the toner transfer method. It works amazingly well and the toner holds pretty good.

20230315_234208.jpg
20230315_234245.jpg
At the moment I still have the problem that fibers of the transfer paper stick to the toner and become gray-white after drying. I already know this from my PCBs, but there it is not a problem because the etching bath takes care of it. Here it does not look good after drying....
20230315_234423.jpg
I think I can solve this by changing the paper to a film paper without fibers.

I will try that tomorrow.(y)
 
Okay, a little addendum. Before I went to sleep last night I sprayed 2 layers of clearcoat on the test front panel, just to see what would happen.

The result was immediately much improved. Clear coat is on our side!

As described above, after drying, the paper fibers sticking to the toner made the front panel unusable. The result was not only way too white but also blurry and washed out.
20230316_064832.jpg
Even the first layer of clear coat improved the result drastically, the print became darker again and above all sharper. In principle, the wet condition was (almost) preserved by the clear coat. Very good, that gives hope!
20230316_065105.jpg
This is how it looked this morning, an appealing result. The test print, a components layer from a PCB project, is readable. One would choose a larger font for a front panel in reality, but it works so far.
20230316_065225.jpg
You can still see the negative influence of the paper fibers, the print could be even blacker and richer in contrast. If I can get rid of the fibers, then this will be really good, I am very confident! (y)
20230316_065338.jpg
PS: with 2 to 3 layer of clear coat this will be a very durable solution!:ninja:
 

Attachments

  • 20230316_064832.jpg
    20230316_064832.jpg
    27.4 KB · Views: 0
  • 20230316_065105.jpg
    20230316_065105.jpg
    389.2 KB · Views: 0
  • 20230316_065338.jpg
    20230316_065338.jpg
    638.5 KB · Views: 0
Last edited:
This company apparently converts commercially available inkjet printers for printing on aluminium.

The linked example is a modified Epson Stylus S22.

It seems to work.

https://www.pocar.eu/en/3/printer-plates-aluminium-datamatrix.html
Just had a chat with Pocar and it seems at the moment they are making printers that can only work with thicknesses up to 0.5mm.

Basically you would need to make 2x front panels, one with the nominal thickness and a thinner one to place the graphics. Not a very neat solution imho

Personally I would definitely rule out doing the same thing with mylar or similar as anything plasticky would make the front panel look very cheap and of questionable reliability on the long term.
 
Just had a chat with Pocar and it seems at the moment they are making printers that can only work with thicknesses up to 0.5mm.
Thanks for info. 0.5mm is a little disapointing.
Basically you would need to make 2x front panels, one with the nominal thickness and a thinner one to place the graphics. Not a very neat solution imho
I've seen something like that, it can look good.Preservation Sound does something similar as an example.
IMG_4833-1024x1024.jpgIMG_5353-1024x1024.jpg
IMG_9277-1024x1024.jpg
 
Last edited:
I experimented with different papers today.
20230317_111825.jpg20230317_114419.jpg20230317_120110.jpg
In the end, I ended up with my standard paper again. It has, after a small process change, the best transfer performance and visual result.
betty.jpg
The fiber problem is solved. The results are pleasing, absolutely good enough for rock n roll!:devilish:
20230317_181935.jpg
 

Attachments

  • 20230317_121232.jpg
    20230317_121232.jpg
    208.8 KB · Views: 2
  • 20230317_174558.jpg
    20230317_174558.jpg
    1.7 MB · Views: 1
Last edited:
I have done some more research on printing directly onto aluminium.

With the right ink, it is possible, which also means that a printer with a separate ink tank is an advantage.

I have seen some professional photo printers that can do this. Unfortunately, they are quite expensive, so I'm looking for a cheaper solution.

The main problem is the straight paper path without transport around rollers and the possibility to transport thicker paper (=aluminium).

If anyone knows of such a model that could do the job, please post it here.
 
Last edited:
A small update on the toner transfer method.

In the meantime I have a good process for it, the result is appealing and reproducible.

The problem is, it only works on bare aluminium, I haven't found a durable background varnish yet. The heat destroys the lacquer. .
20230317_183807.jpg
Cold transfer with acetone and alcohol doesn't work either.

The next step is heat-resistant lacquer. The usual sources in my area only have it in black. I still have to do a little research on this topic.

Edit: I have found heat-resistant paint in a spray can. Not that expensive. Who paints their car exhaust white? 😁

I am curious if it works with this?
 
Last edited:
Thats good work Rock ,
What about anodising in the front panel markings instead of paint , might be more durable , not sure what chemistry is involved , I think its simple enough though .

Im not sure if you need exhaust paint , you wont have a front panel that opperates as those temperatures , obviously .
 
Im not sure if you need exhaust paint , you wont have a front panel that opperates as those temperatures , obviously .
The heat resistance of the paint is only important for the toner transfer, because the metal conducts heat very well, you need relatively much heat. I estimate just over 200 degrees Celsius. Varnish for radiators is not tough enough, I think 400 or more degrees offers enough reserves. We will see next week when the heat resistant paint arrives. I am confident.
What about anodising in the front panel markings instead of paint , might be more durable , not sure what chemistry is involved , I think its simple enough though .
I'm not familiar with it at all, but it's definitely super interesting! I have to google on this topic. Do you have further info or links?

FYI:

https://www.amazon.de/HITZEFEST-Spr...2lkZ2V0TmFtZT1zcF9waG9uZV9zZWFyY2hfYXRm&psc=1
 
https://en.wikipedia.org/wiki/AnodizingWere all familiar with anodised aluminium ,
It provides better adhesion and is harder than paint ,also very effective against corrosion , which is just what you want on a control panel .
It involves an acidic solution and electric current passing through the metal , which creates a hard oxide coating ,
No question, anodizing is a durable and high-quality surface treatment. The question is rather, can you also realize this at home? At the moment I still lack the appropriate knowledge, but in principle it is very interesting.

I am rather looking for good strategies regarding the marking of metal at home. DIY style, fast and inexpensive.

If I had more space I would probably buy a 50Watt laser engraver/cutter.
 

The good news is anodisation is quite simple , it does require high voltages though , but that shouldnt be an issue for people who work on tube gear .
Theres seems to be a few simple off the shelf chemicals required also ,

The paint on metal idea you have come up with already might be a good way to mask off areas and stop them taking the anodise colour .
 

Latest posts

Back
Top