Questions on PCB making

GroupDIY Audio Forum

Help Support GroupDIY Audio Forum:

This site may earn a commission from merchant affiliate links, including eBay, Amazon, and others.
Or even better (and easier to transport and clean), 3 and 3, with the flush bath in the middle
keeping the two different chemicals apart, like:

Code:
|——————————————————————————————————————————————————|
|  5. Developer Solution                           |
|——————————————————————————————————————————————————|
|  6. Fresh Water Alkaline Rinse Bath              |
|——————————————————————————————————————————————————|
|  7. Stripping Solution 20g/l NaOH                |
|——————————————————————————————————————————————————|

And three like

Code:
|——————————————————————————————————————————————————|
|  8. 20% HCl Solution for Deoxidizing Copper      |
|——————————————————————————————————————————————————|
|  9. Fresh Water Acidic Rinse Bath                |
|——————————————————————————————————————————————————|
|  10. SUR-TIN Solution for Immersion Tinning      |
|——————————————————————————————————————————————————|


And then all you need is a bucket of fresh water for final rinsing, and a towel + hot air gun and that's it.
 
:D :D, If i get to this point Master, will i be a Jedi Knight of Homemade Industry style PCB maker?  ;D ;D ;D ;D, Let me start with Etch I/II and see how it goes, but for sure that solution is the Shit and will make things cleaner and faster, for now home production  :)
 
;D Alright:

Indeed, with these tools you will have everything to master the art of DIY Hispec PCB, young Jedi.

I salute you, for like you I am a mere facilitator of the DIY experience, and thanks to each and every
one of us, this experience is possible in the way it has come to be, and will continue to be, as long as
there is an exciting idea worth trying.

You will find yourself building things that no one has seen before, and no one will see again in
quite the same way, for they will be the true expression of their creator, and more and more and
more so with every build, every design and every modification, which is what is at the heart of all
DIY: whatever you most truly want it to be. Your story, your device, your world, even as it reflects
the worlds of all the others who are creating it with you and have created before you, for they are
having the same experience you are.

Trust is the way. Trust in yourself, and trust in that which excites you and makes you come alive,
which you are compulsive about and makes you forget completely what time it is. For even when
you come to the end of your journey, you may find that all is truly DIY, as it always has been, and
always will be. So go on in your adventure, as far as it can possibly carry you, resting safe and easy
inside knowing that you require no reason in all of creation for doing anything at all, other than:

Because I love it. Because it excites me. Because I want to.

Because it is who I am.


That's as close to "Jedi" as I can get :D


But really it's the whole reason I etch: I love to do it, and it liberates my imagination.

If there's anything I can do to help you, let me know   ;D
 
A drill press is awesome but usually I just use a sewing pin.  Use a piece of wood to roll a pin against a file to create a pseudo-drill bit.  A few passes across the tip increases their speed.  They aren't super durable but that's half the charm-- they have a flexibility that lets them survive a hand-held drill/dremel.
Not a technique for a big run but for a quick something-something it works.
 
livingnote said:
;D Alright:

Indeed, with these tools you will have everything to master the art of DIY Hispec PCB, young Jedi.

I salute you, for like you I am a mere facilitator of the DIY experience, and thanks to each and every
one of us, this experience is possible in the way it has come to be, and will continue to be, as long as
there is an exciting idea worth trying.

You will find yourself building things that no one has seen before, and no one will see again in
quite the same way, for they will be the true expression of their creator, and more and more and
more so with every build, every design and every modification, which is what is at the heart of all
DIY: whatever you most truly want it to be. Your story, your device, your world, even as it reflects
the worlds of all the others who are creating it with you and have created before you, for they are
having the same experience you are.

Trust is the way. Trust in yourself, and trust in that which excites you and makes you come alive,
which you are compulsive about and makes you forget completely what time it is. For even when
you come to the end of your journey, you may find that all is truly DIY, as it always has been, and
always will be. So go on in your adventure, as far as it can possibly carry you, resting safe and easy
inside knowing that there is no valid reason in all of creation for doing anything at all, other than:

Because I love it. Because it excites me. Because I want to.

Because it is who I am.


That's as close to "Jedi" as I can get :D


But really it's the whole reason I etch: I love to do it, and it liberates my imagination.

If there's anything I can do to help you, let me know   ;D

I can Feel the Fooorce  :D :D, Thanks i'll let you know how it goes, i need to have a price on glass panels etc.....


- Where can i get those Signolit SL-Z type paper? Any Webshop that carries those??? Or just transparent Lazer printer paper would work same same??? I used Transparent blurry type paper (70g/m2 type), nothing fancy, but that's what i had in stock


Alright, got your mail, fantastic!

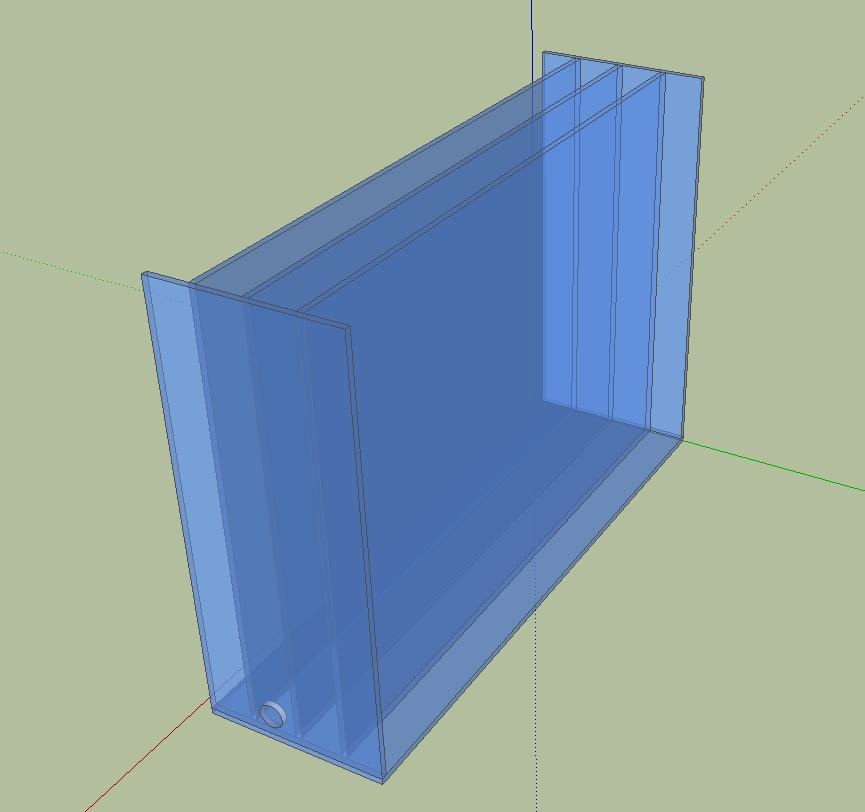
I took the liberty of uploading your sketch to the server:

aquariumFinale.jpg


That's exactly the way mine looks.

Regarding your questions:

What type of glass to use - I've never used Sekurit or Securex glass, that's the stuff that gets
used for car windows, right? You mentioned them saying floatglass was the right kind, if I get
it right then float was the standard kind for windows, in which case you're probably talking about
the same kind I have here in my workshop. Regarding thickness, 5mm gave me the ideal stability
and didn't need to be more but you can of course get thicker if you're inclined to.

The extra at the edges is a trick I got from the commercial plastic units, like you mentioned in
your email it works wonders to give the thing extra stand and really makes for a stable unit
in general.

You gave it a hole on the bottom for attaching an ABS faucet - if you wish, go right ahead and
install one, this can either be cut by the guys who prepare the glass for you or you can do it
yourself with a Dremel and an engraver, if you do do it yourself be sure to get some cooling
spray and cool it while you're cutting or you can break the whole thing.

Personally, I don't have any faucets because the way it worked for me was to get myself a ca.
1.5m plastic hose that fit down in there to use as a siphon. You can fill the hose with water
holding it shut at both ends, then plunge one end down into the acid holding the other end
shut, and then just stick the other end into a 5L plastic canister and let go.

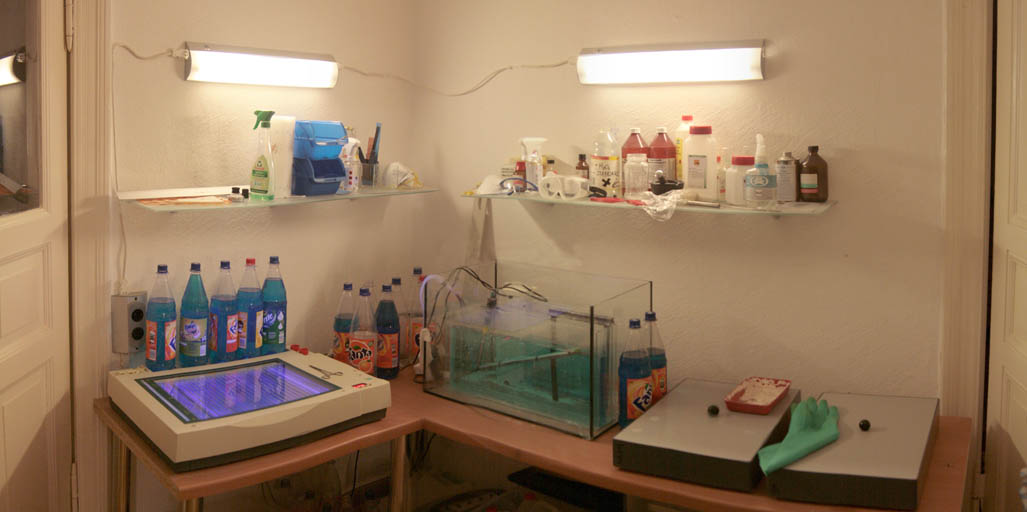
Here is a picture of my etchery with the machine (before I had the other pumps and the wood
aerators/diffusers):

etchery.jpg


While I had originally gotten the big aquarium because I wanted to build myself a spray etching
machine - which turned out to be not only a bit complicated but also would have needed a much
bigger aquarium to start from for the sizes I do, I simply used the big aquarium as an emergency
collection tank in case anything should break while I'm working.

Another good reason to use a big aquarium is this: When you are etching and especially once
you have the microbubbles, this thing will tend to atomize a lot of little droplets of acid into the
air - which can really give you a headache the next day the way Stolichnaya can't (at least I
think I remember that being one of the reasons). So in the aquarium, when I'm etching, I
use those big grey lids you see on the right to cover the whole thing up so that the air is fit to
breathe ;)

To hold the PCBs in place, btw (which is why the big aquarium should be large enough to accomodate)
at this size I discovered something waaaaaay better than these plastic frame-style PCB holders.

You get yourself a cheap version Haemostat like they use in the hospital to clamp stuff. This
you can attach to your PCB and then just hang it in there.

So if you do get a good aquarium, make sure you have enough space toward the top to be
able to get the lid on properly and still everything fits :)

Regarding Signolit SL-Z:

This can be optional at the beginning, depending on your laser printer you can very well use standard
transparent paper and get excellent results, though toner blackener works wonders. There should
be general transparent polyester printing medium available that is heat-stabilized, possibly consult
with someone who is at an architectural faculty or so, they need the stuff for their drawings.

The reason I use it is because it's much easier to get two prints that are completely identical and you
can lay on top of each other, thus making the print opaque. Getting a real seriously opaque print with
a laser printer can be a real fuss sometimes, because it doesn't deal well with areas of black - I have
the LaserJet5000N, but of course if you know of one that does even more and thicker toner by all
means let me know ;)

This also goes a long way toward doing double sided PCBs, where you can essentially make an A4 sized
PCB with minimal distortion to both sides - I managed to get about 0.1mm/10cm, can't get much
more than that out of a laser I'm afraid.

The sickest thing, aside from a proper photoplotter (6000€+Agfa film and darkroom) is to get one
of those digital offset printers that are really wide and print directly on clear plastic film. They also
use toner, but their toner is more like a paste and so does the most incredible black you can get.

They also don't distort, it's amazing. You stick your images into one of those things and then lay
two on top of each other for double sided, you get 100% coverage of both of them. If I could get
my paws on one of those second hand that would be awesome.
 
Cool Lab, i remember seeing this picture now that i look at it, anyway, i made some search today,
and yes we're talking about the same stuff "FLOAT" type glass, same as windows, from what i've read
on Aquarium forums and all, it's the best option, and the cheapest, so cool....

Now i got a price for about 57 Euros for a Square meter all the cuts included for 0.6mm, not bad,
beside the two Holes if i go for that (10euros each for a 2cm Diam.) rough edges tough,
i'll soften with a knife rock, just a tad to be on safe side when assembling.
But i still couldn't find some descent ABS Faucet, and i think when i'll found one it will have a BIG diameter,
as used on those 1000Liter container, but i'll still check on special stores, anyway without it it's still ok and i also tought of the way you do,
using a second aquarium, well i won't do another one tough, i tought of making with plexiglass,
but hey let's try to find a big plastic container and that's it  :D ;D simple and easy, so without the faucet
i don't include any fragile part in the structure that would fail with time, so maybe the better??, and the second container
will secure whatever could happen  ;D even if they won't be too much pressure in there, but never know,
better be safe than sorry like you mentionned...
I've also covered the etching bath when doing the PCB's, all bubbles and drops here and there, vapors etc.....,
NO GOOD :-(, so yes these one will be covered for sure....

For assembling it will be a challenge, but i just can't stop now haha  ;D, and i think all will go well,
i tought about it and found a descent step by step way to build it and still be able to do nice joints,
beside for the middle panel, this one will be hard getting nice joints, but it's not the critical parts so... will see in action....

I found Wood diffusors in Conrad France, the ones they use in their foam machine, looks a tad smaller
than the ones you've refered but i think it's ok and also the Proma temp resistance, since there will be
some order i prefer to group than go on too many dealers... a little more expensive than Conrad.de and the other website but whatever...

Links for people in France who could be interested?:

EDIT: These are expensive ones, and are not of good quality, better get from Aquarium Webshop stuff, wood is heavier and tougher, stands the bath longer...

http://www.conrad.fr/webapp/wcs/stores/servlet/CatalogSearchFASResultView?storeId=10001&catalogId=10001&langId=-2&searchSKU=&fh_search=530026+

http://www.conrad.fr/webapp/wcs/stores/servlet/CatalogSearchFASResultView?storeId=10001&catalogId=10001&langId=-2&searchSKU=&fh_search=530425-62


The cheap version Haemostat, i don't know wher i'll find that, i drilled a quick hole on the PCB's done,
before doing anything of course, and just used a thick electric cable that i buckled from the middle so Copper won't be in there,
worked ok, i could still do the same, but two holes and attach that to a stick that crosses, will see....
But i also found this like you seem to have, looking at the pic, not cheap, but worth a try  ::)

http://www.conrad.fr/webapp/wcs/stores/servlet/CatalogSearchFASResultView?storeId=10001&catalogId=10001&langId=-2&searchSKU=&fh_search=530409+


Thanks for all the infos, you rock!
 
Fantastic! I can possibly get you some haemostats cheap here in Florida.

Don't know your plan, but here's how I built it:

I got myself some coins. Like, when I went shopping I'd always have change, and
the change always ended up in this whiskey tube like for a bottle of Connemara,
so I had a lot of change lying around. Whenever things got tight at the end of the
month, I could still fish out the 1 and 2 Euro pieces and get together what I needed ;)

Anyway, I stacked up the 20 cent coins, if I recall correctly, it was something like
13 20 cent coins that made about the right thickness for the cuvettes. So then I'd
make 3 stacks to make the space from the edge to the first pane, then 3 stacks on
that to make the distance to the middle glass, and then 3 stacks on that onto which
to put the final glass so now you have all three glass panes set up with a standard
distance to each other and the table.

Then put a ton of silicone onto the sides of the three panes and then just stick the
sides and the bottom on, and let them sit for about a day or two, and that was that :)
 
My plan is to use wood bars for keeping the distance, so start by laying all panels flat,
all sides clean with acetone on corners that will be glued.
Apply silicon on flat portions, where all the panels have to go, and also on side panels.
Mount one vertical side, then apply light pressure (having a distance of a couple of mm joint is better),
mount one big Perpendicular panel, apply light pressure and clean excess Silicone on both inner and outer sides,
i won't mount it alone, so cool....
Then mount the other side Big panels, light pressure and clean up the excess, inner outer.
Now i have the exterieur panels mounted and cleaned joint.
For cleaning i'll maybe do some simple long rounded wood stick to be able to go deep.
Then mount the middle panel, light pressure (don't clean excess or try  :)),
Stick 4 bar woods, two on each container, and use plastic type press like these,
http://www.otelo.fr/fr/catalogue/serrejoints/vadium-36807315-ref-88464.html
to keep the panels straight when drying for two days.
Of course the bars won't go too deep to be glued also haha  :)
And finally mount the last vertical panel, that has already been siliconed
And for helping the side panels, maybe use some wood panel and bricks to help them
stand vertical and not move while drying.

Only virtual toughts, but that's my plan, cross fingers  ;D ;D 8) 8)
 
BTW, all the board without breaking bits, All ist Klar!  Thanks for the infos guys, yes rookie technique  ;).
p1030459m.jpg

Edit: couldn't wait for the bits to be here, my friend had te same 0.8 and 1mmm, i was feeling bad breaking his, but with your advices all went good...
 
I was checking out the lazer printers on a webstore here in France, just for curiosity, mine works fine, but i found deals in France that are ridiculous, like these, first one is color and has 30Euros off, second one is Black and WHite, for a 1200Dpi resolution so about 60 euros brand new, but after 20000 paper use, it's cheaper to buy a new one than replace the toner system, a little curiousity that gets me back to reality. WASTE/WASTE/WASTE  :(


Wow nice targeting on the PCB.

Yeah the throw away culture is a bummer. But really what I think is that it really doesn't
have to be so bad at all. Personally I love being a trash collector. Big companies throw so
much good stuff out, like video projectors, big printers, monitors, scanners, you basically
have no reason to buy anything new in this world. Even the laptop I am writing on right
now is out of someone else's garbage - the screen was broken, so I replaced the panel.

You can't fish everything outta the dumpster but for a lot of good reasons...

http://www.youtube.com/watch?v=Z1SiSUrvUnk
 
"...I Loooove Trash..." Hahaha.
Wow nice targeting on the PCB.

Noob Luck haha, let's see how it will be after a couple of boards and just a couple of hours of sleep  :)
Anyway upgrade from last time manoeuver was:

The Dremel was actually a little too high as Kato said on a last post, so i just went down to about 5mm to the board,
just a small movement to drill the hole, BUT my dremel has still the bit not turning very centered,
it's even more obvious when i start and turn off quickly, you can clearly see it going oval a tad, but the drilling went
just fine as you can see, all pretty much dead center ha! Gives play like you said.
Now that i think about it, i just remembered that i had also Bits holder in different diameter that comes with the Dremel,
could be even better for getting a little more precision, and a little less wiggling, next time i'll try this, meaning tomorrow after work
addiction is bad i know  ;D.
At the end the bit was ok, and i was feeling sad with no other holes to drill, am i getting crazy  ::) ;D
Now maybe the bits of my friend were of better quality as mine, and that i can believe, but anyway Dremel is a keeper, and i'm happy it went all good
So i think we can clearly say that even with a little wiggling, drilling is ok with good bits.

 
Allright for info, using these ( they were sleeping in my Dremel box, totally forgot i had those  ::)), made the bit turn dead center. No More Wiggling at all!
Just a nice straight bit turning fast....

EDIT: Just a little note on this:
Sometimes when insertind the bid in the clamp, and checking if this one turns nicely, well you can still see it turning a little off, just at tad,
if this happens, i just unscrew the clamp a bit and i push and turn the bid while tightening it in (those cardbide bids as found on Ebay or Bungard ones, have that plastic colored ring for diameter that makes a flat dead end of the bid), recheck until it turns nicely, works good, and i prefer the clamp for having the exact diameter fixed in there.
Image.aspx


I was using this, and as Mad ax pointed out, it was maybe dirty, but it's just not as good as using the clamp
mandrin-autoserrant-dremel-2615448632-1750245.jpg


BTW, got some transparent Staedler paper for lazer printer, and i made three layers of the sheets for having a deep black (i think my toner is getting empty) anyway works great from the looks.
I cutted two Prints, and added tiny drops of super glue on each layers to keep them focused on one uncutted A4


I am waiting for some stuff before moving on, and today while i was talking to a friend that has a couple of aquarium, he just told me something that i didn't know and think of  ::),
you can buy premade aquariums very cheap, just the glued glass without all the extra stuff, the only thing i'll need to do is just add two panels of glasses and it will still be possible to upgrade later on, the build will be even cheaper, perfect, found a link of some aquarium website that sells those, but i can get those where i live also from what he told me, nice.

http://www.achat-aquarium.fr/achat/produit_details.php?id=555&catid=292
 
Hi tony!

A fish-tank is not easy to ship. Not surprisingly, the website you linked use a carrier, and a quick check with your Zip code resulted in 47€25 on top of the 20€81 that the product cost. So, a total of 68€06. And you still have to buy additional glass panels, and silicon...
In the end, I am not sure that you will save much...

Axel
 
Hey Mad.Ax, no i'm not buying from them! I just linked for giving an idea of who would also be interested, i can buy these over here where i live from wht my friend said, in Switzerland to be exact, and at cheap prices too  ;), well cross fingers, at "Hornbach" they seem to carry those....
If it's a good info and still up to date, then it could be a nice option if the price is right of course, but i tought that buying an aquarium was with all the shabang, and not nude...
So i'm curious now....
 
zayance said:
but after 20000 paper use, it's cheaper to buy a new one than replace the toner system

Not necessarily true, there are toner refill kits on ebay that work amazing at less than half the cost of new cartridges...

I've refilled the black on our Samsung CLP-510 3 times and each colour once with no problems at all.
 
Ptownkid said:
zayance said:
but after 20000 paper use, it's cheaper to buy a new one than replace the toner system

Not necessarily true, there are toner refill kits on ebay that work amazing at less than half the cost of new cartridges...

I've refilled the black on our Samsung CLP-510 3 times and each colour once with no problems at all.

Yes true, but i was talking to a friend that actually did exactlly what you've done, but after 3 refills and so about 20000 copies, well now it's not the Toner that causes problem but the "drum" system? Well that's what the Printer was asking for to be changed, I don't know if it's the same name in English, maybe this depends on the printer also?, but anyway the part was about 120euros, and the Printer sale was 50euros, so guess what he chose...
 
Well seems like my friend was right, i just called "Hornbach" and they sell empty Aquariums, a 50x30x30 is 20Euros.
A little less high, but i can still add the two glasses of 35 or 40 and use one of the side containers for water rinse or whatever....

All in all this will be about 50Euros maybe less, all done. Nice to be curious  :D 8)

EDIT: BUT the more i think about it, and the more i believe assembling inside an already made Aquarium could be more tricky
then going from scratch and assembling with all panels flat, using the Silicone gun can be harder in confined situation....
Both can be done, but i think the 1st Solution is better  ::)
 

Latest posts

Back
Top