500 series Level-Loc project

GroupDIY Audio Forum

Help Support GroupDIY Audio Forum:

This site may earn a commission from merchant affiliate links, including eBay, Amazon, and others.
Since this is my first non-plated thru-hole board, I found out these things take very little solder. First ic socket had a tiny blob over to ground. I checked with a meter just to be cautious and found it.

Nipped it in the bud this time, but I wanted to share with others who are use to plated holes!
 
Got the P.S.B. and faceplates today. About 17 mailing days to SoCal, USA.
No silkscreen for parts placement. Read the the posts.
Do we build the Bom and project from the one posted labeled  picture.
Is there a build post or the mouser cart?
Thanks, looking forward to the build.
 
Received my PCB / Faceplate combo today in North Texas. Looks great!

I would also be interested in someone posting their mouser cart!  ;D
 
I will post mine as soon as I clear the errors (three of them this time!). You guys will have to add whatever toggle switches and knobs you want to use, but the grunt of it is done. I haven't finished building these yet so please double check everything if you use the cart!

I should be able to post it tonight or tomorrow.
 
hello all

please do Indecline, we´ll all appreciate that for sure - just emailed Marek too!

ps: and thank you Ian for this
 
Hi!

For my sins, I'm the person who is making the PCBs and front panels for this project. I notice many of you have received your packs. Only one front panel has arrived broken in two. I don't know how the postal services manage to break something so tough - even when it is protected and padded. The PCBs and panels are made using a milling machine, so do not expect pretty green solder resist, silk-screened component overlay or through-hole plating. As it is a single-sided board, through-hole plating is not necessary. In any case, it's a fairly involved process and not at all cost-effective unless you are manufacturing in bulk. The boards are tinned so soldering should be easy.

I'm looking forward to seeing photos of some of your builds!

Marek
 
Edit: the Linear 50k pot in the cart is the wrong size! The wiper enclosure is on the wrong side and will not fit with the faceplate for 500 series builds.

Also note: That this cart has bc550c transistors that must be mounted backwards. Mouser does carry the original 2n5089 transistors if you would like to replace the 550c with these.

------------------------------------------------------------------------

Here's my Mouser cart. This is for two projects with no spares!!

Things you need to add:
Knobs, LED, Toggle Switches (push button is in the cart), and IC sockets.

Be careful of back orders, I had to sub a resistor on my last order (KOA), and please CHECK THE CART AGAINST THE BOM! I haven't finished building mine yet, but everything has dropped into place so far.

If you guys find an error in my cart, please let me know and I can adjust. If someone wants to find the parts left off of my cart, I will add them to make a complete kit.

Enjoy!!  :)

http://www.mouser.com/ProjectManager/ProjectDetail.aspx?AccessID=a028d54700
 
Hi,

Long time no post - right!?  Sorry about my absence, been mad busy at work since this was done.


Indecline said:
Here's my Mouser cart. This is for two projects with no spares!!

Things you need to add:
Knobs, LED, Toggle Switches (push button is in the cart), and IC sockets.

Be careful of back orders, I had to sub a resistor on my last order (KOA), and please CHECK THE CART AGAINST THE BOM! I haven't finished building mine yet, but everything has dropped into place so far.

If you guys find an error in my cart, please let me know and I can adjust. If someone wants to find the parts left off of my cart, I will add them to make a complete kit.

Enjoy!!  :)

http://www.mouser.com/ProjectManager/ProjectDetail.aspx?AccessID=a028d54700

Thanks for sharing this cart! (I haven't checked it though!  :-[)  I really want this to be a quick, easy and DIRTY project for all to enjoy so this is exactly what it needed!

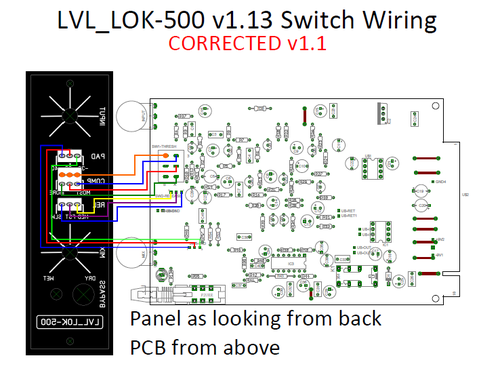
I have noticed an error on my switch wiring diagram... I think they are all 180 degrees out...  :-[ :-[ :-[ :-[ :-[ ::)

I'll verify that I have made a mistake and update - i'll make a note on the drawing to show that it is a corrected version.


Cheers,
Ian
 
Hello all.

I thought I'd already posted this but alas it appears not!  :eek: ???

Anyway, I've updated the document to reflect the now corrected (I hope) wiring diagram for the switches.  It is available on the blog download bit:

https://drive.google.com/file/d/0Bx2bMNFdYu3YSjJXVnBwZmtIS3c/edit?usp=sharing

And looks a bit like:

tumblr_inline_n4zvnxWnZu1r2bfgn.png


I am hoping very soon to check compatibility with a sled but I'm away again for a while.  In my head the dimensions are pretty close so it I think as a worse case it would only need a couple of mm taking off either the pins at the back of the board or the board back edge.  Not a biggie really.

I WILL get that check asap but it may not be for a while.  Sorry.

I hope any builds are progressing well.  And don't forget just how easily Mareks board take solder - without a solder mask this can make things quite easy to bridge.

Cheers,
Ian

:)


Indecline,
Thanks for posting your Mouser cart.
I'm putting an order together and noticed 2N5089 are available on Mouser, if you didn't want to sub bc550c.
I'll post P/Ns for toggle switches if I can find them at Mouser.
And the LED should mount in a 5mm hole?
 
I think these are correct C&K switches (although they are expensive!)
Mouser:
611-7203-001
611-7103-001
 
Is the INA134 correct here? It is 0 dB, whereas the INA137 is -6 dB. The drv134 is +6dB, so as a pair, the ina137 / drv134 would be unity.
Maybe either works and it doesn't matter?
 
Winetree said:
Just got to the part of mounting the pots.
The face plate hole needs to be enlarged so the Mix/Blend pot can sit flush to the face plate.

Hi,

That's strange - I had no probs with any of my pots.  What pots are you using?


Ian.
:)
 
Oh, also whilst I'm here...

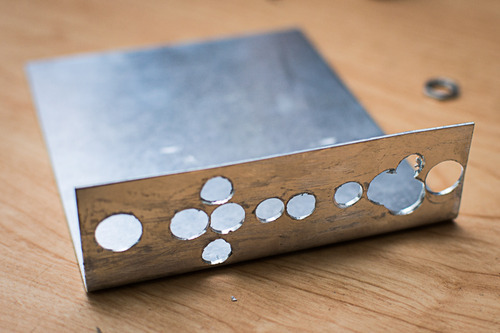
Fresh from the butchers... an old sled no longer being wasted:

tumblr_inline_n57nthC8YT1r2bfgn.jpg


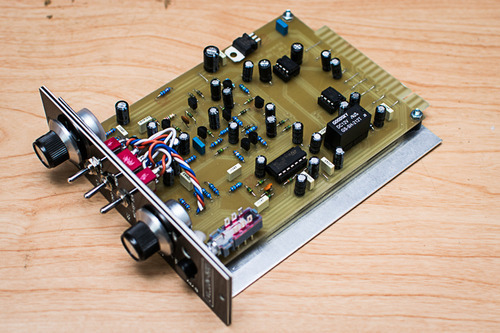
One sled'd LVL_LOK-500.

tumblr_inline_n57nubulLg1r2bfgn.jpg


No mods were necessary - fitted right in.

For those interested I have attached a pdf drill guide...


Ian
:)


Attachments

  • LE-VELOC Drill.pdf
    12.3 KB
Dr Gris said:
Great!

Going slow here as usual, but I just ordered two L-brackets from [silent:arts]

//M

No worries there then - these aren't from [silent:arts] but are the same dimensions (ish!  :eek: ;)).

Good luck with the build(s)!

Ian

:)
 
Back
Top