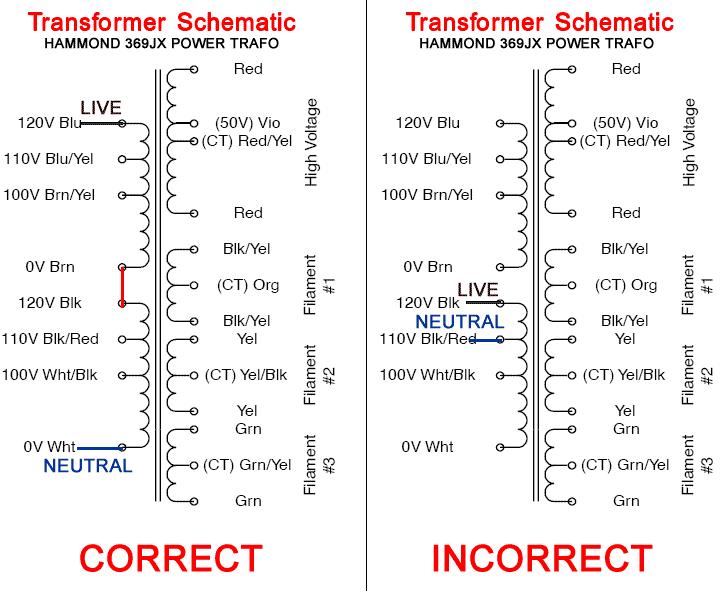
I really don't know if it's center tapped or not.
Purusha,
If you look at the datasheet you will clearly see that it is. Look under the the 369JX info and you will see the Filament #1 is CT (which stands for center tapped) 6.3VAC.
On the 369JX the extra wires you see are the MULTIPLE primaries that the transformer has because it runs at 100, 110, 120, 200, 220 and 240 VAC.
If I read the datasheet correctly the wiring on the secondaries is as follows.
The High Voltage will be RED and RED, just like the Allied and Greg's info with a RED/YELLOW CT which goes to the chassis.
The Heaters/Filament or the 6.3VAC wires are BLACK/YELLOW and go to the LA-2A PCB marked as GREEN, the CT is orange and again that goes to the chassis just like the RED/YELLOW one (Having seen a pic of the trano i can see the datasheets is wrong as the filament is colour coded from filament #3 not one, being GREEN and GREEN witah GREEN/YELLOW CT).
I think your operational voltage in Europe is the same as ours, being 240VAC (well ours is actually 230VAC), in which case you would need to configure it as such.
In order to do this you would have to put the primary windings in SERIES with each other.
To do so connect the BROWN and the BLACK wires together (120VAC + 0V)
Then your mains wires would be the BLUE wire and the WHITE wire.
So the wires that are not connected would be the BLUE/YELLOW, BLUE/BROWN, BLACK/RED and WHITE/BLACK, these must be insulated with some heat shrink and taped up.
I would advise you DON'T cut them as one day you may want to change the primary voltage if you find yourself overseas, and would have the flexibility to do so.
I would NEVER blindly just follow the datasheet. I would test the transformer windings with a multimeter BEFORE just hooking it up to the PCB because you may have a problem with an incorrect winding that could damage your LA-2A.
So mount it in the box and make sure you ground the center taps and throw the switch and measure your secondaries. You should get over 500VAC across the RED HV wires and over 6.3VAC the BLACK/YELLOW wires... I say over as all unloaded AC tranos SHOULD be over the loaded voltage, I forget the % and math behidn it.
I hope that helps you out, enjoy your Christmas!
Cheers
Matt


![Soldering Iron Kit, 120W LED Digital Advanced Solder Iron Soldering Gun kit, 110V Welding Tools, Smart Temperature Control [356℉-932℉], Extra 5pcs Tips, Auto Sleep, Temp Calibration, Orange](https://m.media-amazon.com/images/I/51sFKu9SdeL._SL500_.jpg)