DIY Dry transfer

GroupDIY Audio Forum

Help Support GroupDIY Audio Forum:

This site may earn a commission from merchant affiliate links, including eBay, Amazon, and others.
I've tried this with LaserJet 4,5 and all kinds of glossy paper. One problem,  the glossy paper is too thick . Two, the using a iron is not hot enough. A heat press is required. Three, the toner will transfer successfully about 1-2 out of 5 tries and you'll waste a lot of time trying. To date , I have'nt seen anything work consistently really well eventhough many people talk about this method. Basically , yes, it may work a few times but its a real Pain in the Axx for all the time spent. I use this method for PCB ptototypes and it very cost effective , but you'll lose cost in the time investment trying to get it to transfer to the PCB or whereever the image will transfer too.

Main problem you cannot see how much of the toner has transfered before you start to peel the paper up , most of the time the image only partially trasnfers, if that happens you get to start all over again.
 
I agree it is problematic.

Some thoughts:

1) I think the toner moves TOWARD the heat, so if it is possible to heat the object being printed, and press the paper containing the toner I think you are better off.  As the paper lifts off after you rub down on it, it cools, leaving melted toner in place.

2) The treated paper backing material i spoke of before work better for this.

3) I always use multiple attempts ( i print a 2 or three ) with PCB etching.  Small boards and sections are more reliable.  I really dislike the whole etching process, but at least it works, and I have done some good boards (especially small microphone boards, and big honking psu boards. Small mic boards worked because they were small, big ones worked because they had huge traces that I could go over with sharpie before etching.)

I have tried photo resist etching... but I think my toner is too transparent.  I have tried doubling it up and that works pretty well.  But maybe the real problem is that I need a vacuum table.
I see some folks self etched boards and I am extremely impressed.  I am thinking it must be that they do thier own photo resist because the presensitized boards I get work... but not well.


4) Lastly, if the board has reasonably wide trace spacing (tube boards) I print the same image twice on the same backing sheet.  This sometimes has a double vision issue (a double track) which I fill in with sharpie, and often it makes the pads bigger than they should be and sometimes the hole disappears, but I get lots of toner and the transfer goes better.  If you press hard then you actually get "squishing" and distortion of the traces, it's that thick.  I get a decent etch this way.


5) for doing "painted" front panels, my process - Iron on, acetone, try again... would be really bad, as the acetone would take of the front sticker.

6) I have used full size clear label sheets printed with inkjet.  It looks fantastic (a dull flat finish, perfectly positioned, no defects, and as many colors as you can dream of.  You can even print right over lights by specifying "holes" in FPD (which come out clear) and then printing them and not cutting them.  The lights will shine through the clear bits fine.

I have a picture of a black front panel done this way, and here is one of a bruno 4k5 (ssl 4k input channel) the led's are shining through the label and adhesive

The problem with this method is it is great protoyping tool, but the inks are somewhat water soluble.  And when I have tried to "paint" the sheets with laquer, the results are not good, the sheet deforms.  But maybe someone has a better idea, or waterproof inks?


Attachments

  • photo-1.JPG
    photo-1.JPG
    660.3 KB · Views: 178
electrochronic said:
I've tried this with LaserJet 4,5 and all kinds of glossy paper. One problem,  the glossy paper is too thick . Two, the using a iron is not hot enough. A heat press is required. Three, the toner will transfer successfully about 1-2 out of 5 tries and you'll waste a lot of time trying. To date , I have'nt seen anything work consistently really well eventhough many people talk about this method. Basically , yes, it may work a few times but its a real Pain in the Axx for all the time spent. I use this method for PCB ptototypes and it very cost effective , but you'll lose cost in the time investment trying to get it to transfer to the PCB or whereever the image will transfer too.

Main problem you cannot see how much of the toner has transfered before you start to peel the paper up , most of the time the image only partially trasnfers, if that happens you get to start all over again.

Regarding the ironing, I use the tip of the iron, pressing down quite hard, to make sure it sticks to the surface. This works really well with painted surfaces, haven't tried it too much on other surfaces. I agree with this not being the easiest way to do this, but after some practice it should work every time.
 
LesPaul said:
electrochronic said:
I've tried this with LaserJet 4,5 and all kinds of glossy paper. One problem,  the glossy paper is too thick . Two, the using a iron is not hot enough. A heat press is required. Three, the toner will transfer successfully about 1-2 out of 5 tries and you'll waste a lot of time trying. To date , I have'nt seen anything work consistently really well eventhough many people talk about this method. Basically , yes, it may work a few times but its a real Pain in the Axx for all the time spent. I use this method for PCB ptototypes and it very cost effective , but you'll lose cost in the time investment trying to get it to transfer to the PCB or whereever the image will transfer too.

Main problem you cannot see how much of the toner has transfered before you start to peel the paper up , most of the time the image only partially trasnfers, if that happens you get to start all over again.

Regarding the ironing, I use the tip of the iron, pressing down quite hard, to make sure it sticks to the surface. This works really well with painted surfaces, haven't tried it too much on other surfaces. I agree with this not being the easiest way to do this, but after some practice it should work every time.

Hey LesPaul, I have a couple of questions for you:
[list type=decimal]
[*]What laser printer do you use?
I see your holes were drilled before you put the glossy paper on the panel. How did you line up the image so perfectly to the holes?
When you pull off the paper after the water, there was a ton of white paper that stuck to it. How did you get that off? Seems like a HUGE pain!
After everything, cloudy residue disappears when you spray it with glossy laquer? Like Krylon?
[*]
[/list]

Thanks so much for this great technique! I might buy a laser printer just so I can use it for my projects.
 
Scrappersa said:
LesPaul said:
electrochronic said:
I've tried this with LaserJet 4,5 and all kinds of glossy paper. One problem,  the glossy paper is too thick . Two, the using a iron is not hot enough. A heat press is required. Three, the toner will transfer successfully about 1-2 out of 5 tries and you'll waste a lot of time trying. To date , I have'nt seen anything work consistently really well eventhough many people talk about this method. Basically , yes, it may work a few times but its a real Pain in the Axx for all the time spent. I use this method for PCB ptototypes and it very cost effective , but you'll lose cost in the time investment trying to get it to transfer to the PCB or whereever the image will transfer too.

Main problem you cannot see how much of the toner has transfered before you start to peel the paper up , most of the time the image only partially trasnfers, if that happens you get to start all over again.

Regarding the ironing, I use the tip of the iron, pressing down quite hard, to make sure it sticks to the surface. This works really well with painted surfaces, haven't tried it too much on other surfaces. I agree with this not being the easiest way to do this, but after some practice it should work every time.

Hey LesPaul, I have a couple of questions for you:
[list type=decimal]
[*]What laser printer do you use?
I see your holes were drilled before you put the glossy paper on the panel. How did you line up the image so perfectly to the holes?
When you pull off the paper after the water, there was a ton of white paper that stuck to it. How did you get that off? Seems like a HUGE pain!
After everything, cloudy residue disappears when you spray it with glossy laquer? Like Krylon?
[*]
[/list]

Thanks so much for this great technique! I might buy a laser printer just so I can use it for my projects.

I have used different kinds om laser printers, don't think it matters too much. As for the holes, I marked them with a cross on the paper and held it up towards a light to position it.

The paper should stick to the panel, but use a finger to carefully get it off. Hold it under the water until it's clean. This may take a while, but it's worth it :D

Don't use glossy laquer, this will only make the cloudy effects stronger!
 
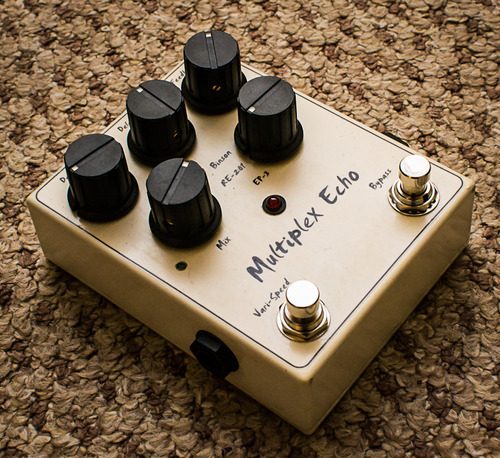
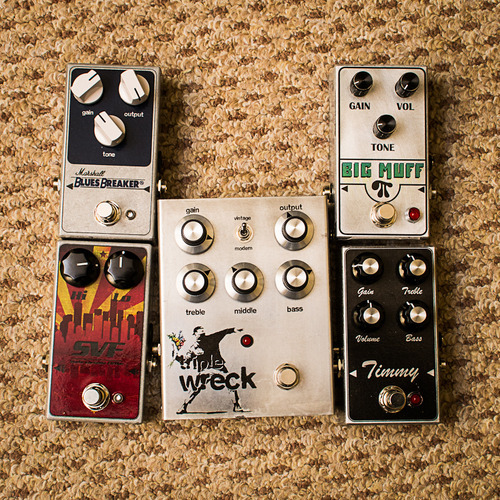
I know it's not dry per se, but for guitar pedals I've been using waterslide decals.  If you use a laser printer you don't need to seal the ink before applying clear coat either.

I use LaserTran (I think is the name).

It can be pain when doing 1u enclosures or larger, but for 500 series it'd be great:

tumblr_inline_mh0257bO9B1r2bfgn.jpg


The ethically questionable labelling (I'm most aware of the Timmy because PaulC is such a good guy) is trying to be justified by the fact that these are only for me.

tumblr_memva7WysT1r2bfgn.jpg


tumblr_mdaj5nDJyD1r2bfgn.jpg


Cheers,
Ian
 
irfrench said:
I know it's not dry per se, but for guitar pedals I've been using waterslide decals.  If you use a laser printer you don't need to seal the ink before applying clear coat either.

I use LaserTran (I think is the name).

It can be pain when doing 1u enclosures or larger, but for 500 series it'd be great:

tumblr_inline_mh0257bO9B1r2bfgn.jpg


The ethically questionable labelling (I'm most aware of the Timmy because PaulC is such a good guy) is trying to be justified by the fact that these are only for me.

tumblr_memva7WysT1r2bfgn.jpg


tumblr_mdaj5nDJyD1r2bfgn.jpg


Cheers,
Ian

This is fantastic. What was so difficult about doing large surfaces? How did you print in color? Do you have a color laser printer? Those seem pretty expensive. I'm looking to buy a laser printer just so I can try these techniques.
 
Like bruce0, I've been using the backing paper for decals - really thin and glossy - with good results.
compressorc.jpg
.
I have used clear coat as an adhesive to transfer the toner. Now, I'm eager to try the ironing technique. Seems a lot less messy.
 
pettol said:
Like bruce0, I've been using the backing paper for decals - really thin and glossy - with good results.
compressorc.jpg
.
I have used clear coat as an adhesive to transfer the toner. Now, I'm eager to try the ironing technique. Seems a lot less messy.

That looks fantastic, great design.

Can you explain the clearcoat transfer technique?  That seems like a much better way for painted boxes.


Be aware that I have recently noticed that my laser printer cartridge is getting "foggy" it has a grey background.  This happened once before and I made nothing of it, but I wonder if the silicon on some of the label sheets comes off on the cartridge and degrades them.  Last time replacing the cartridge fixed it.  But just a warning because the cartridges can be expensive.

I don't "Know" that this was caused by the label backing, but I now suspect.
 
Thanks!

I spray the printout lightly with clear coat. I use Montana Gold for this because it dries slowly, which gives me a decent time window for the subsequent transfer. I do not use Montana for the actual clear coat of the box as it has distinctive yellow tint!
When the paint is sticky but not wet, I apply the label on the box and rub it. Then I remove the paper slowly from one end and if some parts were not transferred correctly, I just fold the paper back and rub some more.

About the grey background - I'm having the exact same problem at the moment. But that's with a printer I have only used a couple of time for this. Just thought the printer was old and crappy. Hmm... lots of printers in the office... ;)
 
That's interesting about the grey background.  I think it may depend upon the brand of labels used.  Some may be releasing silicon or some other material onto the toner cartridge components.
 
Tried something new. Instead of clear coat as adhesive I sprayed the print outs with KK2000 (temporary adhesive for textiles), which is what Pulsar pro fx uses. Works like a charm. Virtually invisible, no mess and does not require perfect timing (as opposed to clear coat). Even better, you can wipe off the excess of the adhesive with IPA. I've only tried small transfers so far. Next week I'll go for something bigger. I think this might be it.
 
For all this work, couldn't you create, expose, and make your own silk screen and silkscreen like the pros do?
 
Treelady said:
For all this work, couldn't you create, expose, and make your own silk screen and silkscreen like the pros do?

I have considered silkscreening, but the main thing about these methods described here is that they are really cheap! Silkscreening is a totally different story...

And it's truely DIY ;D
 
Back
Top