You are using an out of date browser. It may not display this or other websites correctly.
You should upgrade or use an alternative browser.
You should upgrade or use an alternative browser.
Restoring and old Neve desk - DONE!!!!
- Thread starter API
- Start date


Help Support GroupDIY Audio Forum:
This site may earn a commission from merchant affiliate
links, including eBay, Amazon, and others.
Brian Roth
Well-known member
I believe those are called feed-through (also feed-thru) insulating terminals.
Bri
Bri
ruffrecords
Well-known member
API said:Yes, i got the busbars from Blake Dewitt in the UK.
I cannot find them anywhere. Google keeps returning results for some obscure baseball player.
Cheers
Ian
if you post a closer photo I can take it to a local electronics wharehouse that has a lot of NOS parts from the 60's and 70's and check if they have it
Thanks Brian, that sounds like the correct (and logical) name for them.
Will take some better pics tomorrow for you Whoops, would be great if you could find some.
A quick google search only turned up larger and different one.
Ian, Blake is a Neve tech in the UK that have alot of parts.
He is somewhat hard to get hold of though since he is always out travelling.
He sometimes posts on Geoffs Aurora forum and that is the best place to catch him if you want to get in touch.
It would be possible to build your own if you could find the feed-through bushes which should absolutely not be impossible.
radardoug
Well-known member
You used to be able to get white teflon ones from RS components.


![Soldering Iron Kit, 120W LED Digital Advanced Solder Iron Soldering Gun kit, 110V Welding Tools, Smart Temperature Control [356℉-932℉], Extra 5pcs Tips, Auto Sleep, Temp Calibration, Orange](https://m.media-amazon.com/images/I/51sFKu9SdeL._SL500_.jpg)


$15.98
$16.98
Gikfun Upgraded USB Mini Amplifier Electronic Transparent Stereo Speaker Box Sound Amplifier DIY Kit for Arduino EK1918
Gikfun_Official_Store
radardoug said:You used to be able to get white teflon ones from RS components.
Yes I was thinking about those ones also, they might work very well. There's in different sizes and shapes.
you can check the farnell offers:
http://pt.farnell.com/allthread/164003002/spacer-nylon-m3x2-pk50/dp/891370
http://pt.farnell.com/webapp/wcs/stores/servlet/Search?catalogId=15001&langId=351&storeId=10171&categoryId=700000004846&beginIndex=2&showResults=true&aa=true&pf=110163777,110443067,111639658,111639663,111873159,112957933&vw=
you can also check this links out:
https://www.google.pt/search?q=busbar+insulator&client=firefox-b&source=lnms&tbm=isch&sa=X&ved=0ahUKEwiZ-d_St6nRAhXBWBQKHSHMDAYQ_AUICCgB&biw=1276&bih=699
http://www.techzonics.com/wires-cables.htm
http://www.qbett.com/products/ptfe-insulator/
Quote from: API on Today at 01:16:32 PM
Yes, i got the busbars from Blake Dewitt in the UK.
I cannot find them anywhere. Google keeps returning results for some obscure baseball player.
Cheers
Ian
His name is Blake Devitt with a "V"
Scotch Mcneil website has a Neve replacement parts section, maybe it can be usefull also:
http://www.scotchmcneilaudio.com/content.php?id=15&type=app&content=parts&page_count=1
http://www.scotchmcneilaudio.com/content.php?id=16&type=app&content=specialist&page_count=1
http://www.scotchmcneilaudio.com/content.php?id=15&type=app&content=parts&page_count=1
http://www.scotchmcneilaudio.com/content.php?id=16&type=app&content=specialist&page_count=1
thomasdf
Well-known member
Holy s***!!!!
I am AMAZED! You make it look some simple...
Keep up the great work, and I'll keep drooling over and over!
Cheers
I am AMAZED! You make it look some simple...
Keep up the great work, and I'll keep drooling over and over!
Cheers
Whoops, thanks for the links.
Those at Farnell are way to big though, these are kind of tiny with a body diameter of ca3.5mm and the middle hole is about 0.7mm.
But the other link looks more promising.
Also the McNeil Neve parts website i believe is for the later Neves, but thanks alot for them anyway, they could come in handy.
Rob, yes you are correct, normal V in Devitt.
His nickname is Blakeyboy!
Will check RS again Radardoug, there must be something similar somewhere.
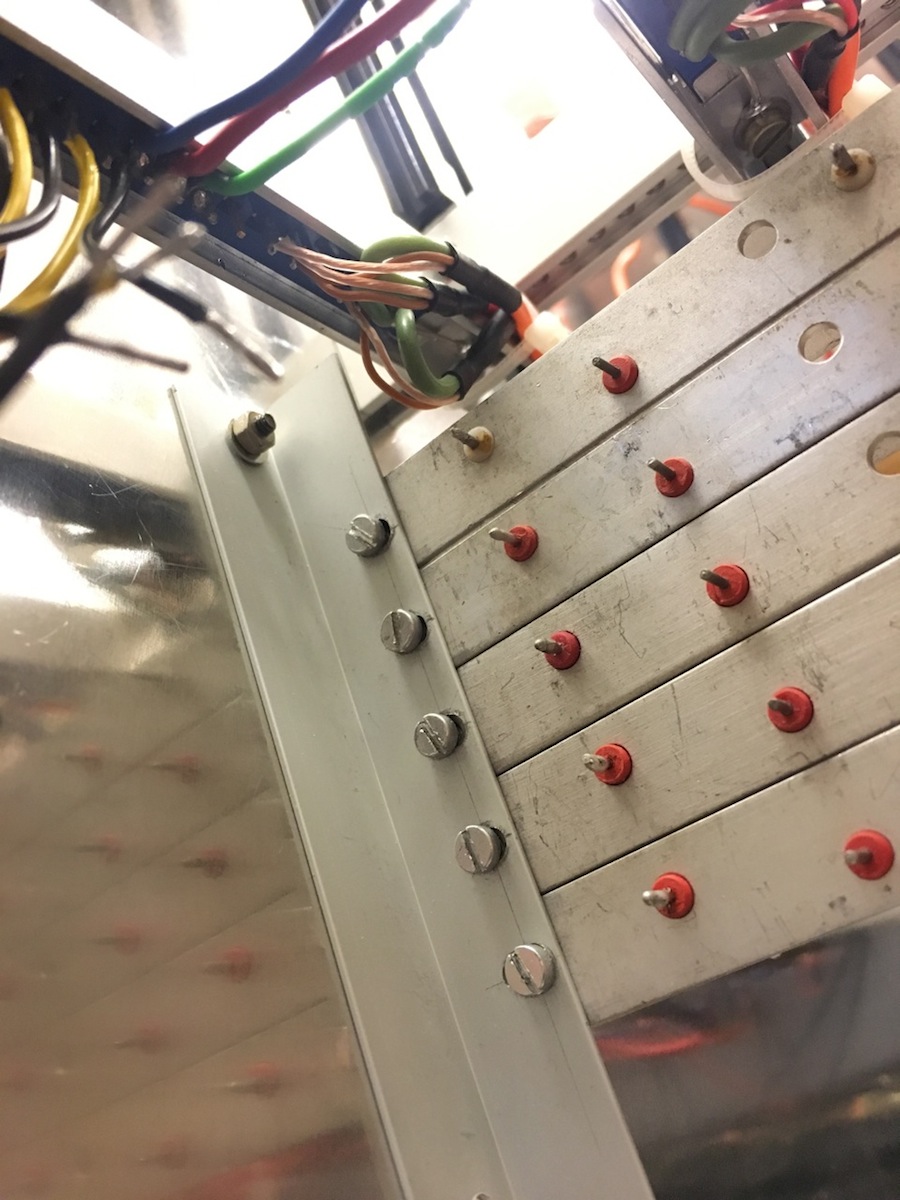
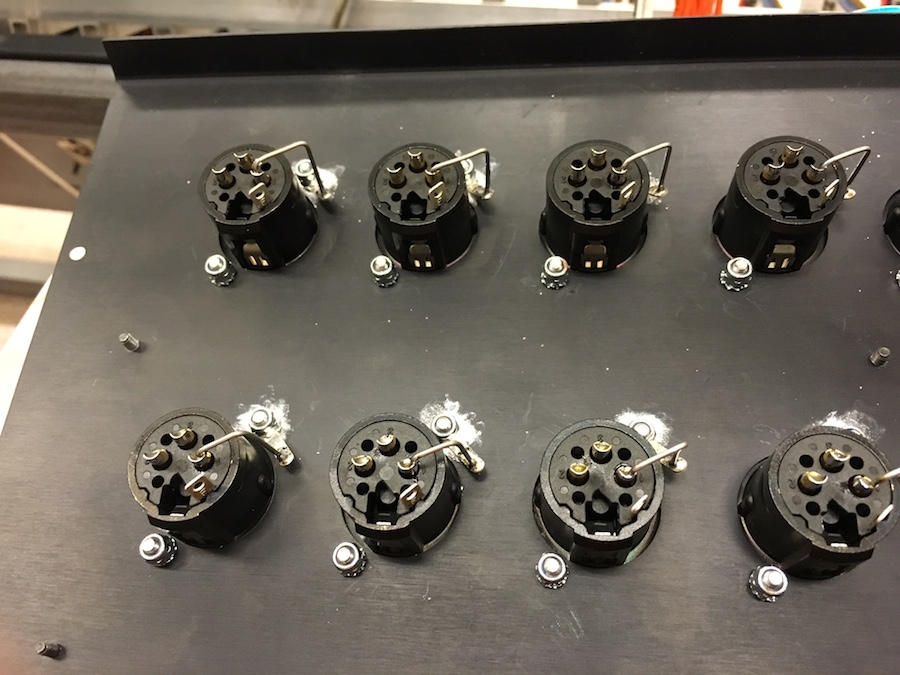
Here is a pic of two versions, one with a fixed pin in the middle and one with a resistorleg sized hole.
Those at Farnell are way to big though, these are kind of tiny with a body diameter of ca3.5mm and the middle hole is about 0.7mm.
But the other link looks more promising.
Also the McNeil Neve parts website i believe is for the later Neves, but thanks alot for them anyway, they could come in handy.
Rob, yes you are correct, normal V in Devitt.
His nickname is Blakeyboy!
Will check RS again Radardoug, there must be something similar somewhere.
Here is a pic of two versions, one with a fixed pin in the middle and one with a resistorleg sized hole.
thomasdf said:Holy s***!!!!
I am AMAZED! You make it look some simple...
Keep up the great work, and I'll keep drooling over and over!
Cheers
Haha, thanks alot Thomasdf!
Believe me, its not simple, the struggle is real!
But its more fun to post the progress and fun parts, but there are many hours of work behind each new post.
I am sorting through alot of pictures at the moment but will post some more tomorrow.
Gene Pink
Well-known member
API said:Here is a pic of two versions, one with a fixed pin in the middle and one with a resistorleg sized hole.
That looks like a Feed-through terminal.
Gene
PS: An amazing build, nice work.
Gene, i think we have a winner!
Thanks for that link, will follow up on that.
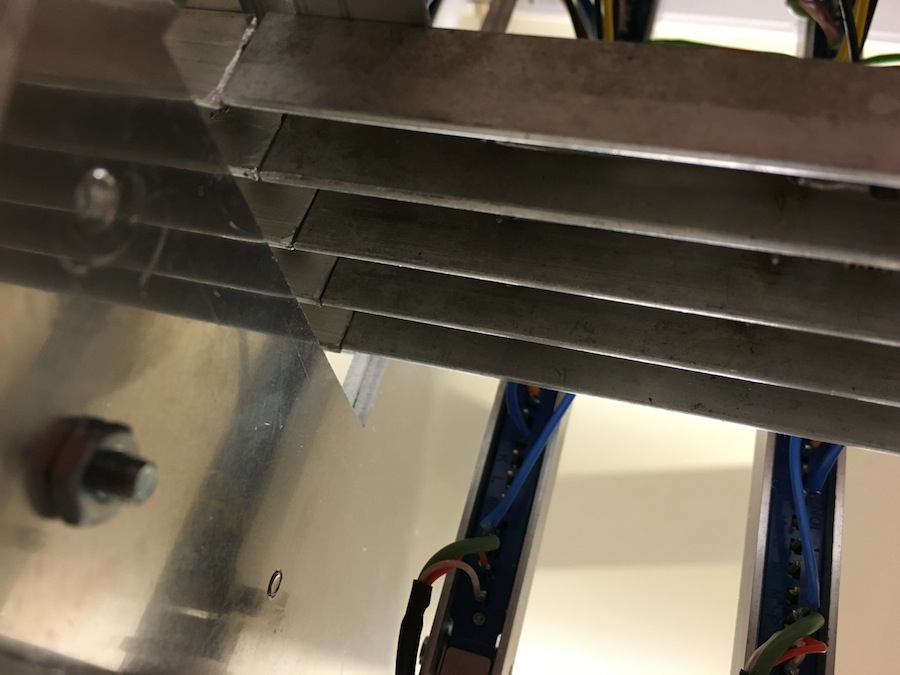
So, back to the restoration where the time have come to mount the busbars.
This was more tricky than you would think since when they cut the originals of it was not done very evenly.
I tried to grind them down to get them level but they were still a little different in lenght after that.
Also they were not lining up evenly with the new ones when using the original mountingholes, so i had to come up with something clever.
My solution was to first drill new mountingholes in the busbars and also place the mounting holes in the bracket unevenly.
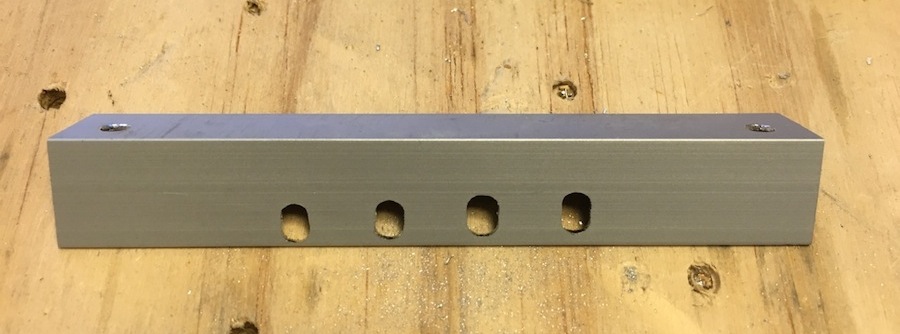
First i cut some new brackets out of a simple V shaped bar and drilled a few holes.
This was slightly bigger and thinner than the original, but good enough.
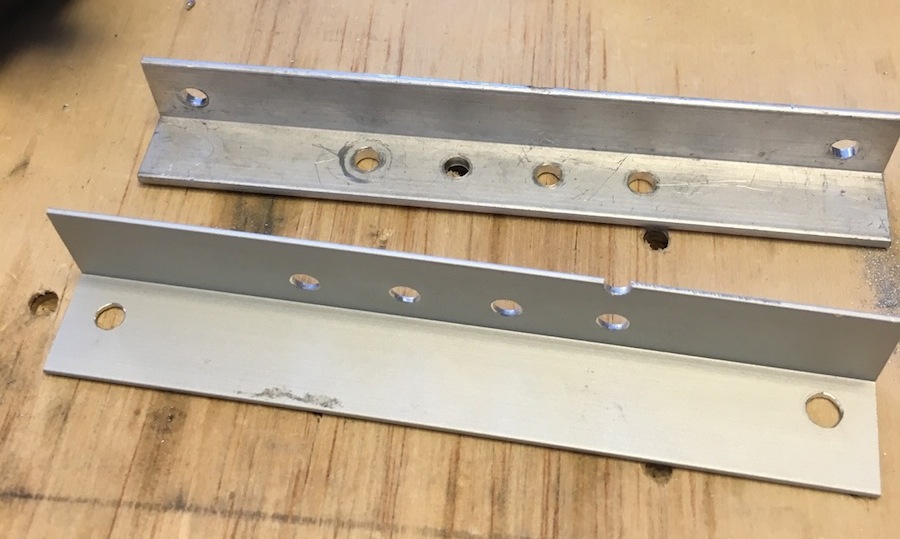
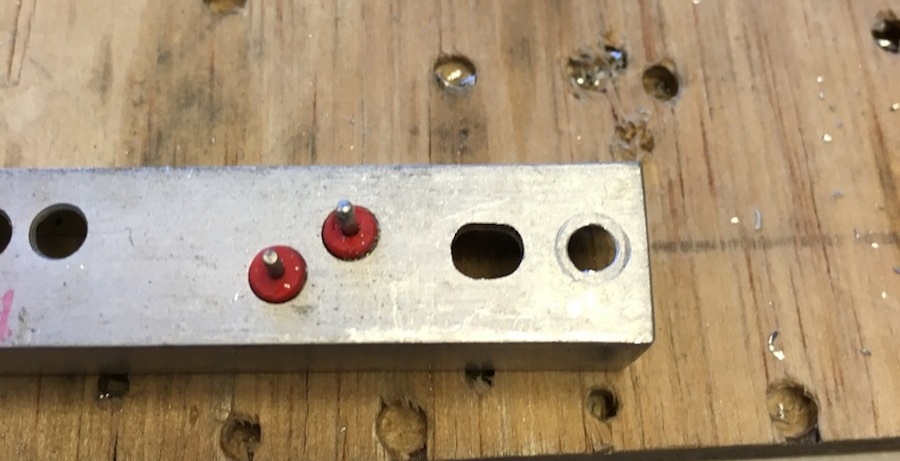
Then i had to make some grooves in the bracket so i did not make contact with the feed-through terminals
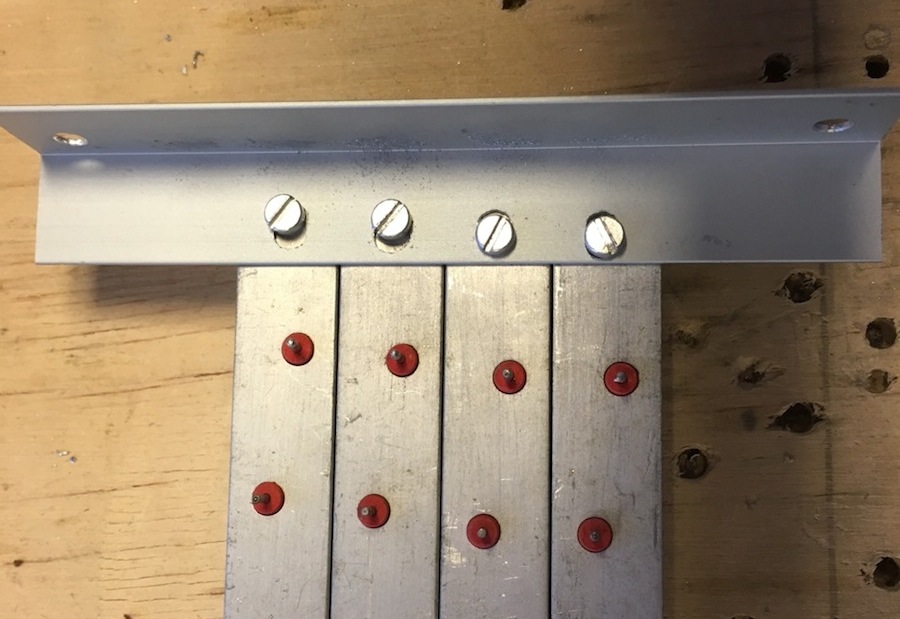
After that i drilled new holes in the busbars and made them a bit oval so i could move them back and forth.
I also placed the holes slightly different from eachother according to how the excisting busbars were cut off so they would fit better.
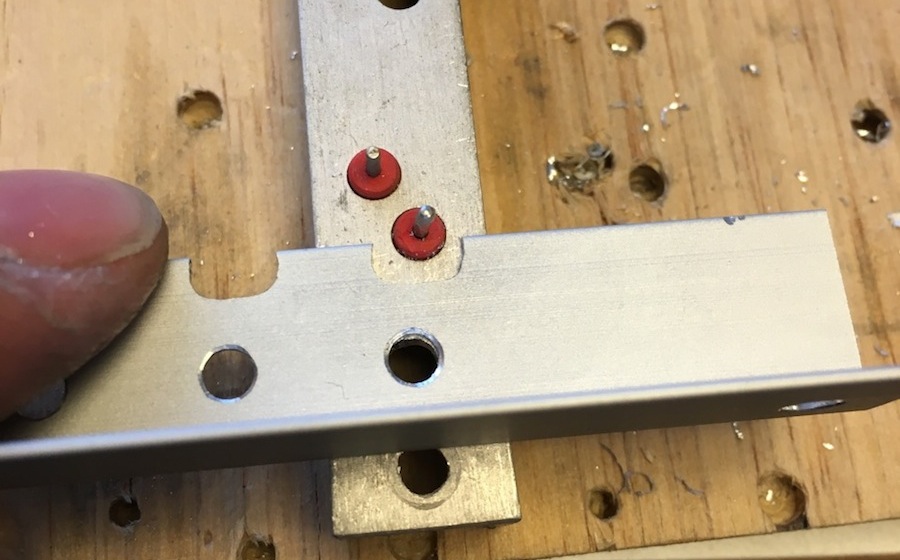
Here they Group busbars are mounted to on of the bracket closest to the old bars.
For the other side i did the other way around and made the holes in the bracket oval and not in a straight line.
This was because on this end i could use the original holes in the busbars and did not want to drill them out more than neccesary.
Then i did a similar thing to the echosend, solo and FB send busbars,
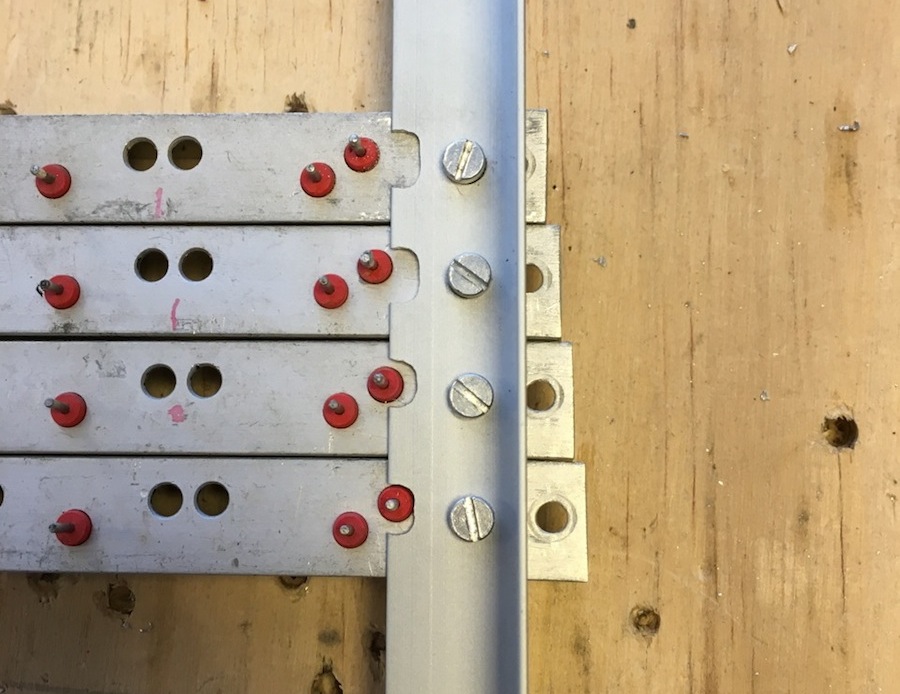
And here they are ready to be mounted in the frame.

So first i attached the bracket on to the wall between the buckets together with the other bracket on the on the other side.
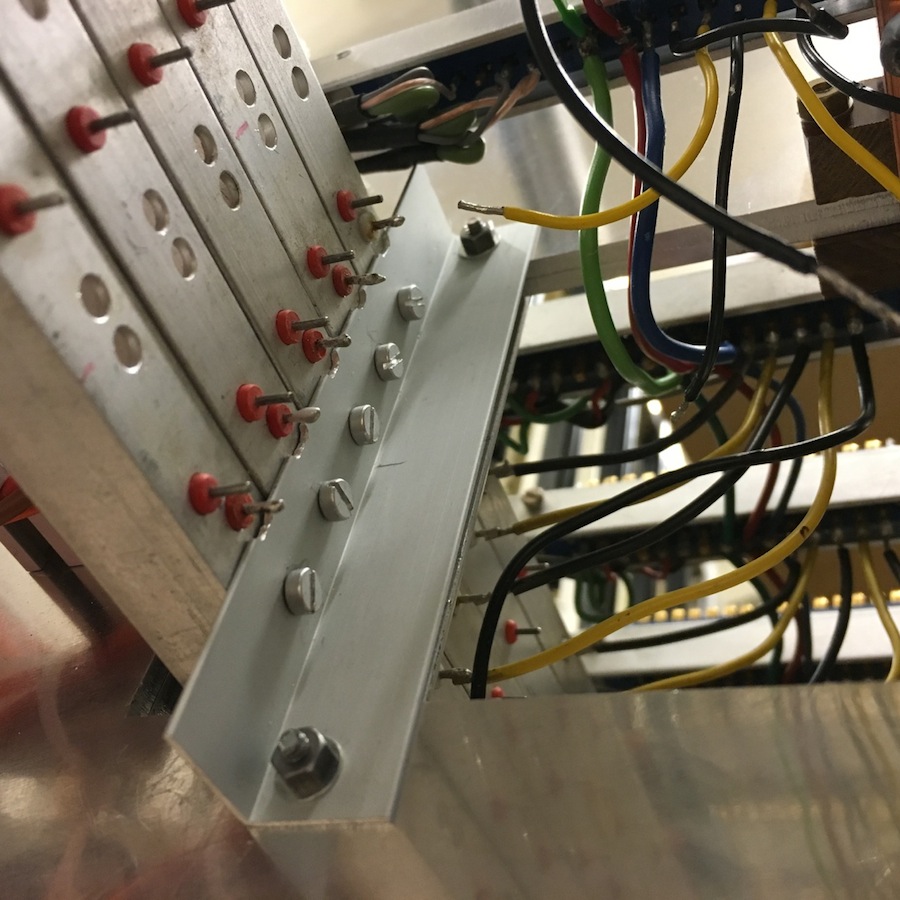
I then pushed the busbars as close to the old ones to get as tight fit as possible and secured them with the screws.
Then i secured them by the other bracket as well.
Now they are connected as good as possible without welding or changing the whole lenght out.
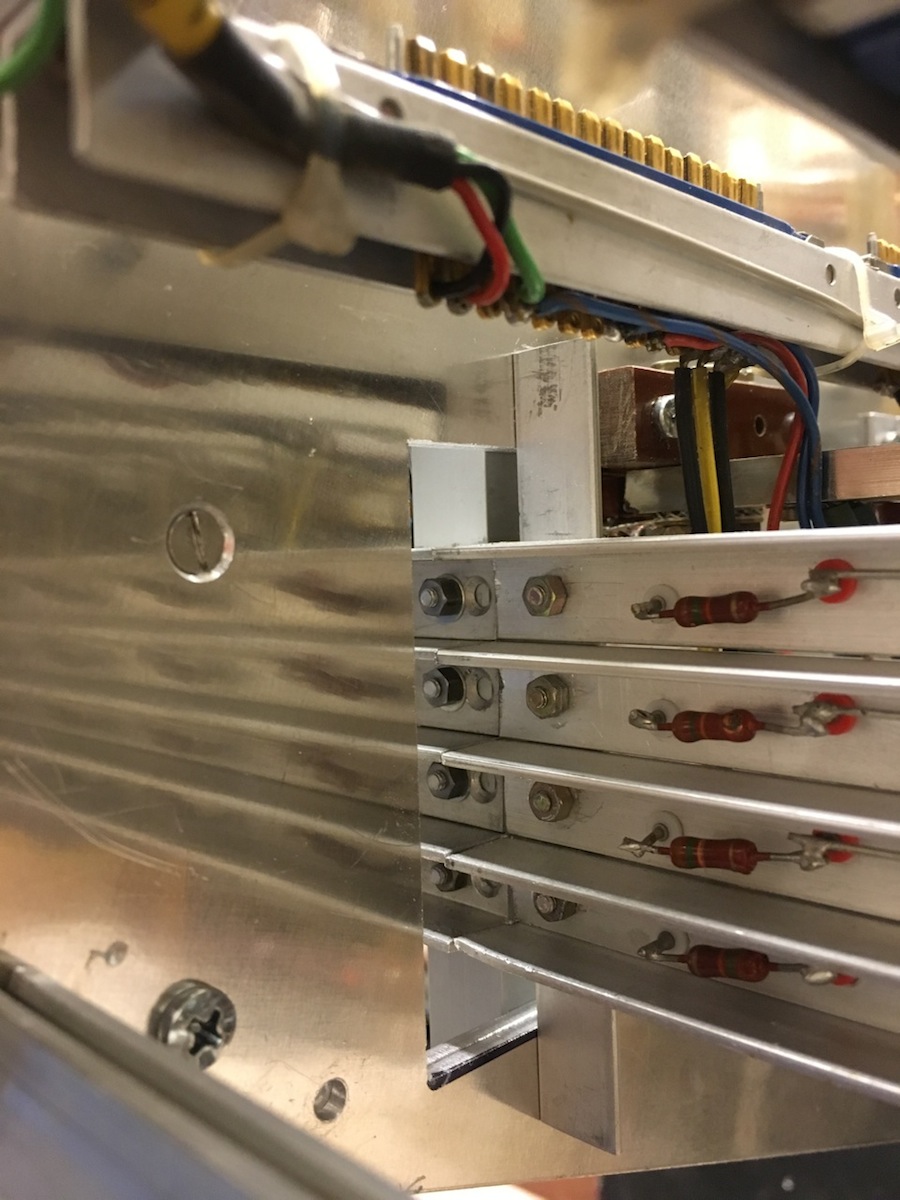
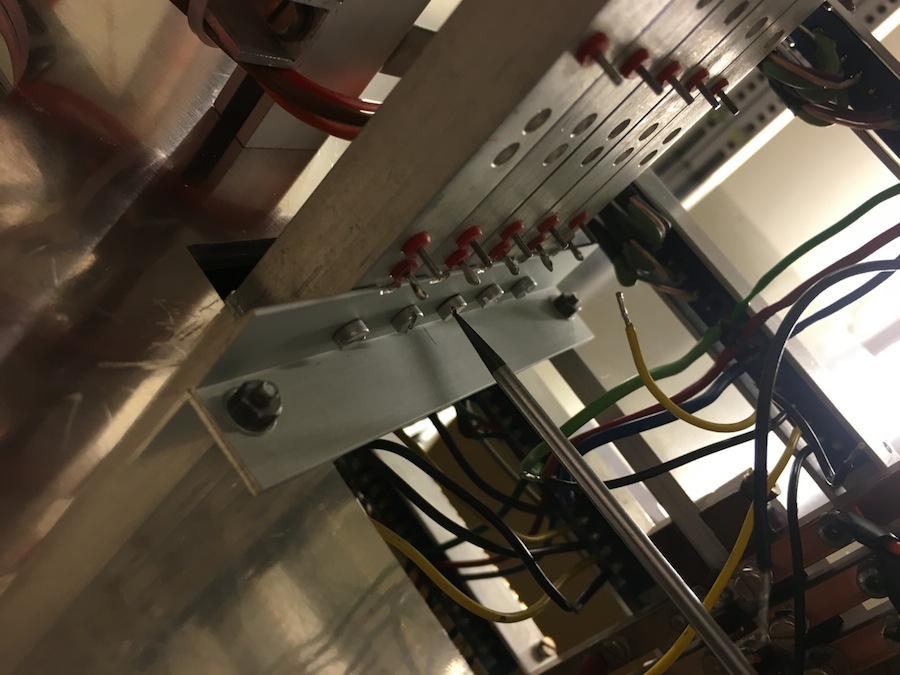
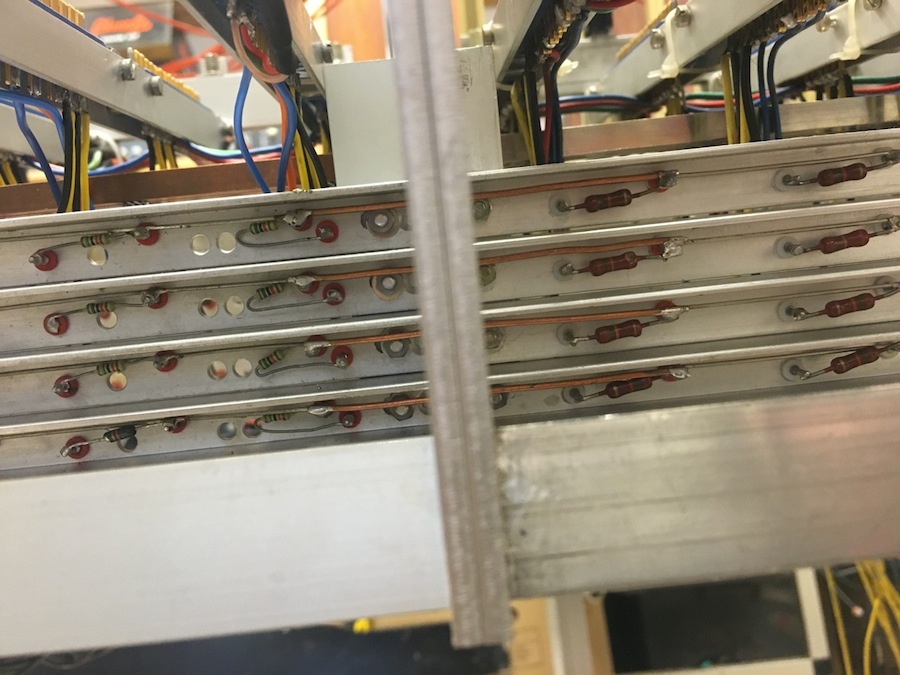
The last things i do is to solder in a piece of solid copper to tie the busfeeds together and start soldering in all the feeds from the routingmodule connectors to their corresponding feed-through terminal ( i love that word now!).
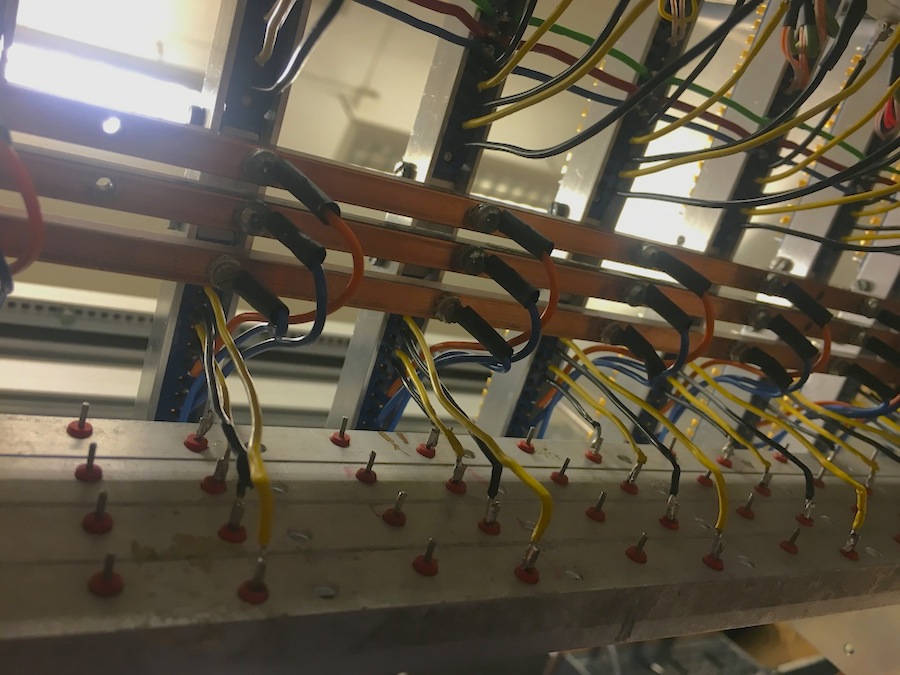
Sorry for the long post but mounting these was major pita that i wanted to show you.
As you can see i had already mounted the square, copper bars for B+ and B- before this, i forgot to take pictures of that part but it was slightly easier than the busbars.
All i had to do was to cut the phenolic, insulating blocks in the the correct length and drill them out properly to mount them in the frame.
All the terminals on these are screwed in to the bar so that was kind of easy...
Either way, a thing that looked easy on paper turned into a major hassle, all just since some stupid person decided to cut off that bucket sometime in the past, but now at least its done....
Thanks for that link, will follow up on that.
So, back to the restoration where the time have come to mount the busbars.
This was more tricky than you would think since when they cut the originals of it was not done very evenly.
I tried to grind them down to get them level but they were still a little different in lenght after that.
Also they were not lining up evenly with the new ones when using the original mountingholes, so i had to come up with something clever.
My solution was to first drill new mountingholes in the busbars and also place the mounting holes in the bracket unevenly.
First i cut some new brackets out of a simple V shaped bar and drilled a few holes.
This was slightly bigger and thinner than the original, but good enough.
Then i had to make some grooves in the bracket so i did not make contact with the feed-through terminals
After that i drilled new holes in the busbars and made them a bit oval so i could move them back and forth.
I also placed the holes slightly different from eachother according to how the excisting busbars were cut off so they would fit better.
Here they Group busbars are mounted to on of the bracket closest to the old bars.
For the other side i did the other way around and made the holes in the bracket oval and not in a straight line.
This was because on this end i could use the original holes in the busbars and did not want to drill them out more than neccesary.
Then i did a similar thing to the echosend, solo and FB send busbars,
And here they are ready to be mounted in the frame.
So first i attached the bracket on to the wall between the buckets together with the other bracket on the on the other side.
I then pushed the busbars as close to the old ones to get as tight fit as possible and secured them with the screws.
Then i secured them by the other bracket as well.
Now they are connected as good as possible without welding or changing the whole lenght out.
The last things i do is to solder in a piece of solid copper to tie the busfeeds together and start soldering in all the feeds from the routingmodule connectors to their corresponding feed-through terminal ( i love that word now!).
Sorry for the long post but mounting these was major pita that i wanted to show you.
As you can see i had already mounted the square, copper bars for B+ and B- before this, i forgot to take pictures of that part but it was slightly easier than the busbars.
All i had to do was to cut the phenolic, insulating blocks in the the correct length and drill them out properly to mount them in the frame.
All the terminals on these are screwed in to the bar so that was kind of easy...
Either way, a thing that looked easy on paper turned into a major hassle, all just since some stupid person decided to cut off that bucket sometime in the past, but now at least its done....
ruffrecords
Well-known member
I admire your sheer determination. Well done!
Cheers
Ian
Cheers
Ian
ruffrecords said:I admire your sheer determination. Well done!
Cheers
Ian
+1
Humner
Well-known member
ruffrecords said:I admire your sheer determination. Well done!
Cheers
Ian
And on top of that such a great record/documentation of it all for us to see.
Its really nice to see how these Neve's were built, and its fantastic that you are putting in all the effort to ensure its done right, a console like this really deserves it!
Seriously, thank you all for the nice words!
They make it all worthwile
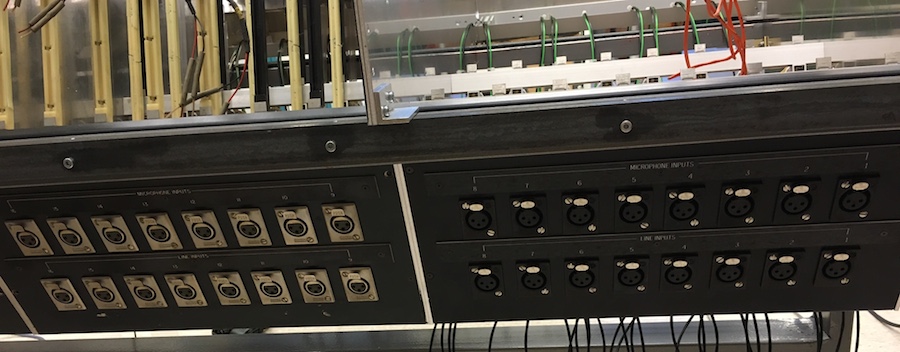
After the busbars and powerbars have been wired in its time to wire in all the channels as well.
For the XLR panel at the back had to replicate the original design which was eloxated black aluminium, where the later ones where painted black.
What also differs is the labeling, later desks have the same type as on the patchbay with printed strips of paper behind a plastic front, but this early desk have all the labels engraved on black/white plastic which is a much nicer and elegant solution if you ask me.
So first i gave the original labels to my engraver so he could copy them.
Here I also had to redo all the white ones above the faders so the numbering would be correct.
Original labels:
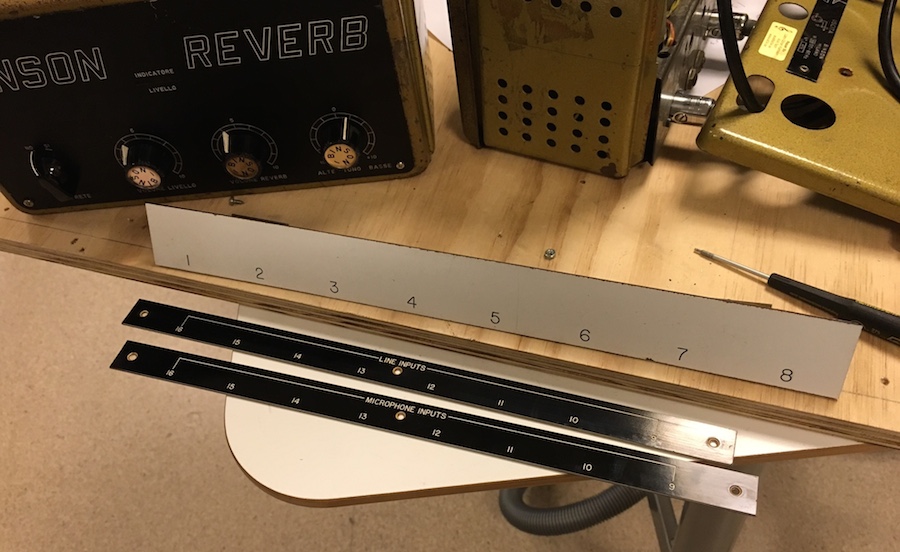
This is what he came up with.
The font is not 100% perfect but its pretty damn close and good enough.
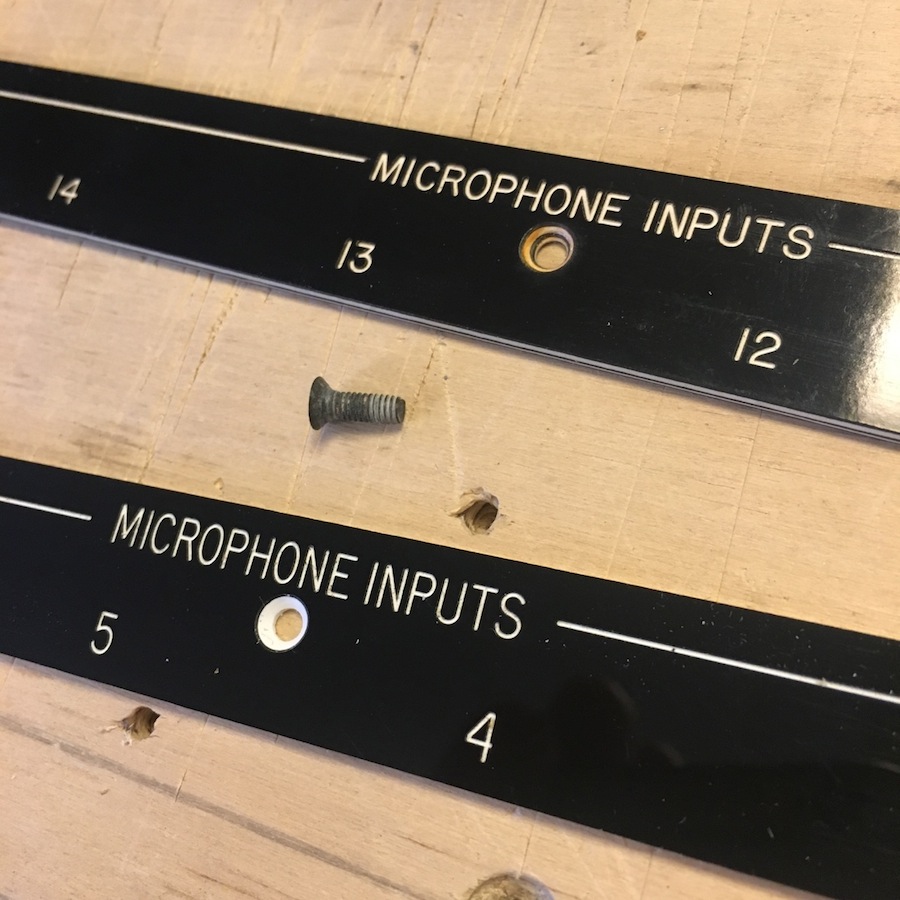
So I mounted the labels to the XLR panel with three 6BA screws as per original.
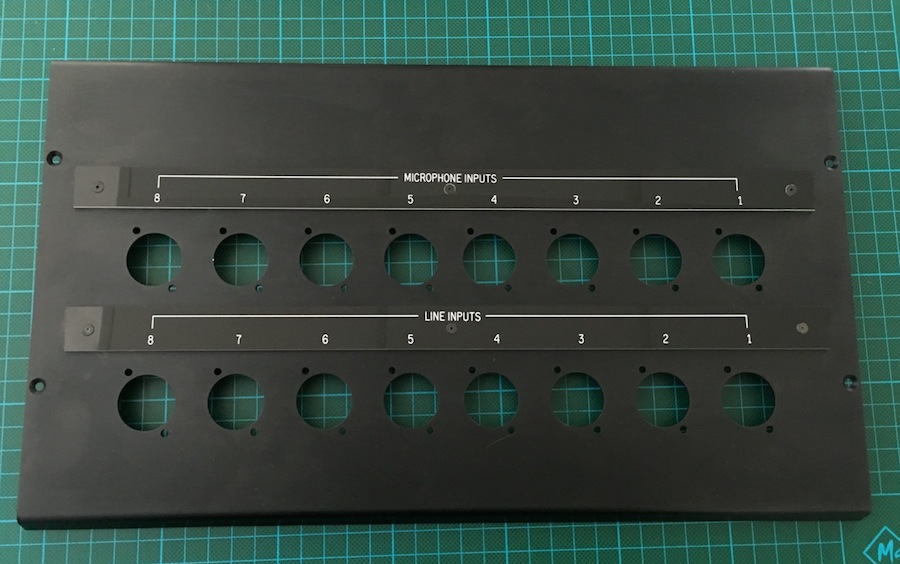
Then i mounted all the XLRs to the panel in the same way as it was done originally and started to solder in all the cabling.

And here its is done and in place next the original XLR panel and all numbering is now correct again.
They make it all worthwile
After the busbars and powerbars have been wired in its time to wire in all the channels as well.
For the XLR panel at the back had to replicate the original design which was eloxated black aluminium, where the later ones where painted black.
What also differs is the labeling, later desks have the same type as on the patchbay with printed strips of paper behind a plastic front, but this early desk have all the labels engraved on black/white plastic which is a much nicer and elegant solution if you ask me.
So first i gave the original labels to my engraver so he could copy them.
Here I also had to redo all the white ones above the faders so the numbering would be correct.
Original labels:
This is what he came up with.
The font is not 100% perfect but its pretty damn close and good enough.
So I mounted the labels to the XLR panel with three 6BA screws as per original.
Then i mounted all the XLRs to the panel in the same way as it was done originally and started to solder in all the cabling.
And here its is done and in place next the original XLR panel and all numbering is now correct again.
ruffrecords
Well-known member
API said:Then i mounted all the XLRs to the panel in the same way as it was done originally and started to solder in all the cabling.
Notice, everybody, pin 1 of the XLR connected directly to chassis at the XLR.
Cheers
IAn
radardoug
Well-known member
In this period, phantom powering arrived, so often there would be two 6.8K resistors mounted on the microphone XLR as well.
No switch on the module in those days!
No switch on the module in those days!
Similar threads
- Replies
- 1
- Views
- 178
- Replies
- 13
- Views
- 1K
- Replies
- 1
- Views
- 268
Latest posts
-

-
-
AKG Perception P220 to Neumann u87 5 min mod ( p200, p100, p400, p420? )
- Latest: Masiusima13
-

-
-

-