[BUILD] 1176 Rev A - Back to the beginning...

GroupDIY Audio Forum

Help Support GroupDIY Audio Forum:

This site may earn a commission from merchant affiliate links, including eBay, Amazon, and others.
beaversaber said:
another...

beaversaber,

Looking good!

Have you got a heat-sink on your regulator? It's hard to see from your photo, but if not you should put one on asap or it may not last very long.

John.
 
One down, one to go.

front1176.jpg


inside1176.jpg


leafcutter said:
I got the kit from Hairball and I must say those cases are works of art, so precise and sturdy, the transformers sound great and the other items are top notch. Used the BOM from the hairball site - very useful

My only suggestion is that an obvious link to the meter and ratio boards documentation would have saved me a whole lot of searching! It's here if you are looking http://hairballaudio.com/docs/FET_Compressor_PCB_Board_Info_V2.pdf

The mnats boards are really beautifully produced, well laid out and superbly documented on his site, everything worked first time and you can't ask for more than that.

Nice work!

Glad you like the enclosure.  It was over a half year of development and hard work.  I'm VERY proud of it. Skylar came up with a genius design with lots of great ideas added by Ed A and MNATS.

You're right, I need o find a more obvious place for the switch docs.

Mike
 
leafcutter said:
beaversaber said:
another...

beaversaber,

Looking good!

Have you got a heat-sink on your regulator? It's hard to see from your photo, but if not you should put one on asap or it may not last very long.

John.

I've been digging these clip on heat sinks:

532-6237B (Mouser)

Need to update the BOM.

Mike
 
Is there a need to use shielded wire from the output Tranny to the XLR Jack?  The Output Tranny's wires *almost* reach the jack in my build - so I was planning on lengthening one of the wires by an inch or so and going with it.  Or would it be better to chop the wires closer to the Tranny body and use shielded wire to the XLR (shield tied to chassis at the XLR)?

Also - I searched Hairball's Mouser Cart and I didn't see R11 and R31 I asked about earlier.  R11 is incorrectly screened on the PCB as 10K, but the BOM/Schematic has it at 9.1K.  The cart does list an R31 in the "Customer P/N" Column, but it's a 68K part  ??? (should be 3.3K)

Where are most of you tapping into the PCB for the VU's lamp connections?

And lastly (for now!) - What is the best place to mount the Stereo Link Board?  I'm planning on placing it next to the main PCB on the PCB Rails - mounted from one side due to it's size (as close to the PCB / As far from the Power Transformer as I can).  I'd assume I can tie the VU Lamp and the Stereo Link +30v/Gnd to the same points on the PCB?  I already added the 1/4" TRS and the Link Switch to the back panel...

Getting so close!!!!!!!!  8)
 
Randyman... said:
Is there a need to use shielded wire from the output Tranny to the XLR Jack?  The Output Tranny's wires *almost* reach the jack in my build - so I was planning on lengthening one of the wires by an inch or so and going with it.  Or would it be better to chop the wires closer to the Tranny body and use shielded wire to the XLR (shield tied to chassis at the XLR)?

I would chop it and shield it.

Randyman... said:
Also - I searched Hairball's Mouser Cart and I didn't see R11 and R31 I asked about earlier.  R11 is incorrectly screened on the PCB as 10K, but the BOM/Schematic has it at 9.1K.  The cart does list an R31 in the "Customer P/N" Column, but it's a 68K part  ??? (should be 3.3K)

I need to make a few fixes.  I just recently discover that when you use the "customer P/N" it saves across all the rev carts.  So if you select say a 1K resistor and assign it "R1" in the REV A cart, 1K's will be called R1 in all the carts.  That's a problem.  I'll probably just use the "Note" instead.

Randyman... said:
Where are most of you tapping into the PCB for the VU's lamp connections?

I use the secondary at the PCB.  Either one and ground.  220Ω 2W resistor.

Randyman... said:
And lastly (for now!) - What is the best place to mount the Stereo Link Board?  I'm planning on placing it next to the main PCB on the PCB Rails - mounted from one side due to it's size (as close to the PCB / As far from the Power Transformer as I can).  I'd assume I can tie the VU Lamp and the Stereo Link +30v/Gnd to the same points on the PCB?  I already added the 1/4" TRS and the Link Switch to the back panel...

Getting so close!!!!!!!!  8)

Use the the AC secondary for your lamp, and the +30DC for your board.  Mounting sounds fine!

Thanks,

Mike
 
Ah - so the VU Lamp can run off the AC Secondary?  I thought I'd be tapping into the power supply's rectified/regulated +30V.  Thanks for clearing that up!

Just posted in the Rev D thread as well with a few 2-1176 Q's...

Thanks for your excellent help, Mike!  ;D


Edit/Add:  If you are going to update the Rev A BOM / Mouser Cart - I have a few other suggestions that might help others:

1) Include the washers or nuts needed to offset the "0 Set" pot off the front panel, and the washer/nut for the Input Pot (so the knobs are as flush to the panel as possible).  I had these laying around - but lots of noob's certainly won't...
2) Consider using slightly longer screws for the PCB Rail Mounts.  The included screws don't even screw all the way through the nuts (they work fine, but I could see them stripping out with a heavy hand)
3) Pre-Drill the PCB Rails for the optional Stereo Link Kit, and provide Stand-Offs, Screws, the "Link" switch and 1/4" TRS link jack with the Stereo Link Kit.
4) Consider a secondary "Premium Cart" with the Bourns output Pots already subbed for the standard Alpha pots in the regular Cart link.

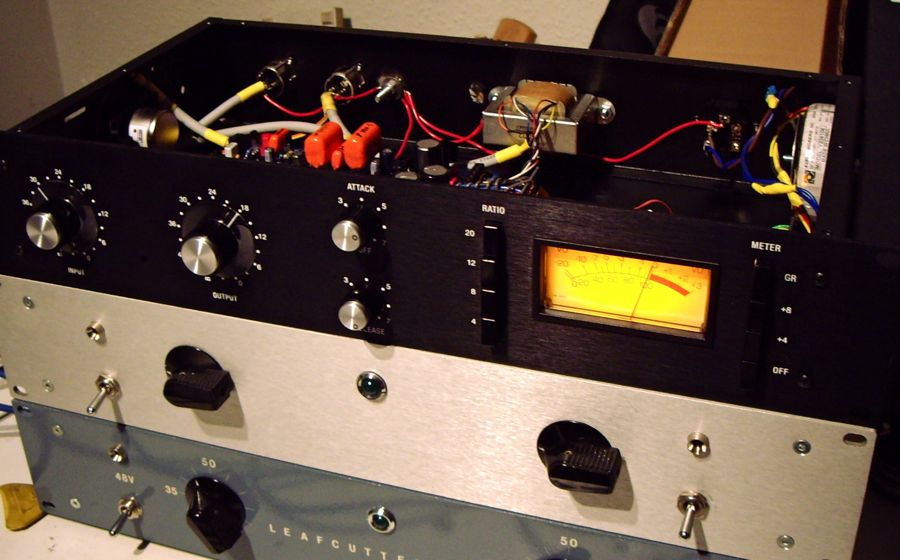
I'd also add a link on your website to the quick Wiring Diagram picture you e-mailed me (looks like it was done in Paint).

Just a few things I ended up doing "after the fact" that might make this "that much easier" for a complete noob  ;)
 
beaversaber said:
Hey all,
Just curious about possibly adding a switch for a slower attack time on my 1176 rev a.  How hard would this be? Something like a switch that put a resistor before the attack pot or something?

anyone?

Also, those clip on heat sinks look sweet...
 
Hello,

I just finished a pair of Hairball/mnats Push-Button Rev A 1.2.5's.  They both pass audio and I was able to complete calibration steps 1 & 2 w/o issues (once I realized I had to use the Test Points 10 + 11 for the 0v reading - not R74 like the video says  :D ).


However - neither of them are doing any gain reduction.  I've checked that Pad 22 is connected to Ratio Board Green to enable Compression, and Pad 22 is shorted to ground when switched off (DPST switch on the Ratio Pot).


If I physically touch the Attack Pot's connections and create a ground loop I do get gain reduction (output level decreases and the GR Meter also shows reduction) - so I know the actual gain reduction circuit is "active" - it just doesn't seem to be getting any sidechain audio.

Power Supply Voltages are good, and both units were built side-by-side - so I'm sure it's a simple mistake on my end which was replicated to both units.  I'd appreciate any help in tracking it down.

PS - I'm also using the Stereo Link boards as pictured, but I tried bypassing the Stereo Board's "Loop" input to see if it might have been shorting out the sidechain audio somehow - but it still didn't work.

Any clues on where to start looking?  I can post better pics if needed - click on the pics for the larger original images (sorry about the quality):


PS - Pads 28, 29, 7 & Ground are connected correctly - the wires are running underneath the PCB ;)


Thanks for any help!   8)
 
Shameless bump for some troubleshooting help (RE: the above post).  Any wiring issues off the bat that would cause this?  The DPST GR Bypass switch seems to be wired correctly (Pad 22 to Ratio Board Green when enabled, Pad 22 to Ground when bypassed).  Black on my Ratio Board piggy-backs on the DPST switch's shield which ties to Chassis Ground+PCB Ground at the PCB...

I'm thinking the GR section isn't getting Sidechain Audio.  How would I test that?

Thanks!  8)
 
I can't look specifically into your particular problem because i lackk time, but, I reckon you should double check your wiring, but try to take not make the assumption that it's probably right.  Assume nothing.    That is the biggest thing that slows me down when I fault find.
 
Thanks for your reply!

Where would be a good place to start looking?  I was able to get Calibration steps 1 & 2 done w/o any issues - and the unit passes audio just fine.  That should eliminate lots of potential culprits - correct?  XLR > Atten > IP Tranny > PCB Input is good.  Output fader seems good.  Output Tranny seems good.  Meter is good.  Power is good.  GR Enable/Disable seems good.

It seems that the GR circuit isn't getting any sidechain audio (assumption based on symptoms).

If I touch the Attack or Release pot's connections (creating a path through me!) - I do get Gain Reduction that follows my touching the connections (output drops and GR Meter shows GR : up to 15-20dB worth of reduction).  The attack and release settings seem to affect the gain reduction accordingly - so they *seem* to be wired correctly (Shortest attack = CCW; Shortest release = CW)

I double checked the DPST GR Disable Switch - and it connects 22 to Green when "On" (GR Enabled), and connects 22 to Ground when disabled "OFF" (checked from the PCB Pad 22 to the Ratio Green - verified continuity when "ON" - all good)

I'm assuming this might be attributed to one of the unbalanced wires (one of these passes unbalanced sidechain audio through the Release control - correct?).  

Maybe the Ratio Board?  Could the Ratio board itself be bad?  What/where should I measure to test that?

I spent the better part of the week wiring and taking my sweet time day by day and mirrored the procedure across both units - I can't find anything that jumps out at me.

Thanks for any areas I should zero in on with this specific issue across 2 units (no Gain Reduction across 2 units)...

8)
 
Be sure that you have the pots wired up correctly.  From memory the orede of the wires on the boards doesn't necessarily match the order of the pins on the pots.

The sidechain is also fed through the ratio switch so I would check that as well.  The attack & rel pots are actually at the end of the side chain amplifier before it feeds the control fets.    the bypass switch either connects the i/p to the side chain to ground (bypassed) or to the ratio switch (unbypassed).  SO maybe that would be a good place to look too
 
PCB 22 connects to Ratio Green when the GR should be "ON".  Physically tested from PCB Pad 22 to the Ratio Board Green (0 Ohms when "ON").  Pad 22 goes to Ground when "Off" (tested from Pad 22 to Chassis Ground = 0 Ohms when "OFF").

I'll poke around some more around the Attack/Release and Ratio Board's Unbalanced connections.

Anywhere else that might prevent GR from happening based on my "touching the Attack pot gives constant gain reduction" observation?  It appears the gain reduction circuit is functional - it's just not getting any sidechain audio...

Are there any components on the PCB that could cause this?

It's funny because BOTH units have the same exact issue - must be me SOMEWHERE (but where  ;D )


Thanks so much for your time!  It means a lot to me  :)

8)
 
Are you using them in stereo link mode?

I don't think I see a "link" wire on the stereo PCB.  There are two pads with a line between them.  You need to use a wire to link those, like a resistor leg or something.

Mike
 
Where is this?  On the actual Stereo Link PCB?

I have the Stereo Link's "Link" connected to the bottom SPDT tab (added a SPDT "Link Switch" on the front panel).  The Output Pot is fed into the SPDT's top tab - and is also "paralleled" to the Stereo Link PCB's "Loop" input.  The common tab on the Link switch goes to the Ratio Board.  Switch "down" = Output Pot goes to Ratio Board.  Switch "Up" = Stereo Link "Link" pad goes to Ratio Board.

I thought this was how your Stereo Link page had it?:
http://hairballaudio.com/guides/Stereo_Link_Wiring_Guide.pdf

Is that correct or is there still a jumper missing?  It seems like the Stereo Link board is effectively out of the circuit when LINK = OFF?  (With the exception of the "Loop" input which is paralleled off the Output Pot - I did try to disconnect that to make sure it wasn't shorting out the sidechain somehow)

Thanks for any clarification!  8)
 
Yes on the stereo link board.  There is a line next to the copyright info with a pad on either end.  You need to link that with a wire.  It's a connection to ground I believe.

Mike
 

Latest posts

Back
Top