GROUP BUY: Universal Audio 176 - a 100% faithful recreation of a legend! CLOSED!

GroupDIY Audio Forum

Help Support GroupDIY Audio Forum:

This site may earn a commission from merchant affiliate links, including eBay, Amazon, and others.
Thank you so much for you kind words guys!
I really appreciate it!

To answer some of the questions:

Phrazemaster said:
Also, will you make boards available too?

If I can make a run happen for you guys my plan is to offer a kit consisting of a powder coated main-chassis + hinged front panel (also powder coated), 2nd front panel with silk screening (that would be the black panel placed on top of the grey hinged one), mounting bracket for the 1/4" jacks, mounting bracket for the meter switch assembly, custom made panel screws, both pcbs, custom made PSU turret board, ratio turret board & meter switch turret board and some kind of build manual and BOM.

Possibly even a kit with most of the small components such as caps & resistors etc. - not sure yet.

Phrazemaster said:
By the way, I had read that this compressor uses a tube with a variable-mu feature, and that this tube is unobtainium.

That's not quite true. This tube is not being manufactured anymore but it's still available NOS at the major tube retailers such as tubesandmore.com or tubedepot.com (just to name a few) or of course also in the bay.

I'll write more about this tube in detail in the build manual ;)


Phrazemaster said:
Also that one of the transformers for the ratios is also unobtainium. How do we get around these issues?

Well this is at least true for the original transformer of the 176 as it was custom made. But apart from the different tabs that allowed for switching 4 different ratios, the specs of this transformer were not very special.

Sowter offers a replacement output transformer for the 176 (with all ratio tabs) of which the leads are even color coded according to the original transformer. And as far as I can tell it sounds amazing in this circuit.
The only difference is - physically it's quite a bit larger than the original one, but as you can see in my prototype it works still very well ;)
 
Thank-you Rainton; your post is most welcome!

Since it will likely be a number of weeks (months?) before this project takes flight, I was wondering if there's any kind BOM showing the tricky/expensive/NOS parts so we can start collecting them? I'd love to start sourcing the Davens, the attenuators/pots etc, but since I don't know enough, and can't tell the brands/best suggestions from the schematic, do you think you might be able to post the specifics of the hard-to-find parts so we can get started? I found some Daven's, but I don't know what size, or if there's a particular model that works well. Things like that. What would you suggest as the ultimate transformers - the ones you used? I have a UTC HA100x that I heard can work really well, but is this the best suggestion?

Thing is, I just don't know where to get this information. I've been Googling, obviously, but it seems tough to find the real deal info on what actual parts were used, as opposed to just the specs of the part.

I'm like you. I like fanatical attention to detail, the result of which is breathtaking.

I know you're busy so I need to let you get back to your prototyping. Thanks for all you contribute here.

Mike
 
Well, I think, I will use a Mallory T Pad, which is expensive enough and use the then "free" Vernier spot as meter switch...
So I don't have to mess up the nice original layout.
 
Phrazemaster said:
There's an eBay seller with some "NOS" brand new looking Daven's for a "reasonable" price.

Here's the listing: http://www.ebay.com/itm/Daven-TQ-255-G-600-Ohm-variable-attenuator-2-dB-with-Taper-off-Cue-NEW-/362020907368?hash=item544a20a968:g:DwMAAOSwwvZZUVl9

Would these be suitable for the 176?

Thanks,

Mike

The original attenuators go from -40db up to 0db in 2db steps.

The one you posted goes from -infinity up to 0db - the first 3 steps are off & taper and from the fourth step on it's also 2db steps.

So given the fact you'll most likely never use the first 3 steps (going from fully CCW) it should still work pretty much the same with the only difference being (with input knob fully CCW) the original would give you the level of the incoming signal minus 40db, while the above mentioned attenuators would kill the signal completely.

Apart from that I think the attenuators in this auction are very expensive! (I paid 25$ ea. for my Daven attenuators on eBay)
And they don't have a thread to mount them to the Frontpanel but these 2 screws instead.
I could add the holes to the frontpanel accordingly but countersunk bolts would be necessary...

kosi said:
Well, I think, I will use a Mallory T Pad, which is expensive enough and use the then "free" Vernier spot as meter switch...
So I don't have to mess up the nice original layout.

That's certainly an option. I own a pair of the same Mallory T-pads as well and will probably experiment with them in the future.
FWIW I would recommend to rather replace the output vernier pot if you had to choose,  since it's not that critical.
So far I found the input vernier to be more important to dial in the right amount of compression...

...as for mods let's talk about that more later.
I already started to do some mods - but just like kosi I didn't want to mess up the original front panel layout.
I'll keep you posted ;)

 
rainton said:
The original attenuators go from -40db up to 0db in 2db steps.

The one you posted goes from -infinity up to 0db - the first 3 steps are off & taper and from the fourth step on it's also 2db steps.

So given the fact you'll most likely never use the first 3 steps (going from fully CCW) it should still work pretty much the same with the only difference being (with input knob fully CCW) the original would give you the level of the incoming signal minus 40db, while the above mentioned attenuators would kill the signal completely.

Apart from that I think the attenuators in this auction are very expensive! (I paid 25$ ea. for my Daven attenuators on eBay)
And they don't have a thread to mount them to the Frontpanel but these 2 screws instead.
I could add the holes to the frontpanel accordingly but countersunk bolts would be necessary...

That's certainly an option. I own a pair of the same Mallory T-pads as well and will probably experiment with them in the future.
FWIW I would recommend to rather replace the output vernier pot if you had to choose,  since it's not that critical.
So far I found the input vernier to be more important to dial in the right amount of compression...

...as for mods let's talk about that more later.
I already started to do some mods - but just like kosi I didn't want to mess up the original front panel layout.
I'll keep you posted ;)
Rainton THANKS for such detailed info! Such a great help!!

Yes I agree that the Daven's I linked too are terribly expensive; especially compared to the deal you got! I've been buying some of the background parts and they all seem expensive to me.

But yeah, if I can get some for on the cheap that will be fabulous! I'm keeping my feelers on the lookout!

Having that info is surely a great help in the quest.

Thanks man, and keep up the great work!!
 
rainton said:
Apart from that I think the attenuators in this auction are very expensive! (I paid 25$ ea. for my Daven attenuators on eBay)
And they don't have a thread to mount them to the Frontpanel but these 2 screws instead.
I could add the holes to the frontpanel accordingly but countersunk bolts would be necessary...
I'd rather find the right parts than have extra screw holes on the front panel, personally. I'll keep looking; things always pop up!

rainton said:
That's certainly an option. I own a pair of the same Mallory T-pads as well and will probably experiment with them in the future.
FWIW I would recommend to rather replace the output vernier pot if you had to choose,  since it's not that critical.
So far I found the input vernier to be more important to dial in the right amount of compression...
I'm not clear what you mean about "replacing" the vernier pot - with what? And are you saying you would use the Mallorys in place of the Davens?

Thanks Martin!
 
http://www.uaudio.com/webzine/2004/february/text/content4.html

"The Input and Output controls are both stepped at 2dB increments, and “Vernier” controls are provided for both Input and Output allowing fine-tune adjustment of the gain structure between the 2dB increments."

https://en.wikipedia.org/wiki/Vernier_scale

Mallorys or the likes are continous potentiomenters, so, there is no need to use an extra Vernier poti. So you can replace one of the Verniers with a 3 way switch to change the VU meter display (In/GR/Out). 
Or do something else. Have a look on the Retro 176, especially the left front side
 
kosi said:
http://www.uaudio.com/webzine/2004/february/text/content4.html

"The Input and Output controls are both stepped at 2dB increments, and “Vernier” controls are provided for both Input and Output allowing fine-tune adjustment of the gain structure between the 2dB increments."

https://en.wikipedia.org/wiki/Vernier_scale

Mallorys or the likes are continous potentiomenters, so, there is no need to use an extra Vernier poti. So you can replace one of the Verniers with a 3 way switch to change the VU meter display (In/GR/Out). 
Or do something else. Have a look on the Retro 176, especially the left front side
Very helpful kosi! Thanks!
 
rainton said:
If some of you want to use the the API 361 meter, I could do some special edition chassis for the group members interested.
I'm in for 2 chassis with 361 meter :)
 
do these attenuator can replace the daven?
other values are available

http://www.ebay.com/itm/EIZZ-100K-24-Step-HIFI-Audio-Gold-Plated-Stepped-Serial-Attenuator-Potentiometer-/252662364443?hash=item3ad3d9b91b:g:L~gAAOSwXeJYHDUz

 
core13 said:
do these attenuator can replace the daven?
other values are available

http://www.ebay.com/itm/EIZZ-100K-24-Step-HIFI-Audio-Gold-Plated-Stepped-Serial-Attenuator-Potentiometer-/252662364443?hash=item3ad3d9b91b:g:L~gAAOSwXeJYHDUz

Well - correct me if I'm wrong but this auction is for a serial stepped attenuator. That means the output impedance would change when turning the attenuator. (plus with every step of attenuation another resistor would be in the signal chain - meaning up to another 23 resistors would be in the signal chain for each attenuator)

The schematics call for a T-pad or Ladder attenuator for the input and output impedance to remain consistent at 600 Ohms no matter the degree of attenuation.
That is important because the input signal hits the attenuator first and from there it goes straight to the (600 Ohm) input transformer. The same goes for the output: from the output transformer the signal goes to the output attenuator and from there to the output of the unit.
 
I feel the Attenuators  may stop many of us attempting to realise an historically authentic build,  I'm sure alternative options will be discussed. Perhaps this project may spawn a sister thread on the creation of  DIY 600 stepped Attenuators ?
Can someone shed more light on the Verniers used in the originals. Are these indicated as R1 and R30  300 ohm on the 176 schematic?  and,  are they a Vernier reduction dial attached to a standard pot or something else entirely.

Thank you Rainton for another brilliant project.
 
Hi Martin, I wonder will a "ladder" attenuator work instead of a "T" - does it matter? I'm not clear if this will compromise the operation of the unit. Also, does the taper need to be "audio" or can it be linear? I'm not sure what was used on the original.

Thanks for thoughts,

Mike

Edit: well in doing my own digging it seems the ladder attenuators do not hold impedance the same on input/output as well as the T-pads. Can anyone confirm this? So therefore ladders would not be desirable here on input/output controls? I ask because an awful lot of the daven/langevins I find are ladder types. Thank-you.
 
craig said:
I feel the Attenuators  may stop many of us attempting to realise an historically authentic build,  I'm sure alternative options will be discussed. Perhaps this project may spawn a sister thread on the creation of  DIY 600 stepped Attenuators ?
Can someone shed more light on the Verniers used in the originals. Are these indicated as R1 and R30  300 ohm on the 176 schematic?  and,  are they a Vernier reduction dial attached to a standard pot or something else entirely.

Thank you Rainton for another brilliant project.

Great idea - maybe we could check the forum - someone else might have done DIY 600/600 attenuators before.
Alternatively - as mentioned before one could use something like Mallory 600 Ohm T-pads which are not stepped and actually pots, but would work in this project for sure.

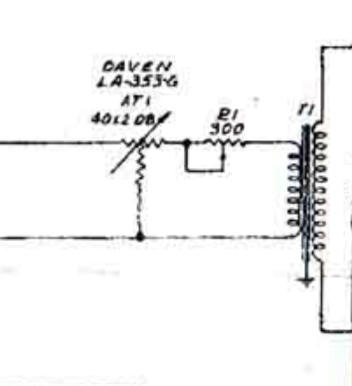
R1 & R30 are just plain 300 Ohm linear pots place between the input attenuator and input transformer and between output transformer & output attenuator respectively to fine adjust the levels, since the stepped attenuators were only adjustable in 2db steps. I'm not sure wether they used 300 Ohm pots indeed or just any other linear pot with resistor in parallel. (e.g. a 500Ohm pot with a 750Ohm resistor in parallel - or a 10K pot with a 310 Ohm resistor in parallel)


That pretty much answers the following question:

Phrazemaster said:
Also, does the taper need to be "audio" or can it be linear? I'm not sure what was used on the original.

The attenuators can control the signal from 0db down to -40db in 2db steps -> linear.

Actually all pots found across the 175b & 176 circuit are linear pots.

Phrazemaster said:
Hi Martin, I wonder will a "ladder" attenuator work instead of a "T" - does it matter? I'm not clear if this will compromise the operation of the unit.

Yes a ladder attenuator does hold the impedance.

As far as I found out - by default the 175 & 176 were equipped with 600/600 Daven LA-353-G attenuators:

y61x1012n1esd1g4g.jpg


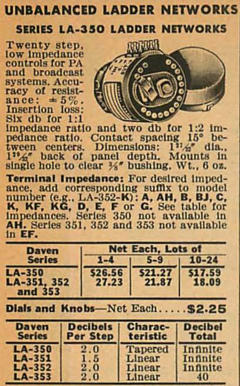
According to the spec sheet these were unbalanced LADDER attenuators with 600/600 in/out impedance:

w1jw5tc1j7ddev94g.jpg


As you can see there were other attenuator models that went from 0db to -infinite, which means - as stated before, with the knob full CCW the one model would attenuate the signal by 40db while the other one would turn off the signal completely.
I tried to explain that in more detail in an earlier post.

Anyway - the default config for these units was the LADDER attenuator. BUT as a "built-to-order" configuration both the 176 as well as the 175 were available with T-pad attenuators on either input, output or both - which would add either one "T" at the end of the model number ( for a T-pad on either input or output) or "TT" (for a T-pad on both).
So it would have been a "UA 176-TT" for example.

Each T-pad would increase the level by 6db compared to using the regular LADDER attenuator.

I've seen a 176 that had a regular Daven LADDER attenuator on input and a Langevin T-PAD attenuator on output.

Since I now have a working unit at hand I can say that this configuration can make sense indeed:

I have Daven on input & output at the moment and I while on input I feel it gives me a perfect range to control the gain reduction (which as you most likely all know is the same principle as in an 1176, driving the input signal against a predefined threshold) where I think the 6db increase of a T-pad in this position would make the unit compress much earlier on the scale and thus make it a little more difficult to control. (Also I really love how the "VERNIER" pot let's me fine tune the compression here)

On the output on the other hand I mostly have to turn up the attenuator to somewhere around the 3 o' clock position to make up for the gain reduction. Which is not a huge problem, since astonishingly the 176 I've built here has an extremely low noise floor - I haven't exactly measured it yet, but even with the attenuator fully CW I can't hear any noise in a real world situation.
But still - I think here the 6db increase of a T-PAD would come in handy. So I might just try to use a Mallory T-PAD in this spot...

...anyway this should give all of you many more options ;)
 
Thank you very much for the detailled answer martin

does ladder attenuator are what we call L pad?

If yes I found these differences on wikipedia

A speaker L pad is a special configuration of rheostats used to control volume while maintaining a constant load impedance on the output of the audio amplifier.[1] It consists of a parallel and a series rheostat connected in an "L" configuration. As one increases in resistance, the other decreases, thus maintaining a constant impedance, at least in one direction. To maintain constant impedance in both directions, a "T" pad must be used. In loudspeaker systems having a crossover network, it is necessary to maintain impedance to the crossover; this avoids shifting the crossover point.

https://en.wikipedia.org/wiki/L_pad


also does 500 ohm instead of 600 make a difference?
 
Magnificent Martin! Many thanks! I’m so excited to get this project going!

By the way I will be in for 2 Classic API meter versions!

Thx!
 

Latest posts

Back
Top