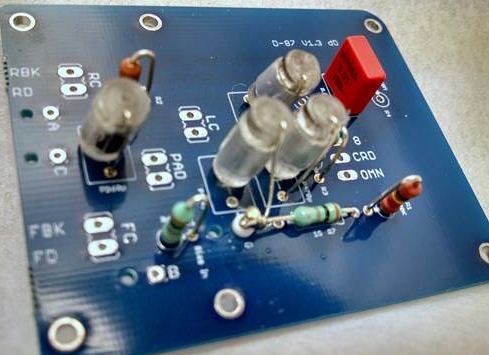
Neumann Vintage U87 Clone : Build Thread.

GroupDIY Audio Forum

Help Support GroupDIY Audio Forum:

This site may earn a commission from merchant affiliate links, including eBay, Amazon, and others.
Hi guys!
Just about to start my build.
I have access to a Fluke 27 Multimeter in regards to checking resistance of R18 and R19.
I googled the specs and it says:

Resistance - Best Accuracy:  ±(0.2%+1)

http://www.fluke.com/fluke/inen/digital-multimeters/Fluke-27.htm?PID=56055

So, is this good enough to just measure and determine value within the specified 0.4%?
I get the +/-0.2 part of the specs, but not the +1..
Anyone? :)
 
errba said:
Hey there, I am soldering my parts to my build buy i coudln't really find which direction the bias pot is supposed to go.

The little arrow on the pot is on the opposite side of the adjustment knob, -- my hunch is that it goes with the adjustable knob facing the left direction pointed away from the jfet but if anyone who did the u87M could provide me a pic i'd be stoked..


kudos

I posted a pic of my build above in Reply #2469...
 
icemanaman said:
...So, is this good enough to just measure and determine value within the specified 0.4%?
I get the +/-0.2 part of the specs, but not the +1..
Anyone? :)
I believe the +1 refers to +1 digit of readout.

The absolute accuracy is less important than the resolution of the meter so that you can check how close the values are to each other, as long as the meter is consistent between readings. With 3200 style readout then I think you get a reading down to the nearest ohm which is about 0.05% [of 2k2] so you should be fine. If you want to get really accurate (or have a cheap meter) then you can use a Wheatstone bridge - it's quite easy to make one.
 
vinylwall said:
errba said:
Hey there, I am soldering my parts to my build buy i coudln't really find which direction the bias pot is supposed to go.

The little arrow on the pot is on the opposite side of the adjustment knob, -- my hunch is that it goes with the adjustable knob facing the left direction pointed away from the jfet but if anyone who did the u87M could provide me a pic i'd be stoked..


kudos

I posted a pic of my build above in Reply #2469...

you are using the green pcb i'm using the blue u87M board, the bias pot knob for my part # is in a different place, it's on top, and the graphics + pot specs are on the opposite side as the ones in the pictures so i just wanted to verify.

if it goes on the left like how yours is pictured cool i just wanted to double check with anyone who has done the u87M build so my post still stands.

is there any way to check with a DMM which legs should be orientated which direction?
 
It shouldn't matter which direction you install. You are only using two legs off the trimmer pot. So install which ever way is easier for adjustment.
 
going through the schematic I noticed some errors in the instructions

The middle leg of the JFET does go the isolation pin GG, however this is the GATE leg according to the 2n3819 data sheet on mouser... on the thread here it indicates it's the drain leg, and on the studio939 website it says it's the source leg.. both of which are typos i presume... caused some confusion for myself.

2n3819 legs are as follows.
1. drain.
2. gate
3. source

http://www.mouser.com/ds/2/68/2n3819-31474.pdf
http://recordinghacks.com/images/mic_extras/neumann/U87-schematic.png

 
derp i dun goofed.. I used the jumper connectors in the BOM to solder my pad,low cut+ diaphram selection points to so i could easily disconnect if i ever needed to work on it, not realizing that the jumper they have continuity... so after i fixed that issue

i went to inject my mic with a sine test tone with a switchcraft and i wasn't getting anything on the scope. (i tested with some headphones alligator clipped directly onto the connections to make sure the tone was working and it was)


When i tapped on
r18 it creates some static on my scope
same with L1 + L2

the voltages i'm getting aree....
at jfet source 2.34
11.5 at drain

zener 23.v
r4 = 26.4
r5 = 26.4
r6 = 0 v
r7 = 0v
r8=26.4
r10 = 0v
r12 = 11.5
r14 21.2
r15 35.6
r16 = 40.3v
r17 = 23v
L1 + L2 = 46.8voltz
r19  46.3
r18 46.8
I'm thinking perhaps my resistors for r19+18 aren't within the 1% they need to be and this is the problem? Let me know if you think there's another problem somewhere..

I tried to get the zener to 24 voltz but twisting the bias pot in either direction seemed to have no affect.

capsule and transformer are not installed yet.

help :D
 
errba said:
derp i dun goofed.. I used the jumper connectors in the BOM to solder my pad,low cut+ diaphram selection points to so i could easily disconnect if i ever needed to work on it, not realizing that the jumper they have continuity... so after i fixed that issue
jumper header does not have continuity not sure what the problem is there

i went to inject my mic with a sine test tone with a switchcraft and i wasn't getting anything on the scope. (i tested with some headphones alligator clipped directly onto the connections to make sure the tone was working and it was)


When i tapped on
r18 it creates some static on my scope
same with L1 + L2
this is normal you are touching a powered circuit

the voltages i'm getting aree....
at jfet source 2.34 
11.5 at drain
this is ok

zener 23.v this is perfectly normal
r4 = 26.4
r5 = 26.4
r6 = 0 v
r7 = 0v
r8=26.4
r10 = 0v
r12 = 11.5
r14 21.2
r15 35.6
r16 = 40.3v
r17 = 23v
L1 + L2 = 46.8voltz
r19  46.3
r18 46.8
I'm thinking perhaps my resistors for r19+18 aren't within the 1% they need to be and this is the problem? Let me know if you think there's another problem somewhere..
no it is not the problem ,

I tried to get the zener to 24 voltz but twisting the bias pot in either direction seemed to have no affect.
it will not and not supposed to

capsule and transformer are not installed yet.

help :D

Sometime it is proactive to go a a step further  and see if the mic works with capsule and transformer to confirm that it does  before actually going too complex  with biasing , once you get a grasp of how it works and understand what happens it is much easier and you actually know that you will be biasing a working circuit.  Just my 2 cents

so my advise plug the transfo and capsule and give it a shot first , and come back later with a full grasp of the biasing method described by Matador. see page 1 link for this method
Precious Info on how to use a scope to Bias a Fet (Thanks To Matador) http://www.groupdiy.com/index.php?topic=46109.40
Best,
Dan,


poctop said:
errba said:
derp i dun goofed.. I used the jumper connectors in the BOM to solder my pad,low cut+ diaphram selection points to so i could easily disconnect if i ever needed to work on it, not realizing that the jumper they have continuity... so after i fixed that issue
jumper header does not have continuity not sure what the problem is there

i went to inject my mic with a sine test tone with a switchcraft and i wasn't getting anything on the scope. (i tested with some headphones alligator clipped directly onto the connections to make sure the tone was working and it was)


When i tapped on
r18 it creates some static on my scope
same with L1 + L2
this is normal you are touching a powered circuit

the voltages i'm getting aree....
at jfet source 2.34 
11.5 at drain
this is ok

zener 23.v this is perfectly normal
r4 = 26.4
r5 = 26.4
r6 = 0 v
r7 = 0v
r8=26.4
r10 = 0v
r12 = 11.5
r14 21.2
r15 35.6
r16 = 40.3v
r17 = 23v
L1 + L2 = 46.8voltz
r19  46.3
r18 46.8
I'm thinking perhaps my resistors for r19+18 aren't within the 1% they need to be and this is the problem? Let me know if you think there's another problem somewhere..
no it is not the problem ,

I tried to get the zener to 24 voltz but twisting the bias pot in either direction seemed to have no affect.
it will not and not supposed to

capsule and transformer are not installed yet.

help :D

Sometime it is proactive to go a a step further  and see if the mic works with capsule and transformer to confirm that it does  before actually going too complex  with biasing , once you get a grasp of how it works and understand what happens it is much easier and you actually know that you will be biasing a working circuit.  Just my 2 cents

so my advise plug the transfo and capsule and give it a shot first , and come back later with a full grasp of the biasing method described by Matador. see page 1 link for this method
Precious Info on how to use a scope to Bias a Fet (Thanks To Matador) http://www.groupdiy.com/index.php?topic=46109.40
Best,
Dan,


okay thanks for your input, what am i missing, was i wrong to assume that the microphone would output the sine signal via the xlr cable plugged into the mic?  i'll check out matadors thread now.
 
it would not output if there is no output transformer connected  ;)
Best,
Dan,
 
haha that definitely makes sense... do i need a scope then or am i able to accomplish the same thing installing just the transformer and not the capsule?
 
okay so bear with me this is my first build I'm still trying to wrap my mind around all the concepts.

I could just set the pot at 11 and be done i suppose but i want to understand and get the best bias possible

using matadors method, you insert a sine@ the resistor in parallel with the coupling capacitor.. which in the Neumann circuit is C4, so before that would be R6, which is the resistor installed backwards..  so

As a signal generator i use my DAW(in this case i'm just using a youtube 1ktest tone) attached to mono instrument cable, to switchcraft jack + of sine wave into R6, (-) to ground chassis

r11 (the bias pot) resistance is then tweaked back and fourth until to the point where there is equal clipping on both sides of the waveform and it's a symmetrical square wave.

In order to receive the signal to monitor (without an oscilloscope) Since the transformer is not hooked up, Is it possible I am able use another mono instrument cable plugged into my interface with the scope software?  pinned with alligator clips at fet drain and  - to chassis...  (isnt' that what the scope software provided at the front of the thread is for??)  If this isn't possible i guess i'm SOL


regarding the jumper pins not having continuity... plugged into the Molex wire housing they do --- which prompted my panic for short circuiting something.
http://i.imgur.com/BM6ZfPI.jpg
 
errba said:
okay so bear with me this is my first build I'm still trying to wrap my mind around all the concepts.

I could just set the pot at 11 and be done i suppose but i want to understand and get the best bias possible

using matadors method, you insert a sine@ the resistor in parallel with the coupling capacitor.. which in the Neumann circuit is C4, so before that would be R6, which is the resistor installed backwards..  so

As a signal generator i use my DAW(in this case i'm just using a youtube 1ktest tone) attached to mono instrument cable, to switchcraft jack + of sine wave into R6, (-) to ground chassis

r11 (the bias pot) resistance is then tweaked back and fourth until to the point where there is equal clipping on both sides of the waveform and it's a symmetrical square wave.

In order to receive the signal to monitor (without an oscilloscope) Since the transformer is not hooked up, Is it possible I am able use another mono instrument cable plugged into my interface with the scope software?  pinned with alligator clips at fet drain and  - to chassis...  (isnt' that what the scope software provided at the front of the thread is for??)  If this isn't possible i guess i'm SOL


regarding the jumper pins not having continuity... plugged into the Molex wire housing they do --- which prompted my panic for short circuiting something.
http://i.imgur.com/BM6ZfPI.jpg

using matadors method, you insert a sine@ the resistor in parallel with the coupling capacitor.. which in the Neumann circuit is C4, so before that would be R6, which is the resistor installed backwards..  so

if you are using the New D-87M  (Blue 2-PCB)  you dont have to install the R6 backwards it has been corrected and the silk screen also indicate where to inject the biasing signal on the pcb ,

make sure also you look at this tutorial
http://www.vintagemicrophonepcbkit.com/Neumann%20U87%20Build.htm

58d0281994537.jpg

inverting R6 for the bias is only valid in the green taper or large pcb version wich has not changed since.


might this help,
Best,
DAn,
 
I am using the latest M board, and installed the resistor backwards, -- does it really matter since the resistor doesn't have polarity? 

Also regarding biasing with the scope -- with the transformer installed i am able to measure the THD etc through the xlr cable and the scope software?


I did order the 50K Pot and have that on hand and found the information on the fourth page regarding getting the zener to 23.14 volts, shall i install that for r17 while i am still tweaking this build? 

Is that an approximate voltage regardless of fet Idss,                    ie is it relative, if i have a jfet with 10 idss and achieve 11 v at the drain and 23.14 at the zener will it be the same bias as if i had a 7jfet idss reading the same values... assuming the resistance would be different at the source and r17 for both the jfets?
 
I did order the 50K Pot and have that on hand and found the information on the fourth page regarding getting the zener to 23.14 volts, shall i install that for r17 while i am still tweaking this build? 

Do not Worry (Forget)about the Zener Voltage this create confusion.  Do not worry about R17 either you have 23.14V and it is fine.  if you have R6  backwards on the PCB it does not matter as far as a resistance goes. the injection point is not the same, depending on where you clip the lead , it must in all case be clipped just before C4 (Fet coupling Cap).
i corrected that for the D-87M to make it easier to clip the lead on a resistor leg instead of trying to clip it on a pad.

best,
DAn,


so i put the capsule on and the transformer, and i biased it for symetrical clipping at around 9 volts at the source, the figure8 and cardioid sound smooth and nice but the omni pickup pattern seems to have a way lover volume than the other two, is that normal?
 
Greetings everyone.

Does anyone have a URL or a part number on the polarity/pad/filter switches to use with Dany's switch pcb? I emailed chunger about it but haven't heard back just yet.

A data sheet would be great. I'd like to try to source some switches for the pcb that have different actuators but have the same package size/pad footprint if possible.

 
Matt_Oliver said:
Greetings everyone.

Does anyone have a URL or a part number on the polarity/pad/filter switches to use with Dany's switch pcb? I emailed chunger about it but haven't heard back just yet.

A data sheet would be great. I'd like to try to source some switches for the pcb that have different actuators but have the same package size/pad footprint if possible.

I am actually sourcing those switches has I had a lot of enquiries about those ,
they should be available soon.
BEst,
Dan,
 
vinylwall said:
Here are some pics of my build.  Cinemag CM-13113 transformer, V-K87 Vintage Microphones Capsule, SYT-5 Type body from Mic & Mod, Neumann Purple Badge (hahaha).

I want to apologize to the group.  I have only  just discovered the discord over "Mic & Mod" and the designs here on GroupDIY.  I did not know about this when I purchased this mic body from Mic & Mod.  Had I known a little more, I would have sent my money to Chunger.  Sorry guys  :-\
 
poctop said:
I am actually sourcing those switches has I had a lot of enquiries about those ,
they should be available soon.
BEst,
Dan,

This is awesome news I have been desperately searching for ages, I have just ordered some switches that I think are appropriate, the C & K 7103MD9A I should have them by next week so hopefully I can let you  guys know if they work.


Latest posts

Back
Top