Neumann Vintage U87 Clone : Build Thread.

GroupDIY Audio Forum

Help Support GroupDIY Audio Forum:

This site may earn a commission from merchant affiliate links, including eBay, Amazon, and others.
Hi,
I just came back to this discussion having had some issues with my mics.
I've used them on a lot of different instruments. On louder sources they tend to distort in a very strange way. Hard to describe but the mik looses headroom and also starts to modulate. Especially hearable when in front of electric guitar cabinets. I can also see something's wrong when looking at the waveforms in ProTools. The waveforms are uneven.  Only the positive (upward going) side of the waveform looks "healthy". The negative looks to be clipping and shows minimum dynamics.
Anyone else having the same or similar problem?
I'm using peluso capsules and ami transformers.
/
Emil
 
Emil,
Are you using the pad when using the mic on loud source? What about the biasing? Were you able to use a scope of did you use the listen method?
I used the listen method and I did notice that before I got it in the sweet spot, some of my louder vocal tests had a bit of distortion. Much like what geekmacdaddy had on his initial tests before he dialed his bias in better.

Dave
 
Hello all,

I still seem to be having a grounding issue somewhere that I can't find. I did notice today that before I apply phantom power, I can hear the hum. I thought it might be my preamp but I checked it against some other mics and it didn't hum. I am literally out of ideas... Can someone smarter than my point me in the right direction?
 
Cgaines said:
Hello all,

I still seem to be having a grounding issue somewhere that I can't find. I did notice today that before I apply phantom power, I can hear the hum. I thought it might be my preamp but I checked it against some other mics and it didn't hum. I am literally out of ideas... Can someone smarter than my point me in the right direction?

Is your mic body painted?
 
HellfireStudios said:
Cgaines said:
Hello all,

I still seem to be having a grounding issue somewhere that I can't find. I did notice today that before I apply phantom power, I can hear the hum. I thought it might be my preamp but I checked it against some other mics and it didn't hum. I am literally out of ideas... Can someone smarter than my point me in the right direction?

Is your mic body painted?


No I haven't painted it. It's still just the stock aluminum finish
 
Matador,this is nothing but great!
Even scope users can cross-check now what is happening,sometimes it occurs that measuring errors happen when not being concentrated.This is a perfect way to confirm it.
Thank you very much indeed!

Udo.
 
kante1603 said:
Matador,this is nothing but great!
Even scope users can cross-check now what is happening,sometimes it occurs that measuring errors happen when not being concentrated.This is a perfect way to confirm it.
Thank you very much indeed!

@Dany,can you put the calculators link to the compiled info page please?

Thank you!

Udo.
 
Cgaines said:
HellfireStudios said:
Cgaines said:
Hello all,

I still seem to be having a grounding issue somewhere that I can't find. I did notice today that before I apply phantom power, I can hear the hum. I thought it might be my preamp but I checked it against some other mics and it didn't hum. I am literally out of ideas... Can someone smarter than my point me in the right direction?

Is your mic body painted?


No I haven't painted it. It's still just the stock aluminum finish

You mentioned earlier that it only hums when you turn up the gain really high. When you checked the preamp/XLR cable (by using a different phantom powered mic), did you turn up the gain like you did with the U-87? The hum could be the preamp's noise floor rearing its ugly head. It could also be the XLR cable. Did you use the same cable when you switched mics?
 
wave said:
Emil,
Are you using the pad when using the mic on loud source? What about the biasing? Were you able to use a scope of did you use the listen method?
I used the listen method and I did notice that before I got it in the sweet spot, some of my louder vocal tests had a bit of distortion. Much like what geekmacdaddy had on his initial tests before he dialed his bias in better.

Dave
Hi Dave and thanks for your input! Your contributions here are much appreciated!

I did not use the pad. I'll give it a try with the pad the next time i use them. I'm still not sure if all the microphones behave this way. I built three. I'll post my results here.
Having read Matadors latest posts I'll also try to do that. I have no scope so i biased them by ear.
Thanks again all!!
/
Emil
 
HellfireStudios said:
Cgaines said:
HellfireStudios said:
Cgaines said:
Hello all,

I still seem to be having a grounding issue somewhere that I can't find. I did notice today that before I apply phantom power, I can hear the hum. I thought it might be my preamp but I checked it against some other mics and it didn't hum. I am literally out of ideas... Can someone smarter than my point me in the right direction?

Is your mic body painted?


No I haven't painted it. It's still just the stock aluminum finish

You mentioned earlier that it only hums when you turn up the gain really high. When you checked the preamp/XLR cable (by using a different phantom powered mic), did you turn up the gain like you did with the U-87? The hum could be the preamp's noise floor rearing its ugly head. It could also be the XLR cable. Did you use the same cable when you switched mics?

Yeah I did all I that as well. That's why I'm stumped. I tried different cables, used the same gain structure and every other scenario I could think of. I used the stock analyser in my daw on all of the mics and my 87 is the only one with the 60hz wave. I checked the wire coming from the xlr pin and it looked ok as well. I wonder if the xlr jack isn't grounded to the body very well? I'll double check that this evening and see if that could be the issue.
 
I've found that certain mike bodies rely on a tenuous connection from XLR pin 1 to the bottom shell, to a lower screw bracket and THEN to the body.  In fact someone struggled with this previously in the thread.

One thing you can try:  stuff a cable into the XLR jack, then attach a wire to pin 1 on the other end of the cable and attach it to a meter to measure continuity.  If the body is unpainted, you should be able to touch the various parts of the body and read low resistance.  Barring that make sure if the body is clear coated that you scratch of areas where such ground connections are made.
 
Hello All,

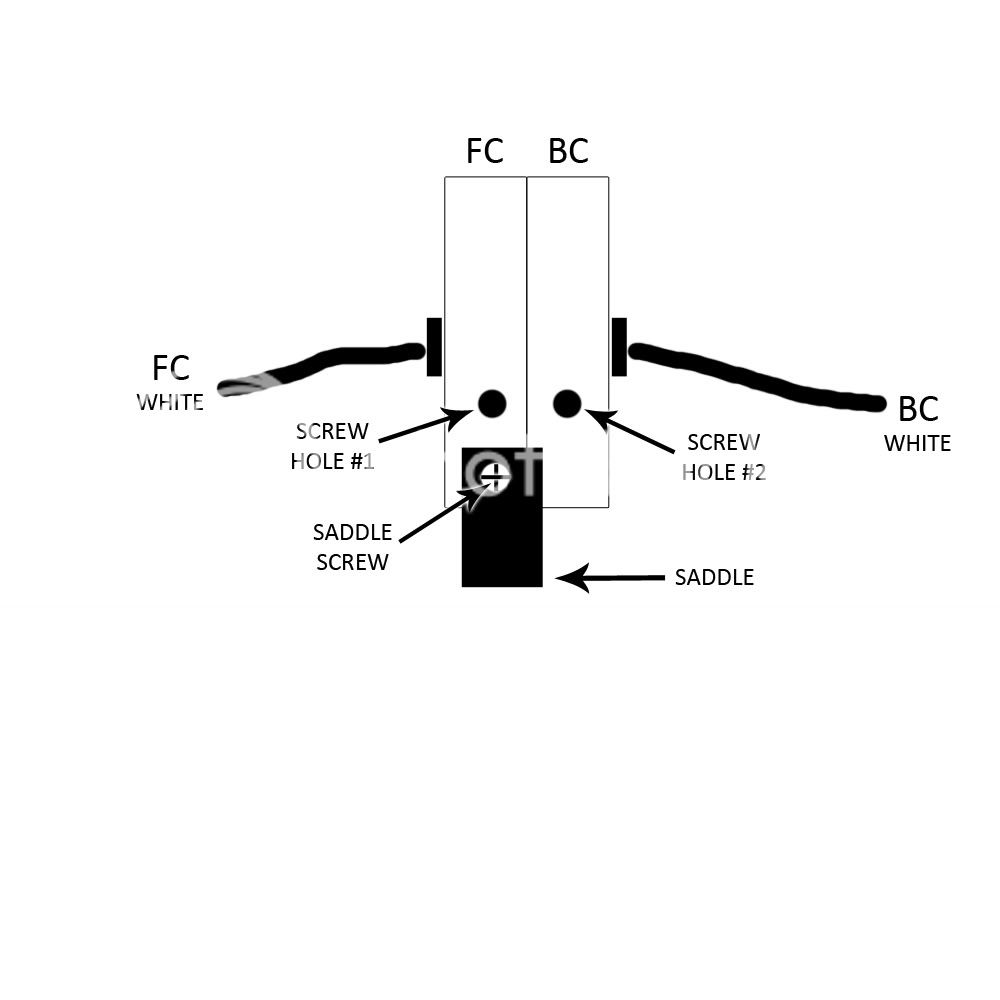
I finally received my RK-87, but I'm unclear as to where exactly I should attach the backplate terminations on the capsule (I know where all the termination wires need to be soldered on the PCB). I've seen a couple diagrams for capsule wiring on the forum, but they all refer to the peluso 87 capsule. From what I can tell from poctop's diagram (first page of the initial thread, not the build thread), the FC (front capsule) backplate termination wire connects to one of the diaphragm clamping ring screws on the BC (back capsule). I'm assuming this is specific to the Peluso 87 because Matt at microphone parts said i should never touch any of the diaphragm clamping ring screws. So, I've attached a small diagram of the RK-87 (side view) and I'm hoping someone can show me exactly where to attach the backplate termination wires for each diaphragm (to be clear, "FC WHITE" and "BC WHITE" refer to the white termination wires connected to the center of the front and back diaphragms. I understand what to do with these white termination wires, but I'm unclear about the blue backplate termination wires). Referring to my diagram, does the FC backplate termination wire connect to screw hole #1 and the BC backplate termination wire connect to screw hole #2? This seems logical to me, but then again I've never wired a dual capsule and I want to be 100% of what I'm doing.

I really appreciate the help. I'm sooooo close! Thanks.

-DUDE GUY

9a8c89e4fbf95675020a68f8eced886f.jpg
 
So to make this simple in this circuit the capsule has 2 backplate and 2 diaphrgame , the 2 backplate are isolated so it connects to the circuit separately you would normally use the saddle screw for on of those backplate and the other one another screw with a little terminal to solder on a wire that will go to the PCB  and then each side of the diaphragme ,

Let me know if this helps,
 

Attachments

  • CapsuleConnection.gif
    CapsuleConnection.gif
    19.4 KB
Dan!!!!!! Thank you!!!!! Finally, it's clear to me! Sorry that I PM'd you and posted, but I'm sure you can understand how badly I want to test this thing out. Hopefully other noobs like me can get some clarity from your additions to my diagram. Feel free to add it to the other diagrams seeing that the wiring for the RK-87 is different than the Peluso 87. Or better yet, I'd be happy to create a higher quality diagram with real pictures that you could post at the beginning of the white market and build threads, if you like. Anyway, thanks again for all your help. By the way, I'm really looking forward to your U67 as well! Happy building/creating.

-DUDE GUY
 
seeing that the wiring for the RK-87 is different than the Peluso 87.
Just a quik note,

The Wiring for the Peluso or the RK-87 should be the exact same principle  :)

I would be more than happy to share your picture and put them in the forum and build thread for sure ,  if it can help this is fantastic  8)
Keep me posted,

Best,
Dan
 
kante1603 said:
kante1603 said:
Matador,this is nothing but great!
Even scope users can cross-check now what is happening,sometimes it occurs that measuring errors happen when not being concentrated.This is a perfect way to confirm it.
Thank you very much indeed!

@Dany,can you put the calculators link to the compiled info page please?

Thank you!

Udo.

Added To First Page of White market  8)  Thanks Matador And Udo,
 
U87 COMPLETE!!!

It sounds damn good, but I want to A/B it against the real thing. All original BOM, RK-87, and AMI T13. My donor is half Gauge ECM87 and half MCA SP-1. No switches, so for now I'll just use the internal jumpers. I'm going to buy a body from Cathedral Pipes at some point. Thanks everyone for your help and a special thanks to poctop for making this available!

2b63d255c446aeb0249eb1bf95729add.jpg
 
Matador said:
I've found that certain mike bodies rely on a tenuous connection from XLR pin 1 to the bottom shell, to a lower screw bracket and THEN to the body.  In fact someone struggled with this previously in the thread.

One thing you can try:  stuff a cable into the XLR jack, then attach a wire to pin 1 on the other end of the cable and attach it to a meter to measure continuity.  If the body is unpainted, you should be able to touch the various parts of the body and read low resistance.  Barring that make sure if the body is clear coated that you scratch of areas where such ground connections are made.


Thanks for the tip matador! I hooked the mic up to my DMM and it shows have continuity from pin one to the mic body. So I guess maybe I need to check elsewhere for the problem. I just don't know why else it could be.
 
Cgaines said:
Matador said:
I've found that certain mike bodies rely on a tenuous connection from XLR pin 1 to the bottom shell, to a lower screw bracket and THEN to the body.  In fact someone struggled with this previously in the thread.

One thing you can try:  stuff a cable into the XLR jack, then attach a wire to pin 1 on the other end of the cable and attach it to a meter to measure continuity.  If the body is unpainted, you should be able to touch the various parts of the body and read low resistance.  Barring that make sure if the body is clear coated that you scratch of areas where such ground connections are made.

Make sure your headbasket, body sleeve, and end cap are all showing continuity with XLR pin 1. Make sure the inner rails, that the PCB's are attached to, are showing continuity to pin 1, as well. Check your ground connections on the PCB's too.

-James-


Thanks for the tip matador! I hooked the mic up to my DMM and it shows have continuity from pin one to the mic body. So I guess maybe I need to check elsewhere for the problem. I just don't know why else it could be.
 
HellfireStudios said:
Cgaines said:
Hello all,

I still seem to be having a grounding issue somewhere that I can't find. I did notice today that before I apply phantom power, I can hear the hum. I thought it might be my preamp but I checked it against some other mics and it didn't hum. I am literally out of ideas... Can someone smarter than my point me in the right direction?

Is your mic body painted?
if you are getting it without 48V applied it's not the electronics.

Try holding the mic near sources of emf like a lightbulb or something. If the hum get's louder and you can change it be reorienting the mic it is likely a transformer issue where the transformer isn't humbucking properly. I have had these issues where the trafo had shorted windings and was able to measure the DCR of the various windings to confirm they didn't match where they should. Which transformer are you using?

Thx,
jb
 

Latest posts

Back
Top