Official U87 "AI" Booster Conversion Board - Build and Support Thread

GroupDIY Audio Forum

Help Support GroupDIY Audio Forum:

This site may earn a commission from merchant affiliate links, including eBay, Amazon, and others.
Matador said:
kante1603 said:
So what went wrong in your build chuck?


Curious now,


best regards,


Udo.

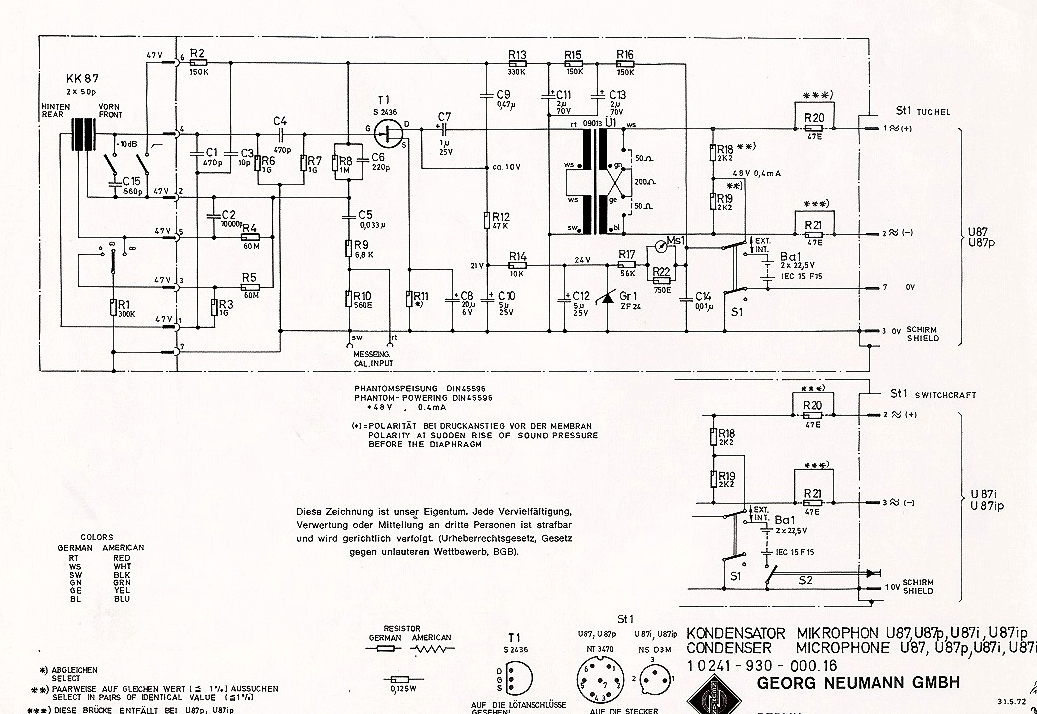
Oh wait - Chuck may be referring to a retrofit of the original U87 - I designed this to retrofit Dany's U87 large format design, which uses a 24V Zener voltage to regulate the JFET operating point.  The original Neumann uses a 33V Zener after a large dropping resistor.  If you tried to draw this 4mA current through a stock Neumann design, the Zener voltage would collapse and the operating point of the JFET may no longer be valid.

However with Dany's stock design it's no problem, as essentially the draw from the LM5002 is diverted away from the Zener diode which is sinking a lot of current to ground to hold the internal rail at 24V anyways (probably even more than chip does in any case).

If anyone wants to try and retrofit an original Neumann, it requires a few more circuit changes (which I wouldn't recommend doing to preserve the value).  But if anyone is curious I can explain it in concept.


The original Neumann uses a 33V Zener after a large dropping resistor

In Fact that would not be correct,  Earlier design of the Neumann U87i version 16  (70's) used a 24V Zener Regulation, it is only later in the 80's that Neumann started using the 33V Zener in revision 21 and above. The D-87 is based on the earlier version of the U87i with 24V zener.
see here ,  ;)
Best,
Dan,

58d02819944e8.jpg


poctop said:
In Fact that would not be correct,  Earlier design of the Neumann U87i version 16  (70's) used a 24V Zener Regulation, it is only later in the 80's that Neumann started using the 33V Zener in revision 21 and above. The D-87 is based on the earlier version of the U87i with 24V zener.

So version '21' doesn't qualify as an 'original Neumann'?  :eek:

In any case, what I said stands:  if you are trying to modify the 33V design more changes are necessary.
 
Matador said:
poctop said:
In Fact that would not be correct,  Earlier design of the Neumann U87i version 16  (70's) used a 24V Zener Regulation, it is only later in the 80's that Neumann started using the 33V Zener in revision 21 and above. The D-87 is based on the earlier version of the U87i with 24V zener.

So version '21' doesn't qualify as an 'original Neumann'?  :eek:

In any case, what I said stands:  if you are trying to modify the 33V design more changes are necessary.

I guess this one was just too broad of a statement and I had to jump in, hence the 33V version would need more tweaks.
No worry,
Best,
Dan,
 
Matador said:
U87 modification instructions:
[list type=decimal]
[*]Run a ground wire to the booster board.  Any available grounding point on the U87 can be used.
[*]The booster power supply comes from the +24V Zener reference.  This is simply a wire from any of the following points:
  • The Zener side of R17
  • The positive side of the Zener itself
  • The positive side of C12
  • The Zener side of R14

[*]Lift the side of R16 (150K) that comes from the phantom tapping resistors R18 and R19.  The output of the booster is connected to this point.
[/list]

Noob question. 
Does V out of the booster connect to the resistor R16 that you lifted from where it connects to R18 and R19? 

Or does V out of the booster connect to the PCB point that you lifted from R16, that connects to R18 and R19? 

If I'm visualizing this right, I'm thinking the first choice.
 
Yes, the first one.  The junction of R18/R19 is what supplies phantom power to what ultimately becomes the polarization voltage.  You disconnect R16 (from that point), and connect the output of the booster right to the resistor leg (from where it was removed from the R18/R19 junction).
 
Matador said:
Yes, the first one.  The junction of R18/R19 is what supplies phantom power to what ultimately becomes the polarization voltage.  You disconnect R16 (from that point), and connect the output of the booster right to the resistor leg (from where it was removed from the R18/R19 junction).

So does that make R18 and R19 superfluous?  Although building the Wheatstone Bridge and finding a match for them was a learning experience.
 
Wavesponge said:
So does that make R18 and R19 superfluous?  Although building the Wheatstone Bridge and finding a match for them was a learning experience.

Nope, they also supply power to the JFET head amplifier, which the booster doesn't do. :)  It's why you only lift one side of R16, and leave R18 and R19 intact.
 
I'm having a problem with my build. 

When  I connect the "voltage in" of the booster to the zener side of R17 or the zener itself, the voltage at the positive of the zener drops from 23V to around 7V.  Also adjusting the voltage trim pot on the booster doesn't change anything at the "voltage out" of the booster which stays around 6.5V.

I notice in the photo of your stuffed board, that D3 and R3 are missing, I included those when I built my board.

I used the values for all the components from the BOM, I notice the schematic has different values for some of the caps.

Don't know how to troubleshoot this...

 
I hope I'm not spoiling anyone's fun, but the level increase going from 48V (actually 46-47V) to 60V is only about 2 dB. For 6 dB, you'd have to double the voltage.

The difference in sensitivity between the U87 and U87A is not just due to the polarization voltage. There are more factors, another being the parasitic capacitance between the backplates in the U87, which acts as a pad. In the later U87A, as we all know, the backplates are electrically connected, which eliminates this parasitic capacitance.

Here's a more detailed explanation by Uwe Sattler (Sennheiser):

http://repforums.prosoundweb.com/index.php/topic,36194.msg531542.html#msg531542
 
Wavesponge said:
I'm having a problem with my build. 

When  I connect the "voltage in" of the booster to the zener side of R17 or the zener itself, the voltage at the positive of the zener drops from 23V to around 7V.  Also adjusting the voltage trim pot on the booster doesn't change anything at the "voltage out" of the booster which stays around 6.5V.

I notice in the photo of your stuffed board, that D3 and R3 are missing, I included those when I built my board.

I used the values for all the components from the BOM, I notice the schematic has different values for some of the caps.

Don't know how to troubleshoot this...

First off, does it work "out of circuit"?  Like if you stuff in 12V from a regular wall-wart or other separate power supply, can you trim it to 60V output?  Does it work properly?  I would start there to troubleshoot (this is how I did it in any case).

D3 and R3 are there to clamp the output of the booster to 62V.  I didn't want anyone to try and stuff the board inside a microphone without first trimming it to 60V, so that is there to prevent sucking in the membranes on the capsule in the worst case.
 
Matador said:
Wavesponge said:
I'm having a problem with my build. 

When  I connect the "voltage in" of the booster to the zener side of R17 or the zener itself, the voltage at the positive of the zener drops from 23V to around 7V.  Also adjusting the voltage trim pot on the booster doesn't change anything at the "voltage out" of the booster which stays around 6.5V.

I notice in the photo of your stuffed board, that D3 and R3 are missing, I included those when I built my board.

I used the values for all the components from the BOM, I notice the schematic has different values for some of the caps.

Don't know how to troubleshoot this...

First off, does it work "out of circuit"?  Like if you stuff in 12V from a regular wall-wart or other separate power supply, can you trim it to 60V output?  Does it work properly?  I would start there to troubleshoot (this is how I did it in any case).

D3 and R3 are there to clamp the output of the booster to 62V.  I didn't want anyone to try and stuff the board inside a microphone without first trimming it to 60V, so that is there to prevent sucking in the membranes on the capsule in the worst case.

So, first of all, I had the voltage regulator installed backwards.  After looking closely at the schematic I saw where the pins should have been connected to the other components.  Fixing that didn't help, just changed the voltages I'm reading now.  (I installed a new voltage regulator just in case I fried the first one)

Input voltage is 15.1 (from a 12V wart), output voltage is 14.6.  Adjusting R8 doesn't have any effect on the output voltage.

I checked all my soldering and tried to measure the components as best I could while in circuit (Don't have a capacitance meter).  I consider myself to be a pretty good solderer, been an audio engineer for 35 yrs. and done a TON of soldering.

In the BOM it makes reference to omitting R5 and R6 if using the Trimpot R8? I have both the trimpot AND R5 and R6 installed.  Could this be the problem?

I omitted the trimpot R9 and put the SMD R3 in.  Is this correct?
 
Let's start with the easy one:  leaving out R9 and stuffing R3 only is fine:  this sets the switch frequency, and the default frequency with 52K should be fine.

So R5/R6/R8:  the design is meant to be either adjustable or fixed.  If you want a fixed output voltage, you omit R8, and stuff R5 and R6.  You then bridge across R8.

However if you want adjustable output, you stuff R8, and you short across R5 and R6:  a short piece of solder wick does this job well, or you can buy SMD 0 ohm resistors if you want it to look clean.

If the BOM says "omit" R5 and R6, that is my fault, it should read "short out R5 and R6".
 
Matador said:
Let's start with the easy one:  leaving out R9 and stuffing R3 only is fine:  this sets the switch frequency, and the default frequency with 52K should be fine.

So R5/R6/R8:  the design is meant to be either adjustable or fixed.  If you want a fixed output voltage, you omit R8, and stuff R5 and R6.  You then bridge across R8.

However if you want adjustable output, you stuff R8, and you short across R5 and R6:  a short piece of solder wick does this job well, or you can buy SMD 0 ohm resistors if you want it to look clean.

If the BOM says "omit" R5 and R6, that is my fault, it should read "short out R5 and R6".

I shorted across R5 and R6 with R8 in place,  R3 has the 52K, R9 removed.  Still no luck, 15V at input (using a 12VDC, 1A wall wort) and 14V at output. R8 has no effect on output voltage.  :-\
 
I have no experience with this board, but I've built quite a few Schoeps-style DC converters (on perfboard). One, I remember, did not work although everything was wired correctly. The reason was that the two inductors were interacting. Remember that a transformer is basically two inductors side by side. Changing the layout and the spacing between the inductors did the trick.

Perhaps this is a similar case. If you can't find any other reason why your board doesn't work, you could try reversing one of the two inductors.
 
This is not a flyback design, and doesn't rely on transformer coupling.  In fact, you don't even need the second one. :)  In my measurements I shorted out across L2.

Hmmm - that EN voltage is dangerously close to the regulator shutoff voltage - do you have a higher voltage supply to try out?  Something in 20-24V range?  Do you have a scope to look and make sure the SW pin is switching?  What is the DC voltage on the FB pin?  It should be sitting around 1.26V if the regulator is operating.

Can you post some pictures of the top-side of the board close-up as well?  Maybe I can spot something amiss.
 
The Schoeps design doesn't rely on transformer coupling, either. On the contrary, what may cause problems is that the two inductors interact like a transformer when they shouldn't.
 
Matador said:
This is not a flyback design, and doesn't rely on transformer coupling.  In fact, you don't even need the second one. :)  In my measurements I shorted out across L2.

Hmmm - that EN voltage is dangerously close to the regulator shutoff voltage - do you have a higher voltage supply to try out?  Something in 20-24V range?  Do you have a scope to look and make sure the SW pin is switching?  What is the DC voltage on the FB pin?  It should be sitting around 1.26V if the regulator is operating.

Can you post some pictures of the top-side of the board close-up as well?  Maybe I can spot something amiss.

I used (3) 9V batteries in series, which gave me about 28V, as a power supply.  Reading about 2.5V at EN, and 8.9 V at FB.
Don't have a scope, except for a software scope, but that's limited to the frequency response of my audio interface (RME Fireface UCX).


Attachments

  • IMG_3281.JPG
    IMG_3281.JPG
    1.4 MB
Can you make the 8.9V FB voltage change by turning the adjust pot R8?  FB pin in pin #6.  Can you also check pin #3?  There should be about 6V sitting there if the regulator is enabled and running.
 

Latest posts

Back
Top