SB4000 Support Thread

GroupDIY Audio Forum

Help Support GroupDIY Audio Forum:

This site may earn a commission from merchant affiliate links, including eBay, Amazon, and others.
bmaughan said:
Hey.... I need some help. I'm having the same problem as Jandoste. I believe that's his name. But on the -12v output of the power supply I'm getting a reading of -19v. I tried swapping regulators as this was the conclusion of that jandoste's thread. But still I have -19. I tried putting a 1k load on it as was recommended and I got -12. so with a load it seems about right. I want to make sure I'm go to go with that. I have correct voltages for all the others with out loads so that seems wierd. Any explanations, thoughts or advice would greatly appreciated. I just want to make sure its ok to proceed. Let me know... Thanks!!!

Hey :)
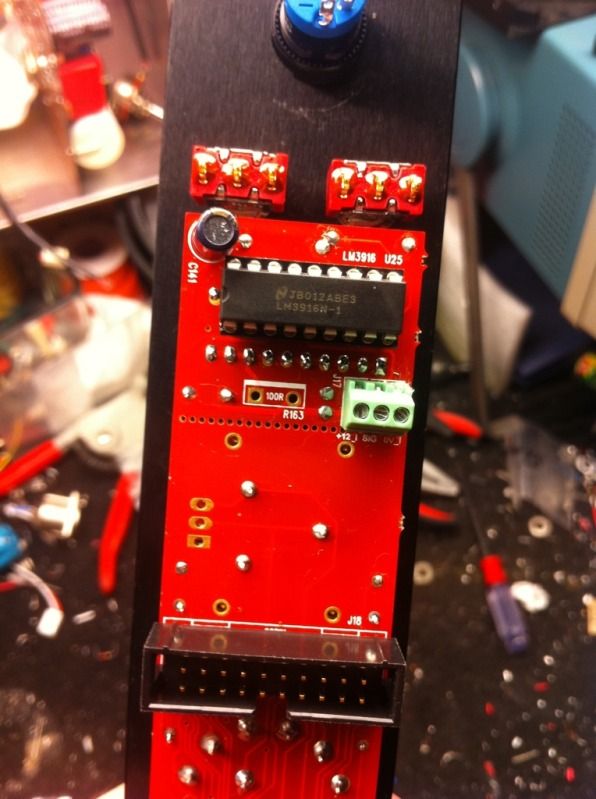
Don't use St Micro!!! I have tried 5 of them and nothing changed!
:eek: just don't use St Micro :)
cheers,
 
When you itstall them with the 1k load... Did you get proper voltage? That's the kicker because I've read that the 912 needs a load to read correctly and with a load... It does perfectly. BUT .... It then makes no sense that the 812 reads correctly on it's own with no load.... I'm telling ya it's the mystical regulator gremlins and this ain't the first time I've run into them :)
 
Don't use the ST regulators.  There are too many documented issues (both here) and elsewhere.  If you choose to use them expect your unit not to work.
 
As far as I know it's only the 7912 St Micro regulator that doesn't work correctly. If the other regulators are putting out the correct voltage just replace the -12v one with a different brand and you should be good.
 
got the regulator replaced...turned it on...calibrated....and it's sounding awesome! Thanks ruckus for all the work....this was my first real diy project.....it was awesome and a breeze...thanks to you!


Ben
 
bmaughan said:
got the regulator replaced...turned it on...calibrated....and it's sounding awesome! Thanks ruckus for all the work....this was my first real diy project.....it was awesome and a breeze...thanks to you!


Ben

I agree, ruckus gives out a lot of helpful advice. I have only built a few units. Some kits and some I made the layout myself. At our level people like ruckus are really awesome to be able to talk to.
 
hey mike,

one down, one to go!  Got the first one all wired up in a temporary case to go into service for a mix this week... next week I'll transplant it into a custom case I'm picking up tomorrow or Wed.

Everything went smoothly, the only kink I had was with U2.. I wasn't getting any voltage at TP11, traced it back to U2. I swapped it with U1 to see if it was a bad opamp, but after swapping they both started working so I guess it just needed a bit of a push.

I'll post some pics after I get the cases, right now it's a bit precariously mounted, but safe enough for stationary use.

thanks for putting this together, and especially for doing the faceplates.. saved me tons of time/headaches!

cheers! 
 
Took me about 5 hours to do the resistors alone. If I didn't measure everyone of them or checked every solder joint it could have taken few hours less. Estimate 20 hours for the building with ready made front panel and all parts at hand. Expect a lot more if you run into problems.
 
Hi All,

Firstly - thanks for all the top info in this thread - it's kept me going this long without asking any stupid questions!  :)

Secondly - My SB4000 build is coming along slowly but surely. All the boards are soldered and I've drilled out the 1u chassis from the excellent diy parts supply kit. I've got to the stage where I'm trying to fit the toroidal transformer in the rack and I'm having problems fitting it in, so I'd be very grateful if any of you could help we with the following queries..

1. I've seen the pictures of ruckus328's build and read about the use of DMD-100 but I can't find a supplier of that in the UK. Would a few strips of insulating tape on the bottom of the chassis do as an alternative replacement for the bottom foam pad in the transformer mounting kit?

2. I know I don't want my mounting bolt to touch the top of the chassis (thereby shorting the transformer) - I can hacksaw it off so that the end of the bolt is flush with the nut and sits below the top of the steel washer provided with the transformer mounting kit. However there would still be only a couple of mm clearance between the top surface of the washer and the top lid of the chassis. Now the washer is covered with black paint and I've checked that it is non conductive with my multimeter. So I figure that I don't need to worry about the top surface of the washer coming into contact with the top lid of the chassis. Is this a good assumption?

Many thanks in advance for any help.

Steve.

PS I've got a 30VA transformer.
 
sdrjones said:
Would a few strips of insulating tape on the bottom of the chassis do as an alternative replacement for the bottom foam pad in the transformer mounting kit?

A lot of off-the-shelf toroidal transformers come with top and bottom dense foam mounting pads, which are fine as insulation by themselves; alternatively thin cardboard, or any insulator that won't degrade much over time is sufficient, but, provided there is something between the transformer and the case ( depending on the construction of the transformer you might not need anything ) it should be fine.  To be honest it's kind of overkill.  Maybe you can post a photo to show us the type of transformer in detail to see if it's even necessary?

sdrjones said:
2. I know I don't want my mounting bolt to touch the top of the chassis (thereby shorting the transformer)

To my knowledge there wouldn't be many transformers that actually short when their mounting areas touch ground so you should be OK.  Can you post a photo?

sdrjones said:
- I can hacksaw it off so that the end of the bolt is flush with the nut and sits below the top of the steel washer provided with the transformer mounting kit.

For the toroidals I've had to mount in 1u cases before, trimming the top of the mounting bolt is a normal requirement to get it to fit.

sdrjones said:
However there would still be only a couple of mm clearance between the top surface of the washer and the top lid of the chassis. Now the washer is covered with black paint and I've checked that it is non conductive with my multimeter. So I figure that I don't need to worry about the top surface of the washer coming into contact with the top lid of the chassis. Is this a good assumption?

I still think you wouldn't need to worry about any of that.  Check the resistance between the mounting points and the main active and neutral.  There should be no connection at all.  If this is true, you don't need to worry about the mounting shorting anything at all.  Photos would be very useful however ;-)

Good luck!
 
Thanks for the info etheory - I'll take photos and post them asap.

I read somewhere else on this forum (though not this thread) that if the mounting bolt touches the top and bottom of the chassis then it might form the equivalent of a single coil winding around the transformer's magnetic core - potentially inducing a current when there was a current flowing through the primary winding. My shorting concern was to do with this rather than any direct path between live/neutral and earth. Sorry for any confusion.

It has however been a long time since I studied all this at University so my knowledge in this area is sketchy to say the least!
 
Just use a nylon bolt and you won't have to worry about it. Cut it to the right length and epoxy or JBWeld it to the bottom of the case, works great.
 
Can't remember if or where I've potentially posted this before, but here are some relatively pointless but nonetheless interesting sound samples of my ( still note entirely calibrated ;-) ) sb4000 for those who want to hear what it does to audio.  All these are way overdone on purpose, but are still relatively reflective of the compression character, which I do love:

http://soundcloud.com/evolutionarytheory/evolutionary-theory-sb4000
 
What is this? The shape of it seems to be part regulator, part capacitor, and then it says 100R on it?

What is this doing in the design?

I am ready to start wiring but I have no idea what this part does and it's the only thing holding me back.

30b24da7.jpg


Here are some other pictures of my build, how does everything look to you more experienced people?

96ea134c.jpg

fc0b1605.jpg

d78d3348.jpg

552f61bb.jpg

b3fb0343.jpg


etheory said:
Can't remember if or where I've potentially posted this before, but here are some relatively pointless but nonetheless interesting sound samples of my ( still note entirely calibrated ;-) ) sb4000 for those who want to hear what it does to audio.  All these are way overdone on purpose, but are still relatively reflective of the compression character, which I do love:

http://soundcloud.com/evolutionarytheory/evolutionary-theory-sb4000

Thank you :)
 
Back
Top