"Crush-n-Blend"

GroupDIY Audio Forum

Help Support GroupDIY Audio Forum:

This site may earn a commission from merchant affiliate links, including eBay, Amazon, and others.
Just got through installing the internal crush-n-blend, and it works!

It did involve some surgery, though...

In the meantime, my SSL looks like this:

sslinside.jpg


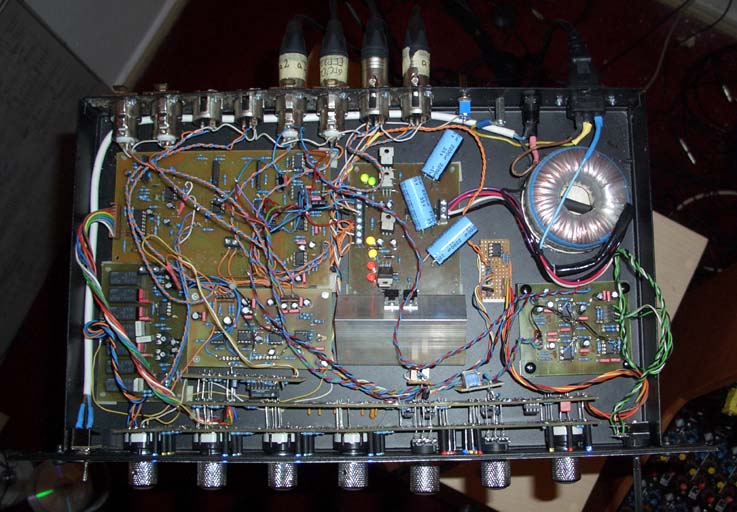
Featuring hpf, turbo, cnb, and balanced sc i/o as well as LED GR and VU meter.

Man, this has been one hell of a trip. But it works, and sounds great.

And tomorrow the front panel is coming  ;D

Bedtime now, though. I'm a-gonna sleep well...
 
Hey man!
Looks great! That could be my ssl in some time since i was planning on doing my ssl this way ;D
Mine will have: turbo, dual sidechain boards with thrust en hp en led gr meter and crush and blend. :-*

I had 2 boards in the mail today with a wrapped open envelope but sealed back again by the mailman.  :eek:
My first xmass present this year! thanks  a lot man! I will SURE experiment with this! haven't really looked good at the boards but they look good anyway.

need any paypal for sending it out to me?
 
Sure, I'll get back to you. It's bedtime now for little soldering mice.

Don't put the cnb board next to the trafo like I did btw, picks up hum.
 
Hi,

Let's talk about crossfading-laws.

The dimensioning of the four resistors 'around' the crossfading-pot in each section
obviously determines the 'feel' that the pot will have. The feedback-resistor across the opamp
doesn't influence feel but just sets resulting gain, so it's further skipped here.

For starters I've compared the result of 'the original Keith values'
& 'the Lukas component-values' and was wondering if there's something to be said about what would be the optimal
crossfading-law (it'll be related to panning-laws, a subject of many debate as I understood).

After normalizing both 50% pot-travel (mid-point) figures to 0 dB,
'Keith' is down 4.9dB @ 0% & 100%, while 'Lukas' does 2.8 dB at the extremes.

For 25% & 75% travel these figures are 0.59 dB ('K') & 0.55 dB ('L') down w.r.t. mid-point.

So the main difference is at the extremes.

Any thoughts ? I think to have seen some words from Keith about this times ago,
but don't recall the details.

Bye,

  Peter


livingnote said:
I quite like the behavior of the crossfade law with this resistor
setup, don't know if there might be some hidden problems
with using 91Ks and such, but it definitely works.

The difference is not that big w.r.t. 'the original Keith' but obviously you both
had a listen to it to verify it for a good crossfading-feel. Nice.

W.r.t. the absolute resistor-values it could be argued that these could be lower in value
to lower the noise-contribution (these opamps can drive 600 Ohms) but since we're
talking line-levels here this will be academic.

Bye,

  Peter   
 
Hey Peter,

got your mail, thank you. Cool that you've been tinkering too  ;D

I'm in a bit of a rush but basically here's the thinking I had:

When I used the crush'n'blend as it was originally designed, I had the
impression that the signals get blended "way too fast" for my taste,
with a relatively long line of fine-tuning down the middle. In my little
world, ideal would be if the basic crossfade law would be a simple
superposition of linear increases and decreases respectively, always
giving you equal voltage at the other end. Considering that we have
a divider to deal with, that would of course be the case if one side of
the resistance ratio approaches infinity, which of course is not practically feasible,
we always have this 1/n-style hyperbole to deal with.

As you said, mr. 91K just cleans up the mess at the other end to make
unity. Might just be right to stick a trimmer in there and not have to
always muck around with that guy if you wanna play with laws...

But here's the point I don't yet get:

What is the difference between shorting + in of the ops to gnd, versus
installing a resisor between? This is definitely a change I am going
to make on the rev3 board, but I don't know the theory of that one.

Cheers,

Lukas
 
Hi! (got the boards, btw. - many thanks!)

For the resistor to gnd., see here:

http://www.national.com/an/AN/AN-31.pdf
http://www.dself.dsl.pipex.com/ampins/webbop/opamp.htm#shunt
http://www.google.com/patents?id=SsAaAAAAEBAJ&dq=5554958

basically it reduces the dc offset @the inputs caused by the current draw of input transistors' bases. You may want to bypass that resistor with a cap, to reduce (resistor's thermal) noise injection into the circuit.

And then, best is to have a truly massive ground plane to reduce noise injection via ground lines as well. (and to have a solid ground to use parralleled rail decoupling caps spread across the layout).

This is a must read as well: http://www.geofex.com/Article_Folders/stargnd/stargnd.htm (not only for tube design)
 
hi,

i'm not familiar w this forum... if u didn't get my personnal msg, i've done smthing wrong - just tell me.

thanks  ;D
 
Great! I'm really glad you like them.

At first I was a little unsure what the response was going to be for just simple no-frills etched boards without any bells and whistles, just plain good etching, but by all your reactions I will be definitely keeping open shop for this stuff. Especially for proto this is great, we can bypass all these setup charges and still be in the league.

I might get into solder mask, but as for me I love to tin my boards in full, all the old funken boards had nice and thick tin on them and it just feels right that way.
 
livingnote said:
At first I was a little unsure what the response was going to be for just simple no-frills etched boards without any bells and whistles, just plain good etching, but by all your reactions I will be definitely keeping open shop for this stuff. Especially for proto this is great, we can bypass all these setup charges and still be in the league.

I might get into solder mask, but as for me I love to tin my boards in full, all the old funken boards had nice and thick tin on them and it just feels right that way.


Hi,

No-frills etched boards mighty fine. Drilling was a long time ago, have gotten spoilt by pre-drilled PCBs  ;)

Soldermask, legending etc all very nice, but luxury. If you'll be adding just one additional nice-to-have I'd vote for drilling; as said having to drill oneself is no problem but it's the most desirable of the three luxuries imo. And it'll look better as well.

Bye,

  Peter
 
just did some stuffing of the board in a pretty cold workshop so i stopped quite soon.. brrrrr..
But what i noticed is that it's best to clean the board first before starting to solder, i had some problems with decently tinning the the board, probably becuase of some moisture remaining on the board?
Anyway.. it worked out oK tough i was misssing some parts..
Now it's time to redesign my gssl frontpanel with yet another extra knob in a better temperature then the workshop  ;D
 
Ah brrrr yeah...

That's the reason I don't tin boards for myself unless I'm reflow soldering. I just leave the photoresist on until the last minute, giving it an extra run on the exposer. Then, when I've drilled the sucker and am ready to solder, I dip the board in NaOH solution to strip off the resist, and you have a totally oxide free trace to work on. It will take solder like nothing and does wonders for the metallurgical bond between copper and tin.

Seno tinning already does a lot in the way to conserve the traces, but just stripping before soldering takes the cake.
 
i would vote 10 times for drilling too !  ;D ;D ;D

(the last time i have to drill a board, i was drilling with a big 20 years old vertical drilling machine from a friend auto-repair place... i've done a pretty experimental set-up to achieve 1mm drilling with that  ;) )

i will work on that maybe in one or two week (because or the drilling "experience" i will have to go throught), do you think a little acetone could help cleaning the tracks to get the solder right ?


Try scrubbing milk. You know, the kind you use for a ceran cooking field?

Oven cleaner works too. And a rough sponge.

Acetone and other solvents are there for stripping boards that still have
photoresist on (which I have already done with yours), but I don't use them,
instead I use NaOH because it leaves the least residue.

As for drilling, try getting a Dremel Workstation mini Drill press. It just does
100 good things, and be sure to get a *tungsten carbide* drill bit.
 
I thought the drilling was fun! Reminded me of back in the days at school drilling self etched print boards  :)
I use a dremel to do that, i really think every DIY addict should have at least one.
 

Latest posts

Back
Top