Neumann U67 Clone : D-U67 Tube Microphone Build Thread.

GroupDIY Audio Forum

Help Support GroupDIY Audio Forum:

This site may earn a commission from merchant affiliate links, including eBay, Amazon, and others.
I do not believe either of them came with silica gel. If they did, it's long gone. I just don't know why one started doing it and the other didn't. Weather is humid here, but they've been side by side the whole time.

What I really need to know is, is there anything I can do to repair it? or clean it? I managed to remove the green stuff, but it pitted the nickel plating.

is there a chemical I can use to treat it to prevent further damage?
 
Strange - another potential problem with chuckD's bodies.
Green usually means copper oxidation.
Clean them thoroughly obviously. There are anti rust chemicals at autobody stores but I don't know if that would be a good idea.
Clear coat?
 
HI All,

Just thought i should put a comment in about a comparison between Erics 67 Capsule with the Sowter 1304 vs Neumann 67 Capsule with the AMI T67 from Jack Murda (as built by Proctop).

The first major difference visually is that the Sowter 1304 is a bit smaller, this may account for differences in the low end, as when we compared my DU67 to Jacks DU67 there was improved bottom end on Jacks, more focused defined.

The other difference which Jack very kindly demonstrated was the sibilance on Erics Capsule, a slight lift about 1khz Jack thought.
Jack described this as smearing, when compared with the Neumann capsules, no smearing was present.

I have to say to my ear it was close, but very different, all the things that Jack demonstrated were clearly audible and has made me get back in touch with Brian Sowter to revisit the 1304 and hopefully build a version which is much better on the bottom end.
I am also looking into trying another capsule for my DU67 to see if i can get rid of the smearing, i will contact Eric to hear his thoughts on this.

Hope this finds everyone well and none of this is ment to offend anyones hard work that has gone into all this, these are just my thoughts and some comments that i have used from what other people has said.

regards

Spence.
 
Spencer,

Did you indeed mean the T49 transformer, or T67?

I'd love to hear people chime in on the BeesNees K6 capsule.
 
Side Note: For those having a polarity that is reversed for a known or unknow reason , remember that you can swap the wire inside the psu at the xlr output connector swapping wire pin 2 and wire pin 3 will reverse the polarity of the ouput.
 
Has anyone used or considered AMI's BV12 transformer? I want to have a look at how the wiring might work but I can't find a data sheet for it.
 
Hi, perhaps a silly question, but in the mouser BOM it says R10 is a 10K resistor (in the comments), but on the schematic and also silkscreened on my PCB it says R10 is 15K. Does the mouser BOM have a typo?

Mike
 
Phrazemaster said:
Hi, perhaps a silly question, but in the mouser BOM it says R10 is a 10K resistor (in the comments), but on the schematic and also silkscreened on my PCB it says R10 is 15K. Does the mouser BOM have a typo?

Mike

Disregard the Mouser Bom (Customer part number) if this is waht you mean,  as they come back once you set them for other project wich is not very good , I use this tough in My BOM to include substituion art number usually ,


in the U67 R10 is definetely 15K,

Best,
Dan,


Thanks Dan! Loving this project! I've been piece-mealing the parts together since last year; finally bit the bullet and bought the mouser BOM with some modifications and upgraded the internal mic resistors to Shinkoh's...cost a bit...not sure if it was worth it but I do tend to be an audiophool. Next up is getting the Beez capsule...

Thanks, you'll hear more from me as I get my build under way. I greatly appreciate you, this project, all the guys/gals on this forum.

Blessings,

Mike
 
Only one I can think of right now is Veronica Sneesby. She actually sent me the capsule for this here project.

And I think I noticed another woman here recently, but they surely are few and far between.

Again, I don't want to hijack this superb thread. I might take this to another thread and section.
 
I thought I was all set to build the PSU when I realized to my horror my case, a lovely danderloo, was set for binders. I have them but was going to use them on another project. Since I'm going to sacrifice the other project binders for the PSU for this project, I thought it only made sense to go higher end for the mic connection rather than the 7-pin xlr. So, even though it might be funny to mix a binder on the PSU case and an Amphenol on the mic end, at least it will be quality.

I found the mic amphenol connector that wave posted in another thread here (thx wave!):

http://www.mouser.com/Search/ProductDetail.aspx?R=T_3477_000virtualkey52360000virtualkey523-T3477-000

And searching on mouser found this cable connector:

http://www.mouser.com/Search/ProductDetail.aspx?R=T_3476_001virtualkey52360000virtualkey523-T3476-001

Do I have those parts mated correctly for going into the microphone from Chunger?

Also what is involved in the boring on the bottom of the mic exactly? I don't have a lot of equipment but what is it going to take?

Thanks for responses,

Mike

EDIT: for clarity and doing my own homework for this post
 
poctop said:
Jim50hertz said:
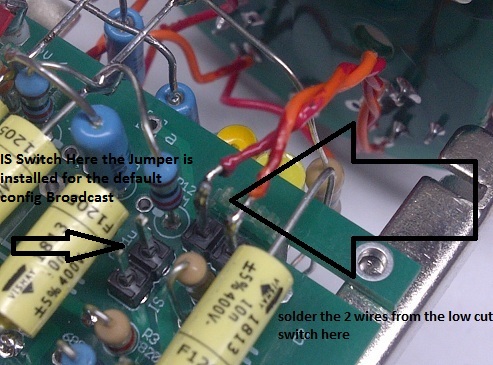
I can't seem to find reference to the second set of jumpers, should I jumper both? I know one is for the internal 200Hz filter, what's the other for?

IS is jumpered for default configuration , you will get more bass response and proximity with the jumper off,  the other jumper serves as soldering point for the low cut switching,
Best,
dan,

bb.jpg

Hi poctop, any reason you have to install the second rightmost jumper at all, if it's used just to solder the wires to the low cut switch? Wouldn't it just be easier to solder the low cut switch wires right to the PCB?

Thanks,

Mike
 
Phrazemaster said:
poctop said:
Jim50hertz said:
I can't seem to find reference to the second set of jumpers, should I jumper both? I know one is for the internal 200Hz filter, what's the other for?

IS is jumpered for default configuration , you will get more bass response and proximity with the jumper off,  the other jumper serves as soldering point for the low cut switching,
Best,
dan,

58d0281993ea3.jpg

Hi poctop, any reason you have to install the second rightmost jumper at all, if it's used just to solder the wires to the low cut switch? Wouldn't it just be easier to solder the low cut switch wires right to the PCB?

Thanks,

Mike


The wire could also be wired directly on the pcb but i found that it was easier Job doing it it that way , but nothing is preventing you to do that , I guess i had in mind at all case to install a jumper there in the eventuallity that you have to troubleshoot stuff ,,,,makes it easier in all case  :) .
Best,
DAn,
 
dgoszillai said:
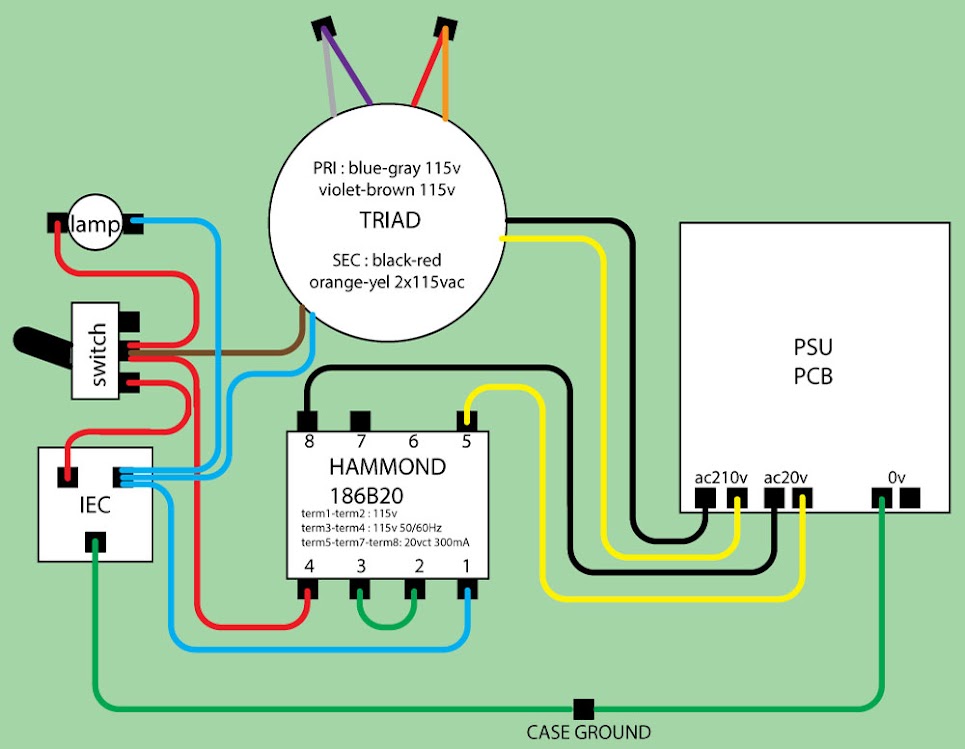
Ok as there's not so many info on the europe version here is a picture of what i did for the ones who could need it.
and because i'm not that great at electronic of course if you find any error please tell me before i power this and blow my house !  8).
europe-PSU.jpg

One comment I noticed folks are only interrupting the IEC hot line, and not both hot and neutral, in their PSU switch. While this is "correct" and "OK" from my understanding if there's a miswiring in the wall then that puts the hot line in constant contact internally in the PSU, dangerous. The solution I found is to use a DPDT switch for the PSU and wire BOTH hot and neutral to it, so both are interrupted.

Just my humble thoughts on making DIY safer and making you all less dead-er. Or burned-er. Or...you get the idea.

PS awesome diagram dgoszillai!
 
poctop said:
Phrazemaster said:
poctop said:
Jim50hertz said:
I can't seem to find reference to the second set of jumpers, should I jumper both? I know one is for the internal 200Hz filter, what's the other for?

IS is jumpered for default configuration , you will get more bass response and proximity with the jumper off,  the other jumper serves as soldering point for the low cut switching,
Best,
dan,

bb.jpg

Hi poctop, any reason you have to install the second rightmost jumper at all, if it's used just to solder the wires to the low cut switch? Wouldn't it just be easier to solder the low cut switch wires right to the PCB?

Thanks,

Mike


The wire could also be wired directly on the pcb but i found that it was easier Job doing it it that way , but nothing is preventing you to do that , I guess i had in mind at all case to install a jumper there in the eventuallity that you have to troubleshoot stuff ,,,,makes it easier in all case  :) .
Best,
DAn,

Thanks Dan!
 
Sorry for the noob question but it was very hard to tell by the pics how to connect the capsule and where to solder,any one have pics that could better show me?
 
potstweaker said:
Sorry for the noob question but it was very hard to tell by the pics how to connect the capsule and where to solder,any one have pics that could better show me?

please Refer to this thread here as the capsule connection is the same as the M269c or 269b

http://www.groupdiy.com/index.php?topic=51350.0  ( section in the bottom )

there is nice picture that shows how to and where to connect the capsule ,

but basically here it is,

Backplate = second turret point ,
Front diaphragme = first turret point ( Grid of the tube where the tube pin is floating or any connection that lead to the tube floating grid  )
back diaphragme will connect to pattern pin 2 ( the wire that i push into the basket , )

Let me know if this helps,
Best,
Dan,

 
Back
Top