Punching Out XLR's (How To Get Screw Slots Lined up)

GroupDIY Audio Forum

Help Support GroupDIY Audio Forum:

This site may earn a commission from merchant affiliate links, including eBay, Amazon, and others.

nedonnelly

Member
Joined
Jun 28, 2017
Messages
18
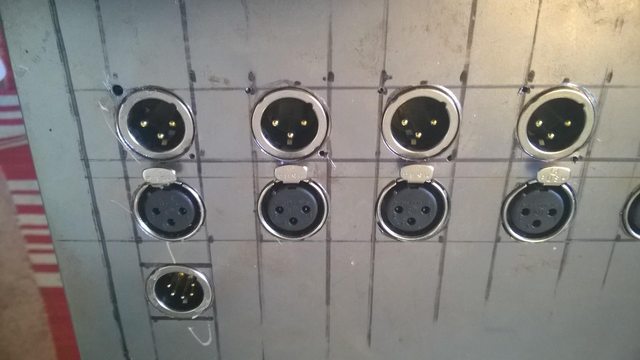
So I'm kind of at a head-scratching place on my project. I've gotten all of my xlr's through, but I am having the hardest time figuring out how to line the holes for the screws up exactly in the right place. I've tried rubber cementing the xlr's to the panel, but that didn't work as the xlrs weren't sticking. I tried tracing the xlrs while in the PCB, but that didn't work as it still doesn't line up well. So I am here to ask for help. Any suggestions from those who have done this before?

lKhKQ8jl.jpg
 
How about placing the whole panel face down, then one at a time put your xlr socket in ,line it up and use a felt tip pen to mark the through screw holes of the sockets, then get a dot/nail punch ,make indents in the centres of the marking dots you made ,now drill it out ,go with a smaller drill first and make sure you keep on target ,if your off centre use a fine file to get things back on track , new drill bits with a good sharp edge will make things much more accurate also.
 
A cordless variable speed drill is what I use ,you can start slow and ensure accuracy ,a drill with a set speed isnt much good unless its a pillar drill and everything is clamped into place .
 
You need to use a SPRING LOADED CENTER PUNCH to mark the holes centers, This will then keep the  drill bit from wandering. There is a kit of center punches that cover a large range of hole sizes.  I have used this many times over the years.

I hope this helps
Duke
 
Tubetec said:
How about placing the whole panel face down, then one at a time put your xlr socket in ,line it up and use a felt tip pen to mark the through screw holes of the sockets, then get a dot/nail punch ,make indents in the centres of the marking dots you made ,now drill it out ,go with a smaller drill first and make sure you keep on target ,if your off centre use a fine file to get things back on track , new drill bits with a good sharp edge will make things much more accurate also.

I have a center punch, but not one that fits the 1/16" size hole that I want. I may have to search for a different one.

In terms of a file, again I don't have a file that will fit the small size. I thought I could use a Dremel to cut through, but it looks like that again is too large. After a search I found this file:

http://www.jlsmithco.com/sanding-and-filing/precision-file-round-parallel-4-1-16-cut-0

It looks like it is rated for brass, but I'm not sure if it would do the trick on 1.5mm steel. Anyone have experience with this?

Thanks for those that have posted the information so far  :)
 
kambo said:
drill press is the way... u can drill them close to cnn accuracy!

One day in the future I will have such nice things  8) Until then I must soldier on with only my hands, a dremel, and a cordless drill.  :(
 
Not a center punch.  A transfer punch set with the correct size(s).

You could use a drill bit as a transfer punch but you will sacrifice the bit.
 
Paul I seem to remember you posting something along these lines a while back that involved clamping a straight edge to the panel, against one edge of the XLRs, in order to stabilize them while marking and drilling. Did you find that to be effective?

Gold said:
Not a center punch.  A transfer punch set with the correct size(s).

You could use a drill bit as a transfer punch but you will sacrifice the bit.
 
I would probably do a quick layout in front panel designer (Schaeffer / Frontpanelexpress), it has presets for XLR holes, print it out 1:1, stick it to the panel and then either pre-drill the holes with a small drill or punch it in the center with a small nail to center and lead the drill. The rest might be a little bit of filing after the drilling with a small round file if it doesn't fit perfectly. Here in Germany they sell sets with small files in different shapes for little money which include a round file typically a bit smaller than 3 mm - which is perfect for the job. Since you already made the big holes, you can also use the XLRs to mark the holes. You could insert them all from the back and use a ruler to make sure they are all in line and straight.

If your XLRs are not soldered to the pcb directly then you can also just mount them on the outside - which would cover the holes hiding small (or even not so small) imperfections in the drilling.

Michael
 
what you need is a drill guide.

even if your layout is perfect, and you use a center punch, that drill bit will drift high-left. using oil helps but not always. if you flip the panel to drill the next hole, then you have a hi-left hole and a low right hole whose errors get summed. (anybody been there done that?  ??? )

holes drilled in thin steel will drift more than holes drilled in thick steel such as 3/8"

so now what?  get a piece of 1/4" flat stock, (i like 3/8's for production work with maybe a little DIY hardening (get  it hot and dip it in water , repeat 3 times) )

drill your center hole the same diameter as your chassis punch, then drill your mtg screw holes with the same diameter drill bit as the screw needs, use plenty of oil, clamp your work, chuck the bit so that only 1/2 inch hangs out so it will not bend,

bolt the finished template/guide to your panel and have at it knowing that your holes will be perfect every time,, and the whole DIY family will have jaws agape at your professional looking panels.

UTC transformers are also a pain to mount so buy enuff plate steel for more drill guides.
 
PRR said:
Figure how over-size the holes can be before you get embarrassed.

HA!! Sadly this may be the final solution.

But at least I have some more possible solutions to try first!  :D
 
Matt C said:
Paul I seem to remember you posting something along these lines a while back that involved clamping a straight edge to the panel, against one edge of the XLRs, in order to stabilize them while marking and drilling. Did you find that to be effective?

I still do that but I use Neutrik D style connectors. The traditional style chassis mount XLR with a plate that load from the front. That method wouldn't work with this style connector. Three is no surface to line up.
 
The way I do it is similar to what Michael Tibes suggested.

Draw up a dummy panel and stick it to the metal.
Use a centre punch to mark the hole centres
Use a 3mm drill - a sharp one - in a variable speed hand drill at slow speed to make the centre punched holes a bit bigger but don't drill through the metal yet.
These marks then provide a better mark to seat the 3 mm drill when you use a pillar drill to drill through the plate.

For modern XLRs, for the main hole, start with the 3 mm and work up in 3 to 4 mm sizes 22mm is about the right size for this.  I seem to remember that the actual size is 21.5mm
Use a de-burring tool to smooth off the hole edges.
For the mounting holes, 3mm gives a bit of slack when actually mounting the connector.  I use 3mm countersink headed screws with a shake-proof/crinkly washer under the nut on the inside.  This also bites into the metal to provide a good electrical connection if you need it.

Hope this helps

Mike
 
madswitcher said:
The way I do it is similar to what Michael Tibes suggested.

Draw up a dummy panel and stick it to the metal.
Use a centre punch to mark the hole centres
Use a 3mm drill - a sharp one - in a variable speed hand drill at slow speed to make the centre punched holes a bit bigger but don't drill through the metal yet.
These marks then provide a better mark to seat the 3 mm drill when you use a pillar drill to drill through the plate.

For modern XLRs, for the main hole, start with the 3 mm and work up in 3 to 4 mm sizes 22mm is about the right size for this.  I seem to remember that the actual size is 21.5mm
Use a de-burring tool to smooth off the hole edges.
For the mounting holes, 3mm gives a bit of slack when actually mounting the connector.  I use 3mm countersink headed screws with a shake-proof/crinkly washer under the nut on the inside.  This also bites into the metal to provide a good electrical connection if you need it.

Hope this helps

Mike

easy way to do it, print on a transparency film.
stick the film on to the panel surface.
center punch then drill the holes.
back then i used a titanium coated 25 mm HSS stepped drill bit with cutting oil.. nowadays, I use a laser cutting.
 

Latest posts

Back
Top