Telefunken ELA M 251 Clone Tube Microphone Build Thread (D-Ela M 251E)

GroupDIY Audio Forum

Help Support GroupDIY Audio Forum:

This site may earn a commission from merchant affiliate links, including eBay, Amazon, and others.
Thanks again for the test. I listened blind after turning the clone up by 0.36dB.

For the first voice I preferred your clone. I would have guessed it was the original if I had to at that point. It was brighter, but in the right "air" spots, not the sibilance spots. It made it sound more 3D and real, while being less harsh. Then the voice switched to someone else and I felt the exact opposite. Now the clone was more sibilant. Very interesting.

So the usual 30M resistor was swapped with 100M?
 
Melodeath00 said:
Thanks again for the test. I listened blind after turning the clone up by 0.36dB.

For the first voice I preferred your clone. I would have guessed it was the original if I had to at that point. It was brighter, but in the right "air" spots, not the sibilance spots. It made it sound more 3D and real, while being less harsh. Then the voice switched to someone else and I felt the exact opposite. Now the clone was more sibilant. Very interesting.

So the usual 30M resistor was swapped with 100M?

Maybe import my new test audio into my old test session?... everything was the same setting.

Yeah just swapped out for 100m flat and square shaped like the ohmites.
 
JessJackson said:
Melodeath00 said:
Thanks again for the test. I listened blind after turning the clone up by 0.36dB.

For the first voice I preferred your clone. I would have guessed it was the original if I had to at that point. It was brighter, but in the right "air" spots, not the sibilance spots. It made it sound more 3D and real, while being less harsh. Then the voice switched to someone else and I felt the exact opposite. Now the clone was more sibilant. Very interesting.

So the usual 30M resistor was swapped with 100M?

Maybe import my new test audio into my old test session?... everything was the same setting.

Yeah just swapped out for 100m flat and square shaped like the ohmites.

I don't use Pro Tools, so I cannot use your session file. I am importing the two audio files into my DAW and comparing from there. I'm not sure what you mean by "everything was the same setting" as the old test session. I turned up your clone .36dB because you indicated in your post it needed to be turned up.
 
Melodeath00 said:
JessJackson said:
Melodeath00 said:
Thanks again for the test. I listened blind after turning the clone up by 0.36dB.

For the first voice I preferred your clone. I would have guessed it was the original if I had to at that point. It was brighter, but in the right "air" spots, not the sibilance spots. It made it sound more 3D and real, while being less harsh. Then the voice switched to someone else and I felt the exact opposite. Now the clone was more sibilant. Very interesting.

So the usual 30M resistor was swapped with 100M?

Maybe import my new test audio into my old test session?... everything was the same setting.

Yeah just swapped out for 100m flat and square shaped like the ohmites.

I don't use Pro Tools, so I cannot use your session file. I am importing the two audio files into my DAW and comparing from there. I'm not sure what you mean by "everything was the same setting" as the old test session. I turned up your clone .36dB because you indicated in your post it needed to be turned up.

I just meant that you can compare this to my other previous test before replacing the capacitor, I had the same pre amp settings and same distance from the mic. Therefore see how much of a difference the capacitor made. Obviously the takes and speaking performance differs.
 
"Yes the noise may be higher slightly but it may also contribute to the vintage sound. To be honest mate thats kinda like growing up in the digital era and telling everyone not to print to tape ever. If you don't try you'll never know. Less noise isn't always a good thing.
"

Tape noise and the un-reliabilty + noise of a ceramic cap for the AC bypass in a condenser mic are not even close to the same thing. Generally, the noise from the ceramic in that application is one that manifests years later. As an example, the ceramic cap used in the U47 was fine when the mics were new in the '50's, noisy by the 1980's.
I have never instructed anyone to not record to tape, quite the opposite. As well I own an ATR 124 & Mtr12,  so I really don't understand the comment.


bockaudio said:
"Yes the noise may be higher slightly but it may also contribute to the vintage sound. To be honest mate thats kinda like growing up in the digital era and telling everyone not to print to tape ever. If you don't try you'll never know. Less noise isn't always a good thing.
"

Tape noise and the un-reliabilty + noise of a ceramic cap for the AC bypass in a condenser mic are not even close to the same thing. Generally, the noise from the ceramic in that application is one that manifests years later. As an example, the ceramic cap used in the U47 was fine when the mics were new in the '50's, noisy by the 1980's.
I have never instructed anyone to not record to tape, quite the opposite. As well I own an ATR 124 & Mtr12,  so I really don't understand the comment.

The ceramic caps in the vintage elam 251 from the same era are fine. That mic has less noise than my current build. I'd imagine its a case by case situation.

Ceramic caps do deteriorate though. I few NOS ones have literally crumbled between my fingers.

J
 
poctop said:
As I received many PMs on this , here is the status.

I currently am polishing the last details on this project , please post on this thread if you would like to be enlisted for the next run as the qty will be limited,
thanks
Best,
Dan,

I'm in for one also!
 
Thanks To my Brother,I should be getting another batch really soon,
Stay tuned,
Best,
Dan,
 
Will it be the same as the initial run or have you changed anything?

Updates Are.

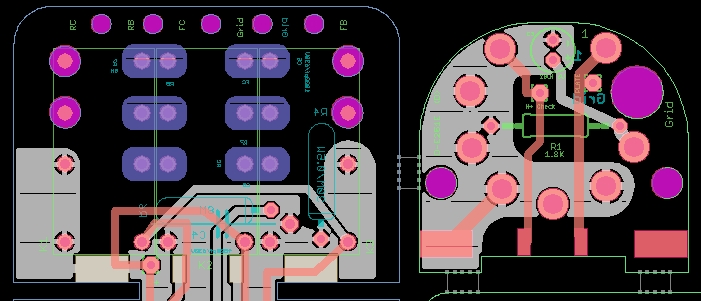
Silk Error Polarity Cathode Bypass Cap  Fixed,
Relay Tightest as possible I guess  :eek:
Output Cap Receptacle Enlarged.

D251E.jpg


58d028199408f.jpg


best,
dAn,
 
Fun build, thanks DAn!!

Here are some photos with the hack build with the Beesneez body. Fiddly! Looking forward to the longer/custom one!

Will install TC capsule and report back when fired up.

Only thing is how to secure the PCB to the rails. I passed some cable ties all around which was secure but then I couldn't get the case over...

Otherwise you can see how close the relay legs are to the rails, so it has to be well secure or they'll short.
 

Attachments

  • ELAM1.jpg
    ELAM1.jpg
    146 KB
Tight!

Notice that I shortened the screw on the left, as it is at risk of shorting with the S+ pad. On the other side is the ground pad, so no need to shorten the screw there.
 

Attachments

  • ELAM3.jpg
    ELAM3.jpg
    238.9 KB
Woot said:
More gutz - notice extra hole for securing cap with cable tie.

thanks for your post  :) , I am glad you made it with the hack of the beesneez Mic body ,
Ultimately the PCB were made to fit the HT-11 Mic body Kit that Chunger will be having soon again ,

http://groupdiy.com/index.php?topic=50015.0

Veronica and Ben are as well probably working out an adaptation at the moment for future builder I guess,

http://groupdiy.com/index.php?topic=55176.0
Best,
Dan,


Latest posts

Back
Top