Lots of parts and looking great . It’s been a while since I’ve seen your frame. Love it ! It’s api but also has a Helios look to it and having two sets of 500 series buckets allows you to be quite modern in choice of gear options. Now on to breathing some solder fumes.
You are using an out of date browser. It may not display this or other websites correctly.
You should upgrade or use an alternative browser.
You should upgrade or use an alternative browser.
Console signal flow, input cards, general discussion on API styled DIY mixer
- Thread starter boji
- Start date


Help Support GroupDIY Audio Forum:
This site may earn a commission from merchant affiliate
links, including eBay, Amazon, and others.
ruffrecords
Well-known member
It never ceases to amaze me just how much work is involved in the design of a mixer but every extra hour spent at this stage will save you ten when you come to put it together.
Cheers
Ian
Cheers
Ian
boji
Well-known member
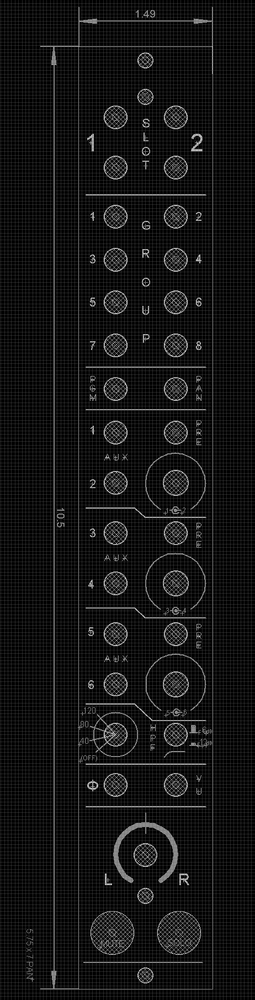
I just upped this same picture in machine shop section, but I thought I'd add it here to mark progress and garner any advice you may have for faceplate layout.
Thanks!
I kinda consider this a community console, but I don't think I should make it a public release as I want to respect Jeff's (CAPI) business, and besides, who wants a wonky 10.5 format... and who knows if this thing will even sound good...but y'all have helped out immensely. I came to the table with next to no knowledge a few years ago and I owe much of my progress to the kind folks at prodigy pro and gdiy. /cheers
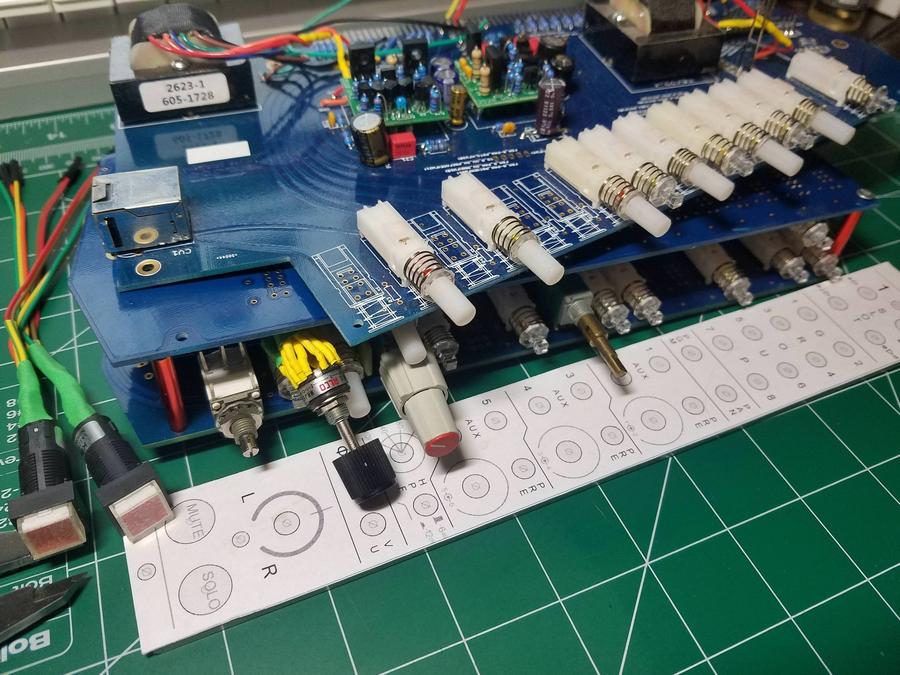
Proto cards, Rev 0.1
Thanks!
I kinda consider this a community console, but I don't think I should make it a public release as I want to respect Jeff's (CAPI) business, and besides, who wants a wonky 10.5 format... and who knows if this thing will even sound good...but y'all have helped out immensely. I came to the table with next to no knowledge a few years ago and I owe much of my progress to the kind folks at prodigy pro and gdiy. /cheers
Proto cards, Rev 0.1
ruffrecords
Well-known member
It never ceases to amaze me how many buttons and knobs people will squeeze into a 6U panel! I count 34 on this panel.
Cheers
Ian
Cheers
Ian
boji
Well-known member
"It never ceases to amaze me how many buttons and knobs people will squeeze into a 6U panel! I count 34 on this panel. "
haha, ;D This is no fat-fingered faceplate, to be sure. But try to think of it as an instrument with really low action on the frets. I hope I have no buzz tho.
But seriously, this is what happens when you get a bug up your arse to make something you don't know anything about, and start with the frame, and assume the rest will go swimmingly. Crowded house!
ruffrecords
Well-known member
boji said:haha, ;D This is no fat-fingered faceplate, to be sure. But try to think of it as an instrument with really low action on the frets. I hope I have no buzz tho.
But seriously, this is what happens when you get a bug up your arse to make something you don't know anything about, and start with the frame, and assume the rest will go swimmingly. Crowded house!
I know just what you mean. When I was using off the shelf module mechanics, it was amazing how much front panel space was unavailable due to the module mechanics and this was with 2.8 inch wide modules. My Mark III design uses 1.4 in wide modules just like yours. I have come up with my own simplified lower cost module mechanics, as much as anything to make as much front panel space available as possible. I only have one PCB unlike your two but I do have a steel screening sheet where your second one is so they are not that dissimilar. Here is a pic of an early version of my channel amp (mic pre + EQ):

The light blue thing on the left is the PCB. The hardest thing is making the legend readable on the EQ.
Cheers
Ian


ruffrecords
Well-known member
boji said:I owe much of my progress to the kind folks at prodigy pro and gdiy. /cheers
I thought prodiy pro was no more?
Cheers
Ian
boji
Well-known member
I thought prodiy pro was no more?
I'm saying I've been trying to harpoon this white whale since before ppro dissolved!
boji
Well-known member
"Here is a pic of an early version of my channel amp (mic pre + EQ)"
Super clean. It's like the antithesis of mine with respect to ease of knob finding and turning. ;D ;D
And it's tube...which well, puts it in a higher league.
Super clean. It's like the antithesis of mine with respect to ease of knob finding and turning. ;D ;D
And it's tube...which well, puts it in a higher league.
ruffrecords
Well-known member
boji said:I'm saying I've been trying to harpoon this white whale since before ppro dissolved!
LOL

boji
Well-known member
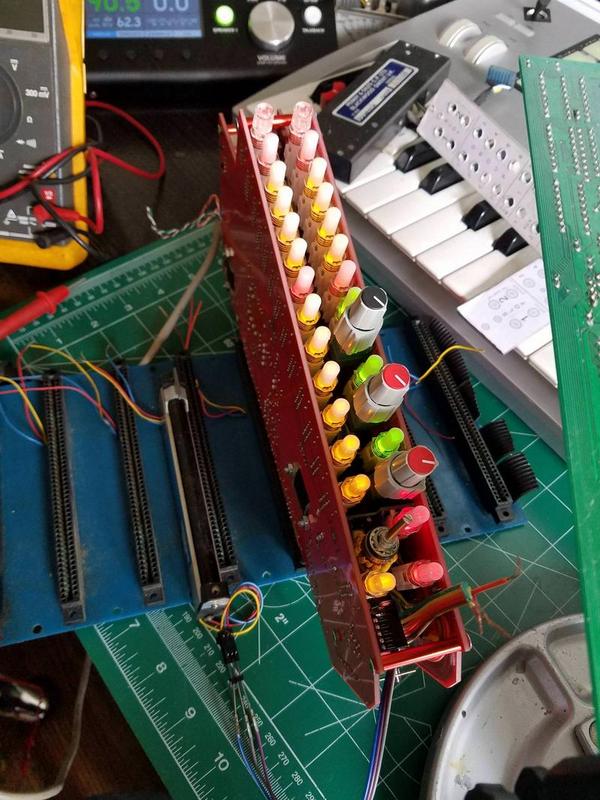
She's alive. Group/Aux/St/Dir all passing audio. It's a heck of a tight fit inside, but so far it looks like only revisions forthcoming will be some slight mechanical nudging. Now just need the time/patience to build another couple dozen. (>.<)
ruffrecords
Well-known member
Isn't it a great feeling when that first module comes together and works?
Well done.
Cheers
Ian
Well done.
Cheers
Ian
boji
Well-known member
Thanks for the kind words and tech support through the design process. Couldn't have done it without yall. Now if you could send me all the 1st year college students with soldering skills you know, that would be great. =D
Additional fun comes when you shoehorn a few tens of modules into the chassis the first time. I recall first build of a 36x24 split console prototype the night before a trade show (last century). For the prototype metal the modules were bent without using dedicated forming tools, so module width accuracy was +/- metal shop bend tolerance. Of course the accumulated error from 60 + strips, +send /returns, and a master section made the last strip a remarkably tight fit.
Enjoy.
JR
Enjoy.
JR
Mbira
Well-known member
Congratulations, man! That's beautiful and awesome!
ruffrecords
Well-known member
@boji,
inspired by your back to back PCB construction I am considering doing something similar in the routing module of the Mark III tube mixer. Can you tell me which make/model of push button switches you are using, what spacing between them you are using and what key caps?
Cheers
Ian
inspired by your back to back PCB construction I am considering doing something similar in the routing module of the Mark III tube mixer. Can you tell me which make/model of push button switches you are using, what spacing between them you are using and what key caps?
Cheers
Ian
boji
Well-known member
No greater compliment than to create inspiration. It's what put me on the path, so thank you!
Push buttons are Wellbuying (Well Buying?) ML series. Not the easiest to source since Rapid and Mouser stopped selling 4 pole. :/
PM sent.
Push buttons are Wellbuying (Well Buying?) ML series. Not the easiest to source since Rapid and Mouser stopped selling 4 pole. :/
PM sent.
Aren't they compatible with Alps SUN?boji said:Push buttons are Wellbuying (Well Buying?) ML series. Not the easiest to source since Rapid and Mouser stopped selling 4 pole. :/
boji
Well-known member
Hey Abby. I looked up Alps SUN and only found non-illuminated. Interested in what you've seen.
Similar threads
- Replies
- 63
- Views
- 7K
- Replies
- 5
- Views
- 5K
- Replies
- 172
- Views
- 39K
- Replies
- 38
- Views
- 7K