Fairchild 660 from scratch

GroupDIY Audio Forum

Help Support GroupDIY Audio Forum:

This site may earn a commission from merchant affiliate links, including eBay, Amazon, and others.
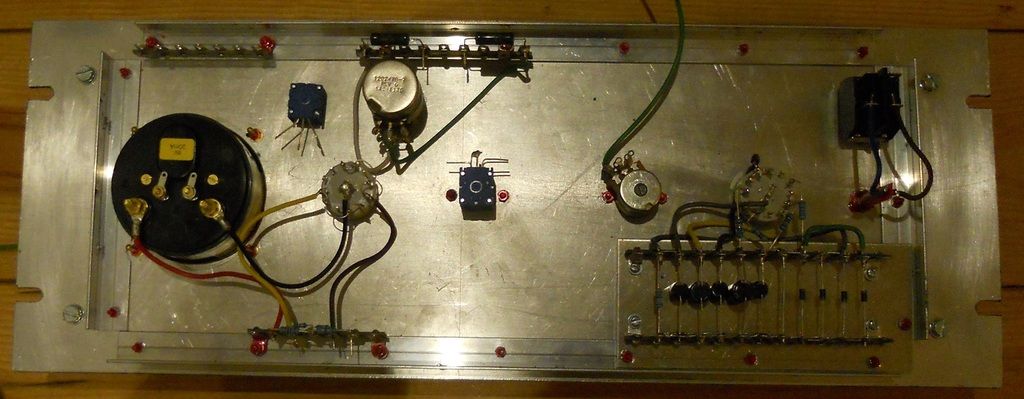
I have finished fitting the components to the rear of the front panel.


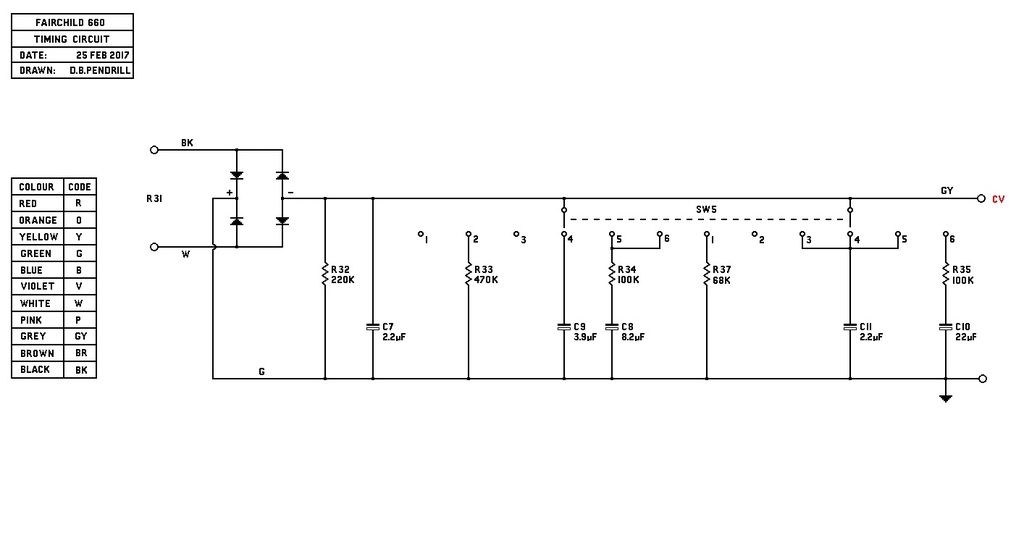
The 660 timing components are on a panel bottom right, they all connect to the adjacent timing switch.  As far as I know, modern studios only ever use positions 1&2 nowadays.

The cathode resistors of the signal amp are above the meter switch, 7W ww types.

The balance resistors for the meter circuit are bottom left.


All these wires have to be found a home inside the front panel!

Its a lousy picture but you can also see a screen I've fitted to isolate the mains switch wiring, bottom right.

Connecting the two parts is the next job.

DaveP
 
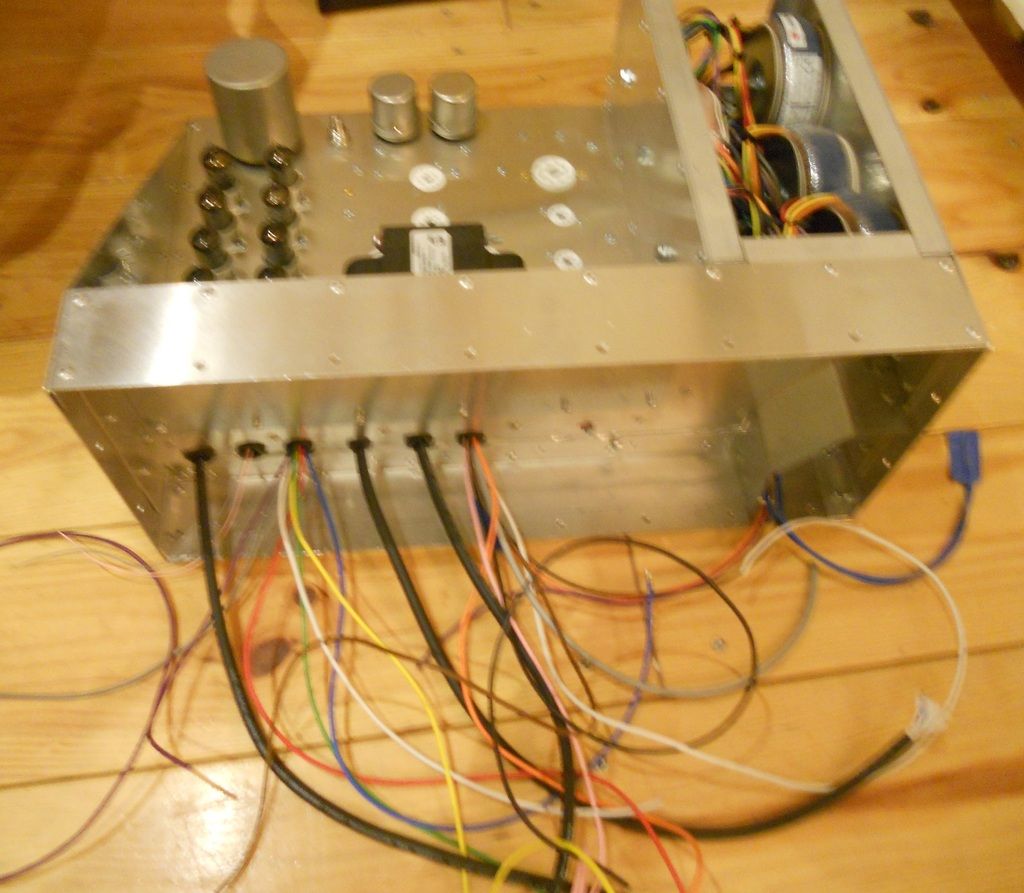
I finished the connections this afternoon, now it's complete electrically.


I will now refit all the tubes and set it up for test.  I still have to make two plates to cover the transformer box, but that's no big deal.

DaveP
 
Looks incredible with all those wires.

Super complicated - thanks Dave.

Formidable !
 
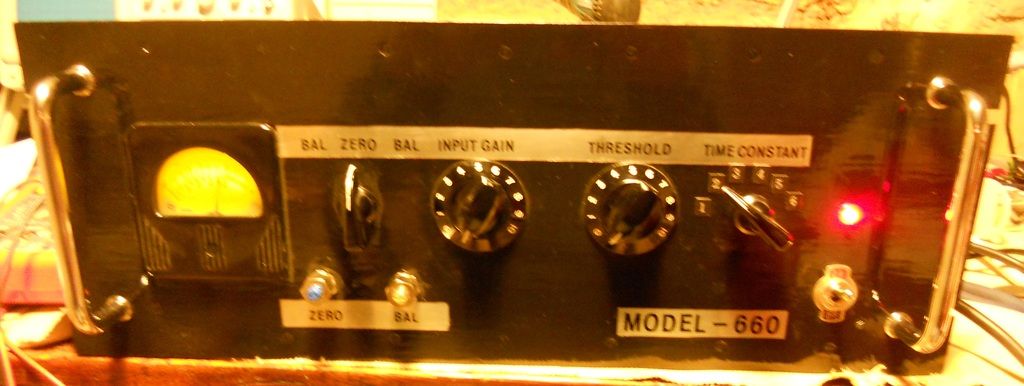
Well it's all finished and I started sine wave testing today.

A few comparisons:  Original 660 weight = 41lbs, this 660 weighs 26.6lbs.

Original spec is 20Hz to 20kHz between -1dB points.  this 660 is 15Hz to 40kHz between -1dB points at +4dbm.  This is probably due to the Sowter transformers in the signal amp.

The S:N ratio is the same at -70db at +4dbm.


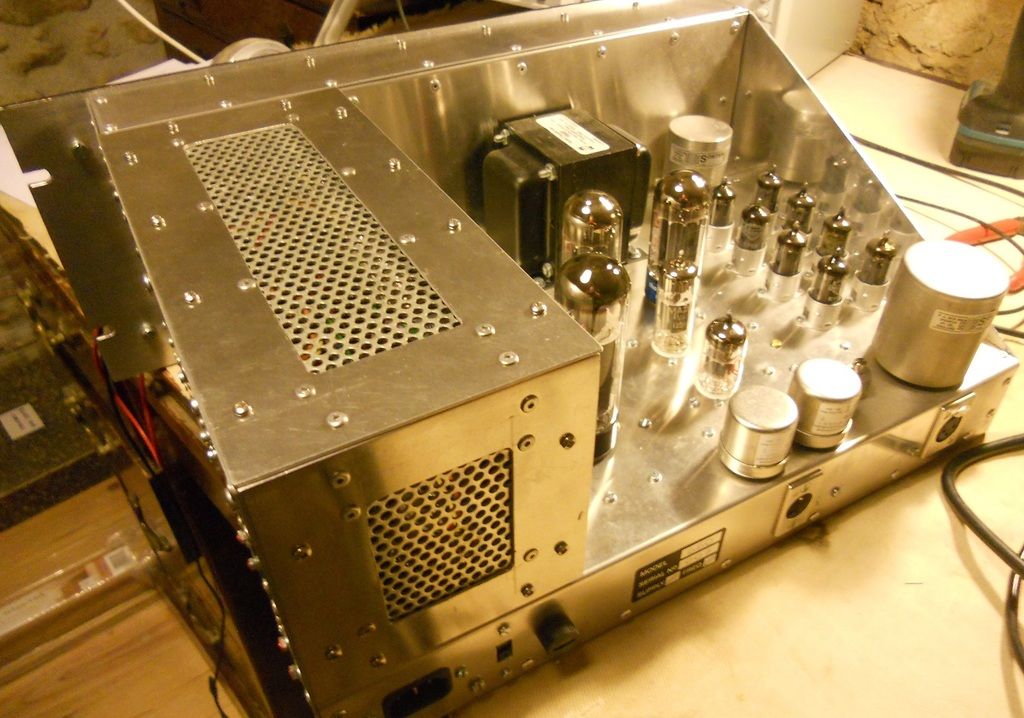
I shall have to give the transformer box some ventilation holes as it got quite warm after several hours.

I have a few more tests to do then it will be packed up and shipped to the UK studio next week.  I must say it was the most complicated project that I've tackled so far so it was very rewarding to see a nice sine wave output on switch-on.  Before I put the 600 ohm load on, it put out 46Vp-p before clipping, which is +26.4 dbm.

Best
DaveP
 
Thanks to everyone for their support, it definitely helps.

This should solve the transformer box heating problem. but please don't  ever let kids poke metal knitting needles inside or ever stand your coffee on it!!

When I was in my band, a guest singer stood his beer on my 100 Watt PA, unbeknownst to me, then promptly knocked it over and there were  blue flashes as two of my four Mullard EL34's self destructed.  needless to say he never got another gig.


I don't know why I didn't make it like this in the first place?  I guess I thought toroids run cool, but with 6 they will get a bit warm :-[

DaveP
 
Wow, Dave.  Jaw still dropped...  :eek: the metalwork alone astonishes.  How does one do such clean metalwork, and rivets... never mind the insane wiring.  My head would spin for months.

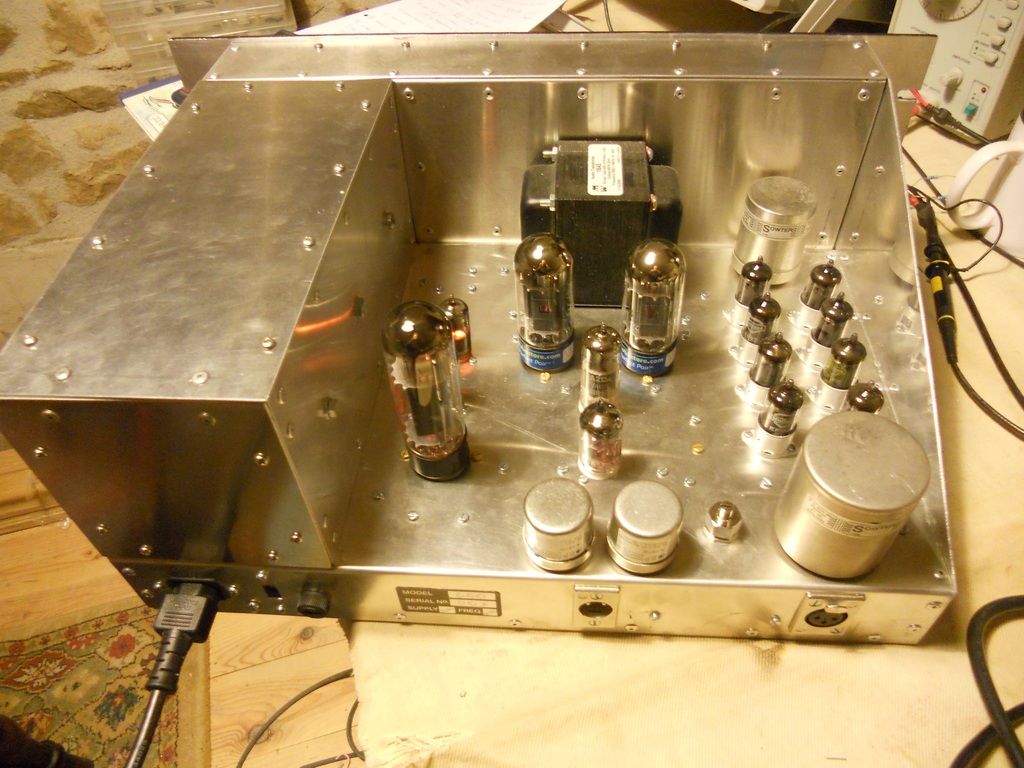
But I have one question.  What is the cute / pro looking sticker you have on the back panel with black and silver rectangles, filled in with info?  How do you enter the data on the sticker?  It makes the box look very pro.  Correction, the box already looks very pro, it makes the back panel look even more pro.  :)

Congrats.
 
How does one do such clean metalwork, and rivets..
You cover the metal with masking tape, mark it out, drill holes for corner radius, jigsaw between holes just short of the line, then file to line by hand. finish off with emery paper.

What is the cute / pro looking sticker you have on the back panel with black and silver rectangles, filled in with info?
This is part no 171-7281 from Farnell /Newark
http://www.newark.com/pro-power/7827275/label-model-serial-no-26-x-51mm/dp/15R3117?ost=1717281&selectedCategoryId=&categoryNameResp=All&searchView=table&iscrfnonsku=false
They are adhesive Aluminium labels that you write on with a ballpoint pen.  This permanently embosses the surface.
I use a rolling serial number to keep track of the stuff I've made down the years.

Thanks for thumbs up.
DaveP
 
DaveP said:
You cover the metal with masking tape, mark it out, drill holes for corner radius, jigsaw between holes just short of the line, then file to line by hand. finish off with emery paper.

Thanks for thumbs up.
DaveP

Thanks.  How do you make such clean straight-line cuts?  For example, the covers on the toroid box have very clean straight edges. 

And you bend the metal with a bending tool of some kind?  .. we should start a new thread on your amazing metalwork.... :) Really, the whole group of mechanical and electrical skills you have are enviable.
 
tommypiper said:
.. we should start a new thread on your amazing metalwork.... :) Really, the whole group of mechanical and electrical skills you have are enviable.
Yes, that is something I would be totally all over.
I am currently planning on diy metalwork on a mixer case (see my soundcraft series one thread) and I am actually studying closely everything Dave posts. And although I get it has a lot to do with  detailed planning and extremly pedantic execution, there is so much more I´d like to know, and there´s not so much on the internet about this kind of work. Or at least I didn´t find.

I´m not saying anything about the 660. I feel it´s more economic to chime in if some day something Dave builds will not be totally brilliant. ;)
 
How do you make such clean straight-line cuts?  For example, the covers on the toroid box have very clean straight edges. 
Here in France I have a shop called Leroy Merlin, it sells aluminium sheets 1.5mm thick x 500x 300mm.  It also sells various sizes of aluminium angle, 15x15mm is handy.  I expect you have even better shops like this in the US.

I always use one of the right angles in the bought sheet so they are perfect and I only have to cut two more lines after that, sometimes those edges can be "lost" out of sight somewhere.  Using the correct blade in the jigsaw for the metal you are using is a must, aluminium needs coarse teeth, steel fine teeth,  fine teeth on ally will clog up.

A good set of newish files is a must, your granpa's old worn out hand-me-downs ain't gonna do the job.

I don't have a sheet bender so I use flat sheet and angle to make corners, then I pop rivet it all together with 3.2mm rivets.  This might seem a pain but it makes it easier to finish each sheet with cut-outs etc. before assembly.

I bought a lot of large fairly cheap ready made boxes before I retired and I used them for some of the parts, I have almost run out of those now so every thing I make in future will use the method above.

Some parts of amps need magnetic screening so I use some galvanized sheet to line the critical parts of an aluminium box for example.  You have to anticipate that kind of thing because it can be almost impossible to add a screen later.  I did some tests in an earlier thread which proved that a mixed metal sandwich was more effective because the lines of flux find it tricky to go from one metal to another.

I was fortunate in that my final school taught metal work as a separate subject, (early 60's), nowadays it gets lost in "CDT" so that what I learned is no longer taught.  Not many people want to get their hands dirty for a living, they all want desk jobs sadly.  Personally, I think it's a mistake to design stuff then send it to China to be manufactured, better to keep a strong skill base in your own country.

I hope that helps

DaveP
 
Very helpful, thanks.  So you must be cutting against a straight edge guide with the jig saw?  Do you use wood, or a harder metal so the blade won't catch?  Ha, glass would be good.  Because jig saws are pretty unstable in a straight line, as they are made to easily turn.
What is your thinking about the large Hammond power transformer sitting relatively close to the output tubes?  It's interesting that the toroids are shielded but not the traditional Hammond.  I have very limited experience, but I would expect those power transformers need distance and/or shielding like the toroids. 

Yes, totally agree about the manufacturing trends.  In general, I feel there are not enough trade skills taught in the US.  Some of the traditional arts of basic manufacturing should at least be reviewed in high schools.  Great to see someone proficient in these hand manufacturing and artisan skills!  :)
 
So you must be cutting against a straight edge guide with the jig saw?
No, I'm cutting about 1 or 2 mm away from a line.  The line can be scored with a scriber or just a ballpoint line as long as you can see it OK.  The jigsaw blade for straight lines is longer than the one for going around circles, so it's not too hard to keep it straight, especially if you can control the speed.  You can practice on scrap beforehand.

Regarding the Hammond TX:  This is not a power TX, it's an OPT.  It is normal practice to have the output tubes next to the output TX.  What you have to be careful of is having high voltages and currents near sensitive input stages.  Inputs need screened leads with the screen only earthed at the tube end.  The signal amp IPT and OPT are in Mu Metal cases which are very good at shielding from stray fields.  The toroids are all fixed vertically at right angles to everything else, you have to cover all these issues to get to pro audio levels of noise and hum.

This is the final pic from me on this thread


Thank you to everyone for your support, I hope you enjoyed the ride. ;D

DaveP
 
One helluva ride!!! I am blown away as usual...
Thanks for sharing your knowledge and techniques!!
I will buy you a beer or two one day :)
 
Hi Davep,

did you stay with the orginal capacitor and resistors in the time constant circuit, or did you change values  and where did you source the capacitors from.

cheers

skal
 
Yes, this was to be as close to an original 660 as possible, even though only the first two timing settings are of any value nowadays.


C7  2.2uF 400 Electro 210-2430       Farnell
C8   8.2uF 200 Electro 234-2097       Farnell
C9  3.9uF 400 Electro 234-2107         Farnell
C10 22uF 200 Electro 739-4504     RS
C11 2.2uF 400 Electro 210-2430     Farnell

They need to be at least 200V components, but they are so small nowadays that you get 400V components as standard.
It's not worth trying to use non-electro caps as they would be enormous and space was limited.  They are not used in the signal path.  They are not exact values (3.9 for 4uF) but the originals would not have been as close to spec as these due to improvements in manufacturing and QC over the last 60 years.

DaveP

 
Back
Top