Skylar
Well-known member
tommypiper said:Skylar, one more design question. ;D Forgive me if I missed it earlier in the thread... but how do we afix the screens to the headbasket top band?
I have several points to ask about that and the headbasket & mesh in general: We'll use solder, presumably with a flame and flux like with soldering copper pipe to afix the mesh?
I know there was some discussion about how solder and the various metals will accept nickel plating... will the stainless steel be solderable, and nickelable?
Is the top dome a separate set of mesh from the cylindrical part below? Attached separately?
If so, I see there's just a tiny lip there on the top of the band (see photo above) to attach it to... is this how it's going to fit? How does one cut the mesh(es) to align evenly along that rim, seems tricky... I suppose with a template to mash the mesh into place, then trim the excess with snips would work like a jiffy. You planning something like that?
Is the entire headbasket going to be plated? Or only the framing, not the mesh?
And finally, if I buy an assembled kit, may I request having the finest mesh omitted when the headbasket is assembled? In other words, just the two coarser meshes instead of all three.
Maybe I should have sent this by PM, but it might be useful info for others...
Thanks.
I'm going to try to answer all of your questions—not necessarily in order.
I am experimenting with ways to form & attach the mesh.
The originals were soldered.
Solder paste + oven may work.
Welding Rod (muggy weld) + flame/heat gun may be necessary instead or in addition to the above.
The mesh is two-part...a main cylindrical mesh & a bowl-shaped top mesh.
The brass headbasket rings are identical to the original with the exception that the bottom ring does not have the pattern switch hole, capsule plate holes are omitted as they're not needed, and the side holes are on 90° centers instead of 120° centers).
The mesh attaches to the headbasket rings via the "lip" that you see on the parts.
Here's one way it could work:
On the bottom ring's lip you would squeeze out a bead of solder paste from a syringe then affix the cylindrical mesh.
The top ring will require solder paste on the top and bottom of its lip.
The top ring would then be attached.
The bowl-shaped mesh is then fitted into the top ring.
Put a bead of paste on the cylindrical mesh seam and the opposite side.
Attach the vertical rails.
The whole thing then goes into an oven, the paste melts, done.
Then the whole assembly is plated (optionally bead-blasted first).
Of course...
The vertical rails may need to be muggy welded instead of solder pasted before the mesh is attached.
It looks like that's how FLEA does it.
This is where some experimentation is going to have to happen.
The mesh I plan to use is all-brass.
Stainless requires high temperatures (torch) & special flux to weld.
Stainless is nickel plate-able but may require a special pre-plate before it will accept the nickel.
I don't plan on using any stainless steel.
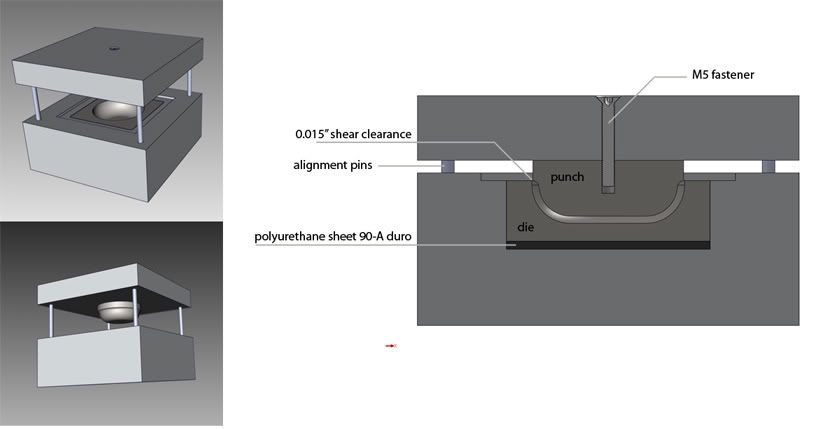
The best way to form the mesh is all three layers at once with a punch press, as we saw in the Neumann "how it's made" video.
This requires custom tooling.
I have already designed the punch & die set that will form & cut the top bowl-shaped mesh using a simple 20-ton arbor press.

I do not know how much this tooling is going to cost yet, but it won't be cheap.
Right now, I'm also looking into having the headbaskets+mesh assembled turn-key, so that I don't have to worry about all of this.
The prices I have received for this before were REALLY high.
BUT, those early prices included the machining of the parts, which the mesh fab shops were probably not capable of doing cheaply.
Now that I've got a good source for the parts, I can send them to a mesh fab place, and hopefully the assembly prices will be more reasonable.
For one-offs, just shape the mesh by hand with a doorknob, then trim as needed.
¡Wow, this is almost becoming a full-time endeavor!
No worries, though; I am super motivated on this project!


![Electronics Soldering Iron Kit, [Upgraded] Soldering Iron 110V 90W LCD Digital Portable Soldering Kit 180-480℃(356-896℉), Welding Tool with ON/OFF Switch, Auto-sleep, Thermostatic Design](https://m.media-amazon.com/images/I/41gRDnlyfJS._SL500_.jpg)


