Coil Winder

GroupDIY Audio Forum

Help Support GroupDIY Audio Forum:

This site may earn a commission from merchant affiliate links, including eBay, Amazon, and others.
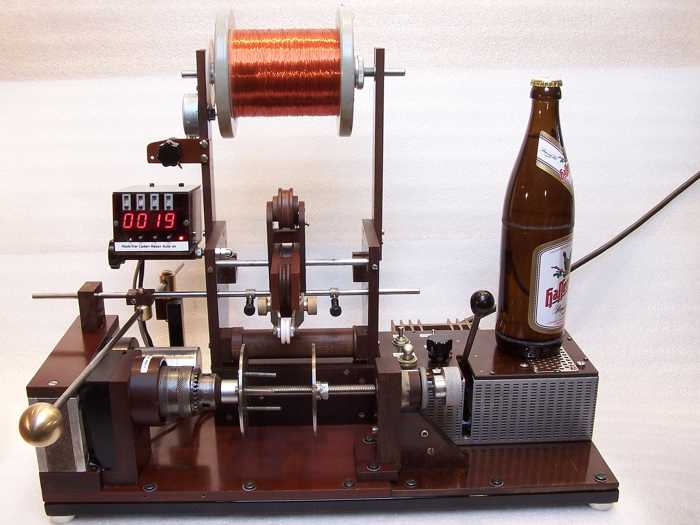
Thats some cool stuff, cheap too!
It would take my brain a year or two to learn PLC's.
The manual for one unit I looked at was 500 pages!

Too hyper to get thru all that.
Looks like 5 khz is max input freq.
I need 200 Khz.

Off note:
I was talking to the Triad guys about how they did the winding in the old days.
The would wind small coils, 35 at a time!
The wire was kept on a "Christmas Tree" type of rack.
The interlayer insulation was applied all at the same time, one big sheet for all 35 coils. Then, after the winding was done, they would take the row of coils off the mandrel, over to the band saw, where they would cut the coils apart!
I always thought that the thin interlayer insl was done one sheet at a time, this explains how they could getr the price point down.
 
OK, I did a step chart and bought some chips.
All I need is some guacamole and I'm set.

http://vacuumbrain.com/The_Lab/Winder/steps_a.jpg

http://vacuumbrain.com/The_Lab/Winder/nte_garbage.jpg
 
Been thinking about a BFO.
Remember when the radio guys bounced two frequencies togetrher to get a lower fundamental?
Build an osc and see what I can do maybe?

Depends on what you want. That sorta' setup will give you a linear subtraction of the two frequencies involved - not a division. This makes it very good for precision frequency detection in a narrow range, but less useable at large variations (like I think you have at the spindle speed).

There is a magic spot for the wire guide depending on the bobbin size.
So with a rectangular bobbin, placement is always a compromise.

Now you've started playing with servo/stepper controlled circuits anyway, you could extend this into a dynamic wire guide? Have a slack-circuit like on sewing machines or old computer tape drives, and move the wire guide back-n´-forth to follow exactly the contour of the bobbin? Mount wire guide on flying-fader hardware. Use optical/ultrasonic distance sensor to dynamically adjust? :grin:

Jakob E.

Edit: from a bit of searching, it could look like you'd need a "Dancer":

http://www.broomfieldusa.com/pdt1020.php

Pneumatic dancer with precision regulator to provide constant tension and take up the wire slack when winding square or rectangular shaped coils.

Here's a pic showing the basic idea:

dancer6.JPG


And, btw, THIS is a real winding machine, though it's for toroid cores:

winding.gif
 
Yeah forget the hetrodyne thing. I think these TTL chips are the way to go.

Gonna put the encoder pulse thru a schmitt trigger and divide it by 10.
Maybe also have a divide by 6 switch so I can get better resolution with the small wire.

If you look at the excel chart, you will see the max steps I need is 500 per rpm, so I can divide the 5000 pulses from the encoder by 10 and get the frequency down to 20 K hz instead of 200 K hz.
Maybe the 555 would work for me at that frequency and below.

I bought a cmos version of the 555, which has a much higher freq response, but careful with those inputs!

I looked at a bunch of tensioners, I think the simpler the better, especially if you are dealing with #58 which requires a winding tension of 0.6 grams. :shock:

Just running it over one pulley would chew up the 0.6 grams . Then you start breaking wire.

I think I am going to make a simple vice type tensioner with some coreprene pads in there.

That traveres is just a platform for whatever wire guides I want to bolt on to it.
It has threads tapped in the top of it, so all I have to do is make a bunch of wire guides for the different gauges, then put them onto something that screws into the traverse.

Are there any bit brains out there who know the logic chips?

I need to know how to hook up this 74HC4017.

Just a tip for the unwary like me, those NTE chips?

The data sheets are nowhere to be found!
I looked for an hour befor I read the small print on the NTE site:

Chips such as the 54/74 series have no data sheets on this site.
Anyway, you just take off the NTE for those part numbers and you have the original NAtional Semi number.
All the regular NTE numbers are on the site, but not the HC stuff.

ie the NTE74HC4017 data sheet can be easily accessed by dropping the NTE on your web search. When you do that, you will have dozens of good hits. Or just look it up in your National or TI book under 74##****.

http://vacuumbrain.com/The_Lab/Winder/sn74hc4017.pdf

A couple of sites on the subject..

http://www.play-hookey.com/digital/frequency_dividers.html

schmitt trigger:

http://hyperphysics.phy-astr.gsu.edu/hbase/electronic/schmitt.html
 
CJ,

Take your cleaned up encoder pulse and shove into the clk input on that counter. Tie enable low. For div by 10, take Y9 and feed it into clr. Y9 is also your div by ten output for traverse. Since clr is asynch on this thing, you may need to run the Y9 signal through a synchronizing (clocked) F/F and then into clr...might get runt pulses and glitchy behavior otherwise.

What I would do is hook up a rotary switch to pick off your divided down output (from /2 to /10). Output of the switch drives your traverse and also to F/F then to clr to reset the counter. Make sense?

A P
 
OK, did a 12 hour lab session yesterday, started with a x2 buffer, which turned into a big waste, built a circuit that required a dual supply, hooked it up, could not get any gain no matter which feedback resistor, realized I was running a single supply, :oops: did not want to build a dual supply nor pay for a fifth box, so an hour wasted, went for a single supply version, had caps and resistors in series with the input, watched what the caps and resistors did to the wave form, realized why digital designs do not include caps and resistors, another hour wasted.

You can get a new perspective on audio design by studying digital, I think people apply digital design to audio, don't use caps, in the TTL world, caps round edges, which is distortion. Audio guy thinks, hey, since caps distort a digital signal. I wonder what they do to an audio signal?

Probably not much unless you happen to be trying to pass a square wave thru your mic pre.

Anyway, I realized I was stuck in micpre design mode. After the second opamp buffer attemt, I was thumbing thru that rat shack opamp design book, "741 used as a comparator" :idea:

I stuck a comparator on the now three times rebuilt rosin board, and viola! No mater what the amplitude or wave form I get from the encoder, the comparator makes it into a square wave. But a comparator type square wave, good leading edge, fuzzy trailing edge.

So I spoil the Schmitt Trigger by feeding it a sq wave from the comparator. The Schmitt turns it into a nice looking clock pulse. I plug it into the stepper and it runs great. More torque, no burping, so now all I have to do is a decade divide and then a adj divider.

BTW, I used the calculator at that above link for figuring out the values for R1, R2, R3 for the schmitt trigger, but it did not work. After I put a decade box on R2 and decxreased it, it started to work. Has anybody done any work on setting up these R values for the scmitt, or noticed descrepencies from the formula to real life?
 
You can clean up your comparator output by adding a small amount of positive feedback to increase its hysteresis. Use a resistor in series with the positive input and a feedback resistor from output to positive input. You don't need very much, otherwise it will oscillate.
 
I found this page about the subject:
http://www.jogis-roehrenbude.de/Leserbriefe/Guido-Speer-Wickelmaschine/Trafowickler.htm
Hope this helps.
 
I found this page about the subject:
http://www.jogis-roehrenbude.de/Leserbriefe/Guido-Speer-Wickelmaschine/Trafowickler.htm
Hope this helps.
great page! :thumb:

Gesamt-frontal.jpg

I love that beer stand! [/quote]
 
I guess that the machine open the bottle while winding and use the precious beverage as energy source.
But I may be wrong. A human could interact.
 
Wow, what a fight, just getting the encoder pulse nice.

Turns out, the output from the encoder needs a pullup resistor.

Thats why 5 different circuits I built, did not work!
Well, one did, the MAX 931 comparator. I left a pin ungrounded and it fpr some weird reason worked, but only went toi 100 K Hertz.

Using the pullup gives me a 5 volt pulse instead iof the 1.5 to 2.5 pulse that varied in amplitude with frequency.

Now, with an LM 319 high speed comparator, I have a nice even pulse, all the way up to 250 K Hz. Used feedback like the gentleman on page 6 suggested, works great! Thanks!
Afteer a week of anxious frustration, I am finally over the hump.
Learned a lot odf stuff, forgot how painful learning is.
Easy to infom people on the forum if you have knowledge, being on the other side of the equation is a lot of work!

Building this modular really helped. I decided a +/- 5 volt supply would give me a lot more options as far as circuit choice, so I ripped out the old supply and stuck in a new one. Had to move the lifght bulb, terminal block, but got it in there.

Building the controller is also going good by doing it modular. I do not have to throw away the whole board when one circuit does not work.
So going from the encoder to the comparator via ribbon cable. Going from the comparator to the divider via another ribbon cable. So in anything breaks, I can just repalce that part of the machine.

Getting very close to a finished product!
AP, thanks for the hookup advice, it works!
But the Y9 output is a thin spike. The other pins have a better pulse, but tsill spikey. The CO, carry over pin, has a much more symetrical output, 4 up and 5 dow.
I have some leftover LM319's, I might stick the CO output thru one of those so I will have an even pulse.
 
[quote author="CJ"]
Getting very close to a finished product!
AP, thanks for the hookup advice, it works!
But the Y9 output is a thin spike. The other pins have a better pulse, but tsill spikey. The CO, carry over pin, has a much more symetrical output, 4 up and 5 dow.
I have some leftover LM319's, I might stick the CO output thru one of those so I will have an even pulse.[/quote]

Hey, glad to help. So you're getting a runt pulse from Y9 with Y9 tied back to CLR, right? Like I said in my post, you'll probably need to run the feedback pulse through a synchronizing F/F and then into CLR. The problem is that CLR is asynchronous, so whichever output you're using to trigger CLR will only produce a pulse as long as the propagation delay between CLR and the output--probably a few tens of nS.

Got a spare clocked D F/F lying around the bench somewhere? Look carefully at the clocking on that divider and draw yourself a simple timing diagram. You may need to run your encoder pulses into the inverted clock input on the divider to get a decent last pulse before reset.

Carry on!

A P
 
I will have you drop by and scope this thing out when it's done.
Maybe you can find some missing pulses.

This is a layer I just did, used a loose 0.016" hole in some teflon, winding some 0.0015 #49 wire, so even with the loosy goosy wire guide set 4 inches bak, didving by ten I get this:

fortynine.jpg


I lucked out on the lead screw ratio.
Dividing by ten gives me just a little bit of space when winding #49.
#49 is about 0.0015".

So if I do not divide by ten, that means the stepper will move the wire ten times faster, or give me a layer of 0.015 with a little space.
Well, 0.015 is about #27.
So I bet #26, the largest ga I want to wind, will come out just right.
There are about 20 gauges of wire in between #49 and #26.

So I will need to divide by 1 to 10 in 0.5 increrments to wind wind
every gauge.

Or, divide by 1 thru 10 and have a divide by 2 right after it with a switch,.

I guess I can work it out so it is all on one rotary switch.

Here is the original proto board that had ten iterations before I discovered the encoder neede a pull up resistor:

http://vacuumbrain.com/The_Lab/TA/Winder/bread.jpg

Here is the ecoder comparator.
The 14 pin ribbon is the input, the 10 pin the output.
Since I had a dual comparator, I stuck both channel A + and Channel B + from the encoder on one board, so I now have an extra pulse to play with jsut in case, or I could route it off to its own divider so as to split the stepper dutiers into two ranges.

http://vacuumbrain.com/The_Lab/Winder/lm317.jpg

Here is the 74HC divider, a MAX931 comparator which drives an open collector d a 2N4124 for the Gecko stepe input. Ribbon in on the bottom, green wire is step pulse output. The divider di not like drivng transistors too much, thus, the comparator.

http://vacuumbrain.com/The_Lab/Winder/divide_ten.jpg

I like buss wire better than the thin rework wire.
You can lay out +/- rails on perf borad, which really helps.

http://vacuumbrain.com/The_Lab/Winder/divide_back.jpg

Stuck on a direction switch up front, left/right-red and green leds.

http://vacuumbrain.com/The_Lab/Winder/direction.jpg

Realized my circuit for direction used a DP/DT switch, the rocker that I wanted to use was DP/ST.

So it took my slow brain another half an hour to figure out a way:

http://vacuumbrain.com/The_Lab/Winder/dir_circuit.jpg
 
CJ,

Looks pretty dang good so far. I should be able to drop by after work one day this week to have a look-see in person--Wed or Thurs? I might even be able to dig out a couple of TTL parts from the stash to help you with the runt pulse and extra factor of two divison.

A P
 
Cool!
Love this TTL stuff, no resistors or caps!
Just buss wire and square waves.

I did some math on the divide by constants, and it looks like a PIC divider would be better for the fine adj.
Just look at these weird numbers I have to divide by to spin different gauges:

GAUGE-- DIVIDE BY:
#27---1
#28---1.116
#29---1.244
#30---1.403
#31---1.577
#32---1.739
#33---1.961
#34---2.217
#35---2.468
#36---2.782
#37---3.060
#38---3.477
#39---3.923
#40---4.500
#41---4.936
#42---5.464
#43---6.375
#44---6.954
#45---7.969
#46---8.844
#47---9.683
#48---10.92
#49---12.34
#50---13.54

I can adjust the divide by counters with another variable type divider, but wouldn't a look up table on a PIC chip work out easier?
If I wanted to tweak a constant, I would just recompile the include file into the code and burn a new chip.

I do not know how big a chip I need, could you do that division with a PIC16C71 18 pin, or ,would I need a 40 pin monster?

The wire constants come out werid because of the way wire is gauged.
They multiply the circyular mils by a conastant to get the next gauge, not the diameter.
So the diameter increas is no limnear with respect to gauge.

I will give the variable divder a shot, and if no go, it's PIC tgime.
I bet I could even shag a program to divide right off the web.
 
PIC? Man, that is overkill...and besides, SW is too much like work. I think you can easily do this in simple TTL or CMOS logic. The CD4059 that Jakob recommended might work, but the datasheet is not so clear to me.

Looking back at this thread...your encoder puts out 5000 pulses/rev, right? And you posted a table for 26-48gauge showing how many horizontal pulses you needed per rev. It ranged from 552 for 26ga down to 51 for 48ga. That gives a range of "n" from 9.06 to 98.04. 7 bits is enough.

Here's a simple 8-bit divide-by-n using two 74xx161. You should be able to get a couple at ACE or Anchor or <shudder> HSC. I don't think the small rounding error for integer "n" is going to hurt given the actual variance in wire and lacquer thickness. You'll need an 8x dip switch or three binary coded thumb switches, and a spdt "load" switch. You should be able to fake the inverter with a single npn switch and save a hex inverter chip.

A P

p.s. I'll email you a simple spreadsheet with the factors...
 
I'm gonna start callin you "digital" packrat!

OK, first, easier to multply by recipe than divide for the pic.
Yeah, I hate all the configuration stuff you have to code.
I don't really need four place accuacy either, the darn wire varies 5 or 10 percent as you despool.

OK, logic first. Fry's right down the street, pray that I find it.
 

Latest posts

Back
Top