EQU47 Mic Bodies | Orders open on January 19th 2013

GroupDIY Audio Forum

Help Support GroupDIY Audio Forum:

This site may earn a commission from merchant affiliate links, including eBay, Amazon, and others.
Marc Duchesne said:
The Wagner shockmount is very nice, it is AUD 225...

This is virtually the same as the $25 ($40 after shipping) Ebay shock mount. Ben offered an identical one in the group buy for not much more than $25. All from China.

I'll try to send photos.

btw, I sliced away most of the foam padding on the Ebay mount and now the 60mm body fits nicely. 

 
bobine said:
Marc Duchesne said:
The Wagner shockmount is very nice, it is AUD 225...

This is virtually the same as the $25 ($40 after shipping) Ebay shock mount. Ben offered an identical one in the group buy for not much more than $25. All from China.

MATTI said:
OK, I somehow imagined Wagner would be of other origin and much dearer

Matti
The mount pictured is, indeed, made in China.
The world is a funny place. It's all about perception.
 
I noticed when I tapped on a mic body with an EQ47-D installed, I didn't hear the same "thump" I did if I tapped on the same body with a conventional rubber post supporting the capsule. It was more of a "tap" than a "thump." (I don't have a sub and my monitors roll off below 50hz.)

I thought this was pretty amazing so I tried to see what was going on.

capsulemountcomparison-taptest1.jpg

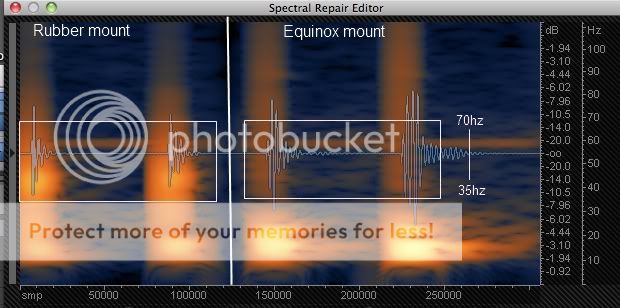
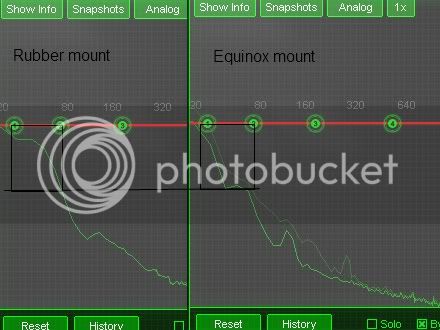
On the peak spectrum screen grab, you can see that, within the black boxes, there is a big difference between ~35hz to 70hz using the Equinox support, with a very significant 6-9db drop compared to the conventional rubber mount (ignore the ghost line). So, it's like an entire octave of "thump" is removed from the region where it is most intrusive.


capsulemountcomparison-taptest2.jpg

The spectral display (where brightness equals intensity) shows what is happening. You can see in the white boxes that the energy in the 35-70hz range is greater with the rubber mount than with the Equinox support, which has lower intensity and shorter duration. With the Equinox mount, it appears that the energy is pushed down below 30hz and dissipated there. It seems to be concentrated below 20hz. That very low frequency energy should be much easier to filter. I can feel it on my headphones, but not my monitors.

And here is a link to the bumps.

http://soundcloud.com/testing-1-2-3/thump-test-bn-k7-vs-q47-d

 
Hi,
i just received my eq47 body this morning (France).

Overall i'm really impressed.

First packaging is first class: Skylar and all at Equinox you've done a great work on this.  8)

Mic body quality is higher than on the model of first batch i own. Headbaskets have correct orientation of mesh layer as in original U47. They seems to be more seriously build, or in a building process much more mastered, at least for the models i own.

Body tube and bell caps seems have slightly different colors pattern and visual aspect. The one from the first batch is 'darker' grey, and diferent surface finish. Sandblasting is finner on first batch model i would say.

Second batch are 'shinny' light grey with some sparkling particles and different surface finish. I like them both batch!  8)

Machining look better on the new batch. On rails i have the two holes, fixing headbasket, being machined in the knee of rail's bend on first batch. It works no problems but it is not "good" looking.

In batch 2 it's much nicer with holes under the knee.

Screws looks way better than in first batch and assembly is a breeze. Took me 15min. Zero problems in aligning parts and headbasket is know firmly attached with body tube, no more tilt as in my first batch mic body.

I'm really happy with result!  8)

You've made some great improvement from previous batch and it's good work and high quality product, really.

I'm thinking to give your capsule a try in the future for sure.
  8)

Krivium
 
Hi there !

Also received my two EQU-47 and like Krivium I was astonished by packaging and build quality !

The headbasket...OMG, what a beautiful piece of art !

Tried to assemble it empty -> very easy.

Congratulations to Skylar and all the Equinox Systems team !

Stephane.

PS : Oh, and the big surprise-> no customs tax...
 
Any tips how to get the first patch body assembled? the siderails are poop and the third screw that connects headbasket to the body has no thread etc... Lots of additional work required to get the body assembled solid. Looks good but otherwise very chinese quality.
 
tmuikku said:
Any tips how to get the first patch body assembled? the siderails are poop and the third screw that connects headbasket to the body has no thread etc... Lots of additional work required to get the body assembled solid. Looks good but otherwise very chinese quality.

Not good, and even with the recent batch this problem is a possibility after a few years.  How about attaching a nut to the inside of the body with super glue?  (Seriously!)

David
 
david-p said:
tmuikku said:
Any tips how to get the first patch body assembled? the siderails are poop and the third screw that connects headbasket to the body has no thread etc... Lots of additional work required to get the body assembled solid. Looks good but otherwise very chinese quality.

Not good, and even with the recent batch this problem is a possibility after a few years.  How about attaching a nut to the inside of the body with super glue?  (Seriously!)

David

Yeah that would do it for the third head basket screw but still need to build custom side rails. This is DIY after all :) Just wondering if someone has already figured out a good solution with easy to get materials / tooling.
 
Hi Tmuikku,

i am a bit surprised, as i don't have so much trouble with my first batch mic body.

I must say i'm me second owner of this mic: Zebra was previous owner, and maybe he did some mod to the mic but after visually inspection of rails and other parts, apparently he did'nt (except from changing nearly all screws, for which i'll thank you again Zebra).

The main problem with mine is tilt from headbasket (5° maybe 10° max) issue which could easily been adressed being careful in handling and positioning of mic and basket in mount, as the basket won't move once it is in position (there is enough strength from the two lateral screws fixing the basket to keep the basket in place, the third screw being only a 'guide'for vertical inclination of the head).

I'll maybe have some vibrations from this third screw with extremely high pressure sound source but not sure from now as my first mic is not finished.

Anyway if problems still occurs after trying to be inventive the idea of Dave-p must be considered. But you must find nut which won't block the body tube/basket junction which i haven't found one for now.

Too, aligning the nut // body won't be an easy task for mine if i don't want to mark the body itself (which i prefer not to do for now) as it need to be aligned with the headbasket in place.

There is always the option to ask Skylar and Equinox new pair of rails which could adress one of your issues, as they clearly show support with us.  8)

Anyway i can't tell for the future how it will behave but i'm a little bit more optimistic than Dave-p with both batchs. Headbasket is really firmly attached to body tube and with a bit of care it will probably last more than a few years with new ones.

For first one i've already assembled and disassembled the body many times (maybe 4 times as a whole, and probably tens of time only mic body/headbasket) and it don't seems to have suffer at all.

The other thing is that once loaded with capsule, tube, caps and transformer the First batch body don't seems as 'chinese product' as it seems unloaded. Wheight don't make the assembly seems 'weak' or 'fragile', quite the opposite in fact.

All this make me feel confident for future.

Krivium.


Thanks for the cheer up Krivium. I think I can manage with the mic bodies I have but it is shame they weren't as spot on as they could have been considering how much effort went to the design / blueprint and stuff. I'll post my tips as well when I'm done ;)
 
The key to making the head basket stable is to be sure its inner flange rests solidly on the steel capsule-mounting disc so it can't tilt. The screws' main functions are to keep the head in place and to position the capsule laterally. 

On the first batch body I placed thin washers between the mounting disc and the top of the rails to extend the height of the disc a little bit. On the second batch body that wasn't needed. Don't fully tighten any of the screws until everything is nudged into place.

 
tmuikku said:
the siderails are poop

Hi Tmuikku,

If you could elaborate on what problems you are having with the siderails, perhaps we could help you?  There is also the possibility we could get you some replacements rails if it turns out your rails are not usable.  If the rails have become bent, a quick trip to a vice is usually all it takes to straighten them back up.

Skylar made an excellent series of videos with some tips and tricks on lining up the headbasket and getting the screws to land in the rails as expected.  If you haven't watched them, they are definitely worth the time:

http://www.youtube.com/watch?v=Z_7IJk-Dlf4
 
KrIVIUM2323 said:
...  i'm a little bit more optimistic than Dave-p with both batchs. Headbasket is really firmly attached to body tube and with a bit of care it will probably last more than a few years with new ones.

On his excellent assembly video, Skylar tell us to take care with the third screw.  The thickness of the body is such that only a few threads are possible in the hole.  I think that it should not be a problem if reasonable care is taken.

David
 
For those looking for Shockmounts, Rycote will be releasing a bigger model of their Invision Shockmounts, called USM-VB:

55-68mm Diameter, with 500Gr horizontal and 900gr vertical weight capability.

Doesn't look vintage at all, but i believe the price will be fair as their smaller ones,
and from what i heard the quality/Specs and the efficiency is very good.

Now lets wait and see, still not in their catalog but will soon be.....

http://www.rycote.com/products/invision_studio_kit/invision_studio/
 

Latest posts

Back
Top