Official 33609 builder's tread. See 1st page for updates.

GroupDIY Audio Forum

Help Support GroupDIY Audio Forum:

This site may earn a commission from merchant affiliate links, including eBay, Amazon, and others.
[quote author="JdJ"][quote author="maxheadroom"]i have a small question about the PSU: what does TrimPot R3 exactly do?[/quote]

You can use either R3 trimmer or R5 fixed (3k57). Igor said earlier that the 3k57 should give you exactly 24v. I used the trimmer just in case I needed to tweak the output DC.

-J[/quote]

thx!

for adjustment, is it possible to use a 200R instead of the 196R when i use the trimpot instead of the 3k57?

and when for this parts a exactly voltage of 24V is given, for what are the parts "for adjustment only" (parts around the TL071)
i can`t found the schematic for this PSU.
 
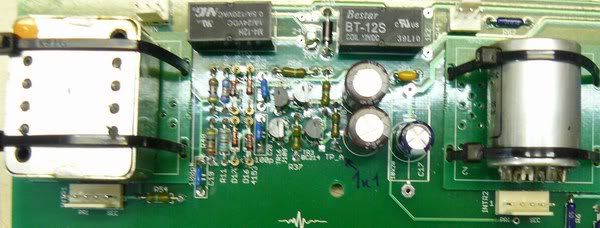
The Lundahls fits right on top of the board.
I mounted my Carnhills on the back inside and with four more off the board trafos it would start to get awfully crowded inside.
 
[quote author="maxheadroom"][quote author="JdJ"][quote author="maxheadroom"]i have a small question about the PSU: what does TrimPot R3 exactly do?[/quote]

You can use either R3 trimmer or R5 fixed (3k57). Igor said earlier that the 3k57 should give you exactly 24v. I used the trimmer just in case I needed to tweak the output DC.

-J[/quote]

thx!

for adjustment, is it possible to use a 200R instead of the 196R when i use the trimpot instead of the 3k57?

[/quote]

I think I did something along those lines... I don't have the PSU infront of me right now, but I think the 196 is post-regulator - shouldn't be a problem w/ the trimmer.

[quote author="maxheadroom"]
and when for this parts a exactly voltage of 24V is given, for what are the parts "for adjustment only" (parts around the TL071)
i can`t found the schematic for this PSU.[/quote]

[/quote]

The "for adjustment only" just means that section is for calibrating the unit - so if you are going to calibrate it using the Neve method, you don't need the 3v output, but from what I understand, Igor's method is easier (for the record I have yet to try either...)

Cheers,

Josh
 
CONGRATS!!!!!!!

Just finished the box and compared to my original(new reissue) 33609 JD it sounds absolutely great. Used Lundahls in/interstage and Marinair for the output. Lots of nice bass, even a little fuller than the belclere gives you in the original.
Thanks so much Igor for a great project, now I'll just have to build another one

PICTURES PLEASE!!!!!

I never compared Lundhalls to original ones in studio, just droped them to
PCB to measure on analyzer... How does they sounds except bass???
I very liked btw original Marinairs (1173) on output...great midrange!
They do some unexplainable magic...

For the next 33609, I sending a bunch of PCB's to Tat,
it will be easier to get case with pcb from one source.
 
I mounted my Carnhills on the back inside and with four more
off the board trafos it would start to get awfully crowded inside.
Hey, you can put Carenhills on the board, just put small blank boards
down the trunny's to prevent shorts, use plastic wire strips
to hold trunny's on pcb (there's 4 holes for this purpose), and wire trunny's to 5-pin connectors marked "+pri- +sec-"...
it looks more accurate!!!!
 
[quote author="Igor"]
Hey, you can put Carenhills on the board, just put small blank boards
down the trunny's to prevent shorts, use plastic wire strips
to hold trunny's on pcb (there's 4 holes for this purpose), and wire trunny's to 5-pin connectors marked "+pri- +sec-"...
it looks more accurate!!!![/quote]

Hi Igor,

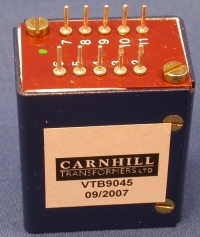
I must be missing something here because I still don't understand how this tranny

CA-18-VTB9045_200.jpg


will fit onto the board.

I see how the blank boards are used to prevent shorts, but surely the Carnhill transformers are still too big for the boards to be stacked on top of one another in a 2RU case?

Cheers :grin:

Rob
 
Rob,

They fit on there side so that the pins are above a header that you connect them to. You use cable ties through the spacer boards which have cable tie sized slots in them to do this. I used a bit of hot melt glue as well as the cable ties to just secure the whole lot in place. You then run wires to connect to the board.
 
Rob, just listen to Rob. ;)
Carenhill should fit this way.
Just have a look:
tr.jpg

just put small blank boards
down the trunny's to prevent shorts, use plastic wire strips
to hold trunny's on pcb (there's 4 holes for this purpose), and wire trunny's to 5-pin connectors marked "+pri- +sec-"...
I think it is easy...isn't it? ;)
 
Hi both,

Yep thanks for the replies. Having looked again I anticipated that sideways must be the answer, but i wanted to make sure I was not missing a more elegant solution.

Daft question of the day award goes to me :grin:

Cheers
 
Igor,

In case you decide to update the PCB layout, the necessary data for the Carnhill VTB9045 and VTB9046 is shown in this (preliminary) document.

http://www.audiomaintenance.com/downloads/carnhill_design_guide.pdf

Colin
www.audiomaintenance.com
 
Colin

The problem with soldering them directly to the board is one of height. The Carnhill 10468 31267 are too tall for them to be fitted in a 2U case. Because the channel boards sit on top of each other.

I know Igor doesn't have a problem with the dimensions for soldering them to the board, because the last set of boards he did for this did precisely that !

But never the less a useful document for the other pcb designers on the forum !!
 
"All dimensions are approximate"
I like it!!!!!
Deep philosophy behind these words ;)
 
OK....

All dimensions were measured by me at my desk using vernier calipers and a transformer from stock and are subject to my incompetance and manufacturing variation etc etc etc...

but that seemed a bit "wordy"... so I chose the word "approximate" instead.

Colin
www.audiomaintenance.com
 
Thanks Colin! I was snooping around the audiomaintenance site looking for just that.

As far as the direct mounting of Carnhills on the 33609 boards go, I am going to mount them off the board entirely. Are there any issues with having longer cable runs to/from the transformers without shielded cables?

Thanks,

Josh
 
Evening DIYers,

Just a little note to say that for anyone who doesn't want to pay £2.53 each at Farnell for the 47uf tantalum caps on this project, I've discovered them here:

http://www.bardwells.co.uk/detail.asp?stockid=TANT036&ref=search%2Easp%3Ft%3D%26qfcode%3D%26catid%3D%26manuid%3D%26keywords%3Dtantalum%26minprice%3D%26maxprice%3D

5 caps for £0.60

Hope this helps someone.

:grin:
 
Hallo gents -

There are a few parts I'm having trouble sourcing here in the US. The trickiest seems to be the AA144 germanium diode needed for the BA340. In searching the net, I've found a DIY 1081 parts list that shows NTE109 as a viable replacement. This is available through good old Mouser (part # 526-NTE109) for $1.30 or so. Any reason why this wouldn't work?

Now the BC441 and BC461 have replacements available through Mouser (NTE324 and NTE323 respectively), but they are so expensive ($4.50 each) that it seems to make more sense to buy them through Farnell.UK via Newark and pay the $15 handling fee.

If anyone has any better info on sourcing these parts here in the States, I'd love to hear it.

MTIA,

Nick
 
Hi Nick,

You can find AA144 here

http://cgi.ebay.co.uk/DIODE-AA144-PREFORMED_W0QQitemZ180166465182QQihZ008QQcategoryZ4663QQrdZ1QQssPageNameZWD1VQQcmdZViewItem

though worldwide postage is a little pricey. I bought a few extra of these though so PM me your address and I'll stick a couple in an envelope to you if you like.

Rob :thumb:
 
Nice one!
Oredered some straight away! I got some electrolytics to put in there, since I didn't want to spend money on a feature I most likely will never use. Never liked auto settings on compressors.

Is anyone using something better than a Lorlin for the gain make-up? That is something that I am willing to spend money on, it being in the audio path and all....

Ciao

/Marco

[quote author="rob_gould"]Evening DIYers,

Just a little note to say that for anyone who doesn't want to pay £2.53 each at Farnell for the 47uf tantalum caps on this project, I've discovered them here:

http://www.bardwells.co.uk/detail.asp?stockid=TANT036&ref=search%2Easp%3Ft%3D%26qfcode%3D%26catid%3D%26manuid%3D%26keywords%3Dtantalum%26minprice%3D%26maxprice%3D

5 caps for £0.60

Hope this helps someone.

:grin:[/quote]
 
The only thing I've discovered about these caps now they've actually been delivered is that they are too tall to go on the front of the switch boards. They will hit the switch mounting bracket if mounetd that way. Soldering to the back of the board works OK though.
 
Back
Top